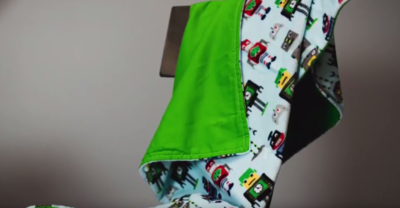
Quilted Cuddle Throw

There is nothing better than this adorable Quilted Cuddle Throw. This tiny DIY blanket is so easy to make for all different sewers, and takes practically no time at all! Plus, this quilted blanket is super small making it perfect for DIY gifts for nieces, nephews, sons, daughters, or anyone you believe needs a little snuggly blanket in their life. This quilting video shows you how to make a blanket and how easy it is to create this super soft and snuggly adorable sewn blanket that you will love. Also, simply change the sizes and you can make a larger blanket for yourself as well!
Project TypeMake a Project
Quilt Size30 inches wide x 30 inches long
Time to CompleteWeekend project
Primary TechniqueQuilting

Materials List
- Backing fabric
- Cuddle fabric, plush fabric
- Sewing machine
- Fabric scissors
- Thread
- Pins
DIY Cuddle Throw Blanket
How to Make a Quilted Blanket
-
Cut your fabric into 30-inch squares, and line your fabrics up as best as you can.
-
Insert pins every few inches all the way around.
-
Put the fabric underneath your presser foot and line it up with the edge.
Tip: DO NOT stitch over your pins. It can really damage your machine. Instead, when you get the pin pull it out and continue to stitch. -
When you get to a corner, stop, put your needle down, put your presser foot up, rotate 90 degrees, put your presser foot back down, and continue.
-
Stitch all the way around with an 8 inch gap for turning, and remember to leave a hole so you can turn you fabric the right way.
-
Clip your corners a couple of threads away from where you stitched, find the hole you left, put your hand in and pull the blanket out the right way. Rememper to oke out your corners.
-
Pin around all the edges one more time as you did before.
-
Sew all the way around again as you did before, but this time sew over the hole you had previously left.
-
When you reach the end sew back and forth a few times to lock your stitches in place.
-
Tack your quilt down in a couple of places to keep it from ballooning in the wash. To do this fold your blanket in thirds, and then fold it in thirds the other way.
-
Place a pin in the four corners to mark it
-
Unfold your blanket, and stitch an X where the four spots you pinned are by pulling out the pin, going forward 1 inch, back one inch, forward to the middle of the line you just made, put your needle down and rotate 90 degrees. Then, repeat the process.
-
Repeat this process for the other pin marks.
Your Recently Viewed Projects
Thanks for your comment. Don't forget to share!
GrandmaSue10
Jan 12, 2018
It says to turn fabric at the corners 90o, However, taking a stitch across the corner (one or two sts) makes a sharper corner when you turn your project right side out.
Report Inappropriate Comment
Are you sure you would like to report this comment? It will be flagged for our moderators to take action.
Thank you for taking the time to improve the content on our site.