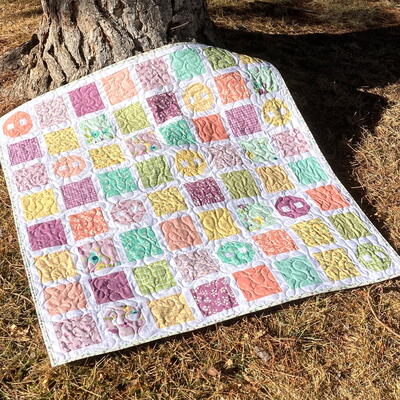
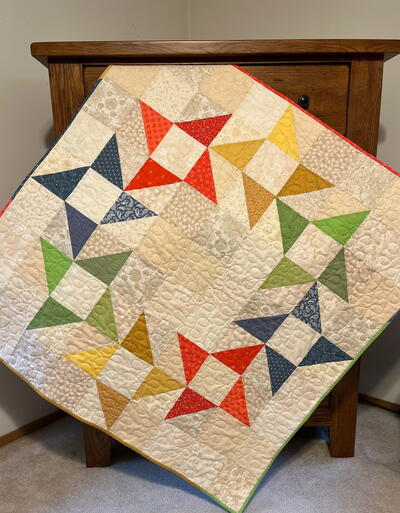
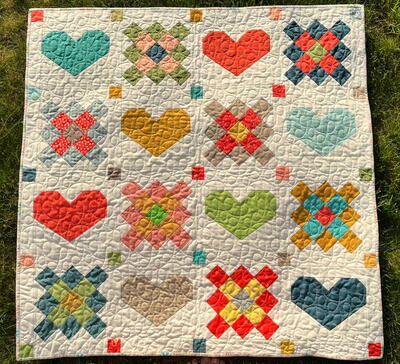
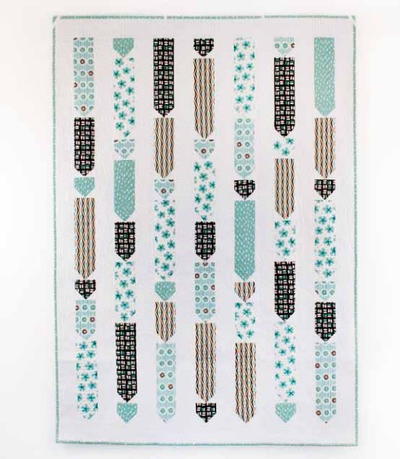
Cute as a Button Quilt

Have you reached your tolerance level for cold weather? Manifest the new warmth of spring with a free PDF pattern for the Cute as a Button baby quilt! This cheerful quilt pattern is made up of 5" squares and sashing strips. All you'll need to start this quick project is your favorite spring-themed charm pack and Melissa's free printable pattern! This baby-size quilt finishes at 45" x 45". Spring days can still be quite chilly, but this quilt is warm enough to keep little ones cozy and safe on walks with mom or quick trips to the park!
Find out more about the Cute as a Button quilt here! And don't forget to check out more free patterns from Melissa at her blog, HappyQuiltingMelissa.com!
Click Here to Download the PDF Pattern
Join Our 100,000+ Fans And Sign Up to Receive Your FREE eNewsletter!
Materials
- 2 Charm Packs / 5” Stackers or (74) 5” Squares
- 1 1/8 Yard of Background Fabric
- 3/8 Yard of Binding Fabric
- 2 1/4 Yards of Backing Fabric
Cutting the Print Fabrics
- Gather 2 squares each of (10) Assorted 5” Print squares.
- From the first of each of the (10) Assorted 5” Print Squares cut:
(2) 2 1/4” x 5” rectangles (20 total)
- From the second of each of the (10) Assorted 5” Print Squares cut:
(2) 1 1/4" x 1 1/2" rectangles (20 total)
(1) 1 1/2” x 1 1/2" square (10 total)
Cutting the Background Fabrics
(10) Strips 1 1/2” x 40”– Piece together end to end and sub cut into (9) strips 1 1/2" x 45 1/2”
(3) Strips 5" x 40” – Sub cut into (72) rectangles 1 1/2" x 5”
(2) Strips 1 3/4" x 40" – Sub cut into (40) squares 1 3/4" x 1 3/4"
(1) Strip 1 1/2" x 40” – Sub cut into (20) squares 1 1/2" x 1 1/2"
Cutting the Background Fabrics
- From the Binding Fabric Yardage cut the following:
(5) Strips 2 1/2” x 40”
Sewing Units: Stitch and Flip
- Draw a line diagonally on the wrong side of 2 Background 1 3/4" x 1 3/4" squares.
- Place the Marked Squares onto the top corners of a Print 2 1/4" x 5” rectangle with right sides together,
aligning the raw edges as shown below.
- Stitch directly on the drawn lines and then trim 1/4” away from the seams. Press toward the Background
triangles.
- Repeat steps 1-3 to make a total of 20 Stitch and Flip Units.

Sewing Units Center Row
- Layout 2 matching Print 1 1/4" x 1 1/2" rectangles, 1 matching Print 1 1/2" x 1 1/2" square, and 2
Background 1 1/2" x 1 1/2" squares as shown.
- Sew the pieces together into a row. Press the seams towards the Print fabrics.
- Repeat steps 1-2 to make a total of 10 Center Row Units

Sewing Blocks – Button Block
- Layout 2 matching Print 1 1/4" x 1 1/2" rectangles, 1 matching Print 1 1/2" x 1 1/2" square, and 2
Background 1 1/2" x 1 1/2" squares as shown.
- Sew the pieces together into a row. Press the seams towards the Print fabrics.
- Repeat steps 1-2 to make a total of 10 Center Row Units

Sewing the Quilt Top
- Layout the 10 Button Blocks and the remaining 54 Assorted Print Squares in 8 rows of 8 units. Continue
to move around your Print Squares and Button Blocks until you have a pleasing arrangement.
- Layout the 72 Background 1 1/2" x 5” rectangles between the Print Squares and Blocks as shown.
- Sew the Blocks and Background rectangles together into 8 rows. Press the seams towards the rectangles.
- Layout the 9 Sashing 1 1/2" x 45 1/2” Rows between the Block Rows as shown.
- Sew the Sashing Rows and the Block Rows together. Press the seams towards the Sashing Rows.

Finishing the Quilt
- Create the quilt backing.
- Cut backing into 1 piece, 54” x 40, and 2 pieces 15” x 27 1/2”.
- Sew the two smaller pieces together to make a strip 12” x 54”.
- Sew the pieced Strip and the WOF strip together to make a 54” x 54” backing.
- Layer the backing, batting, and the quilt top. Baste.
- Quilt as desired. Trim the excess batting and backing.
- Piece the 5 Binding strips together. Bind the quilt.
Are you going to make your own Cute as a Button quilt? Let us know in the comments section below!
Read NextGranny Love Quilt Pattern