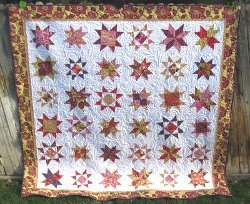
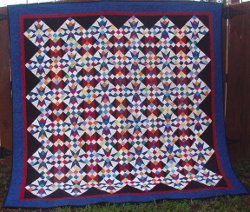
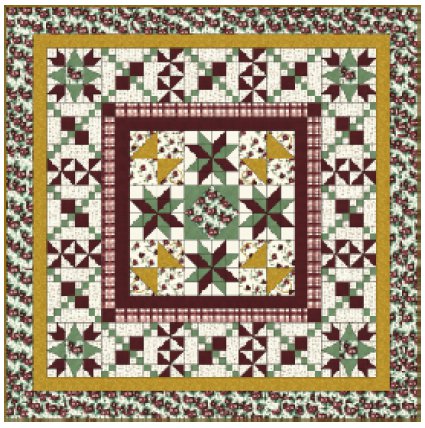
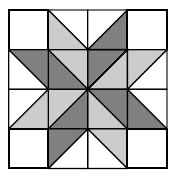
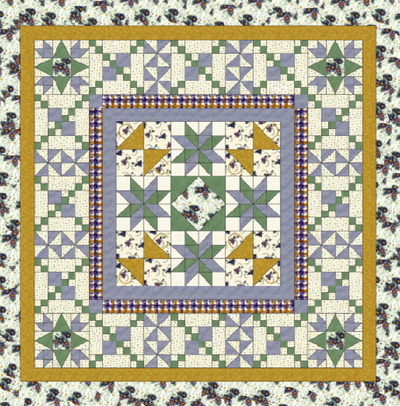
Briar Rose Star Quilt

This Briar Rose Star Quilt is one of our favorite queen sized quilts because instead of repeating one block across the whole quilt, it incorporates several different kinds of blocks into a larger star quilt pattern. Enjoy making star blocks, pinwheel quilt patterns, basket quilt blocks, four patches, and other blocks in this engaging quilt pattern. Free bed quilt patterns with such a rich variety not only present your best quality quilting, but also can become an everyday part of your bedroom decor.
Project TypeMake a Project
Quilt Size90 inches wide x 90 inches long
Time to CompleteA month or more
Primary TechniquePieced

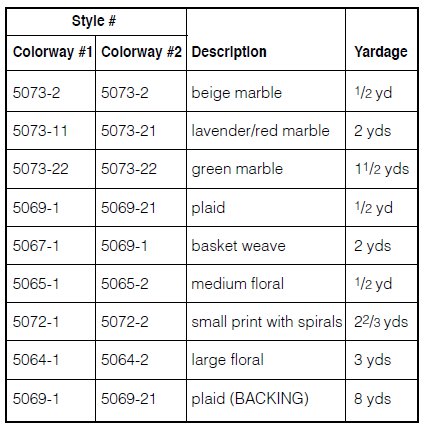
Note: This quilt is made using fabrics from the Briar Rose collection from RJR Fabrics. Fabrics are coded in materials list, and a second color option is provided.
MATERIALS:
- Iron-on adhesive or fusible interfacing
- Templates A & B
INSTRUCTIONS:
Step One: (Center Block)
- From large floral fabric, cut one (1) 12-1/2" square.
- From green marble fabric, cut four (4) 61/2" squares.
- Draw a diagonal line across the wrong side of each 6-1/2" square. Place one square on the upper left corner of the 12-1/2" square, right sides together, and stitch on the diagonal line. Fold and press toward the corner.
- Trim out the middle fabric 1/4" from seam line.
- Repeat this process on the upper right, lower left, and lower right. This completes the center block.
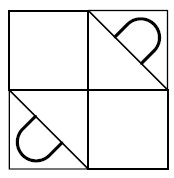
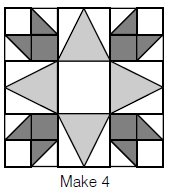
Step Two: (Basket Blocks)
- From the medium floral print, cut eight (8) 6-1/2" squares and four (4) 6-7/8" squares. Cut the 67/8" squares diagonally from corner to corner. You will have eight triangles.
- From the basket weave fabric, cut four (4) 6-7/8" squares. Cut the 6-7/8" squares diagonally from corner to corner. You will have eight triangles.
- Using your favorite iron-on adhesive, trace eight of Template A. Iron onto wrong side of basket weave fabric. Cut out, place on medium floral triangles (see diagram), and iron. Machine appliqué using blanket stitch.

- Place a medium floral triangle and a basket weave triangle right sides together and stitch a scant 1/4" along the cut line. Press seam toward the basket weave fabric. This basket square should be 1/2". Repeat with remaining seven sets of triangles.
- Stitch one of the above squares to a 6-1/2" medium floral print square. Press seam to the floral square. Repeat with remaining seven basket units.
- Stitch two of these units together along the bottom edge (see diagram). You will have four 12-1/2" square basket blocks.
Step Three: (Star Blocks)
- From the green marble fabric, cut (16) 3-7/8" squares.
- From the red (CW2) or lavender (CW1) marble fabric, cut (16) 3-7/8" squares.
- From the cream print background fabric, cut (8) 3-7/8" squares and (16) 3-1/2" squares.
- Place a green 3-7/8" square on a cream print 3-7/8" square and draw a diagonal line from corner to corner. Stitch a scant 1/4" from line on each side. Cut along line. Press seam toward green fabric. Make 16 of these half-square triangles.
- Repeat the above process using a red (or lavender) square and a cream square. Make 16 of these half-square triangles.
- Repeat the process using a red (or lavender) square and a green square. Make 16 of these.
- Stitch star blocks together in rows using diagram below as a guide. Make four star blocks.
Step 4: (Center Unit)
- Stitch a basket block to a star block. Stitch this unit to another basket block. Press seams to the right. This is row #1.
- Stitch a star block to the center block from Step 1. Stitch this unit to another star block. Press seams to the left. This is row #2.
- Stitch a basket block to a star block. Stitch this unit to another basket block. Press seams to the right. This is row #3.
- Stitch row #1 to row #2. Stitch this unit to row #3.
Step 5: (Inner Borders)
- From the red (or lavender) marble, cut two strips 3-1/2" x 36-1/2". Stitch these strips to the top and bottom of quilt.
- From the red (or lavender) marble, cut two strips 3-1/2" x 42-1/2". Stitch one strip to each side of the quilt. Press the seam toward the border.
- From the red (or lavender) marble, cut four (4) 3-1/2" squares.
- From the plaid fabric, cut four strips 3-1/2" x 42-1/2". Stitch two of the strips to the top and bottom of the quilt. Press the seams toward the inner border.
- Stitch a 3-1/2" red (or lavender) square to each end of the remaining strips. Press seams toward the squares.
- Stitch one strip to each side of the quilt. Press seams toward the inner border.
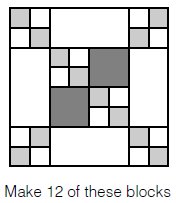
Step 6: (Four-Patch Blocks)
- From the green marble fabric, cut (144) 2” squares.
- From the small print with spirals, cut (144) 2” squares and (48) strips 3-1/2" x 6-1/2".
- From the red (or lavender) marble fabric, cut (24) 3-1/2" squares.
- Using 12 green and 12 small print squares, make six (6) four-patch blocks.
- Stitch a four-patch block to a small print rectangle. Stitch this unit to another four-patch block. Press seams toward rectangle. This is row #1.
- Construct a four-patch block using two (2) red (or lavender) squares and two (2) four-patch blocks. Stitch a small print rectangle to each side of this block. This is row #2.
- Repeat steps in row #1 to construct row #3.
- Stitch rows together to complete block.
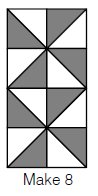
Step 7: (Pinwheel Blocks)
- From the red (or lavender) marble, cut (32) 3-7/8" squares.
- From the small print with spirals, cut (32) 3-7/8" squares.
- Place a red (or lavender) square and a small print square, right sides together. Draw a diagonal line from corner to corner and stitch 1/4" along each side of line. Cut along line. Press seams away from small print. Repeat
with remaining squares, making 64 half-square triangles.
- Stitch these together according to diagram on right, to construct eight pinwheel blocks measuring 12-1/2" x 6-1/2".
Step 8: (Corner Blocks)
- From large floral, cut (4) 4-1/2" squares.
- From red (or lavender) marble, cut (16) 2-1/2" squares and (16) 2-7/8" squares.
- From small print, cut (16) 2-1/2" squares, (16) 2-7/8" squares, and (16) 4-1/2" squares.
- From green fabric, cut (16) appliqué pieces using Template B.
- Place a red (or lavender) and a small print 2-7/8" square right sides together. Draw a diagonal line from corner to corner and stitch 1/4" along each side of line. Cut on line and press seams away from small print. Repeat with remaining (30) 2-7/8" squares. You will make 32 half square triangles.
- Construct a four-patch unit stitching a 2-1/2" small print square and a 2-1/2" red (or lavender) square to (2) of these half-square triangle units as shown below.
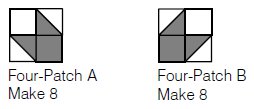
- Using your favorite iron-on adhesive, place green appliqué piece onto 4-1/2" small print square and machine stitch, using a blanket stitch. Make 16 of these units.
- Stitch Four-Patch unit A to appliqué unit, and stitch this to a Four-Patch unit B. This is row #1.
- Stitch an appliqué unit to a 4-1/2" large floral square and stitch this to another appliqué unit. This is row #2.
- Stitch Four-Patch unit B to an appliqué unit and stitch this to a Four-Patch unit A. This is row #3.
- Stitch these rows together to form a 12-1/2" corner block as shown.
Step 9: (Stitching Blocks Together)
- Stitch blocks together in the following manner to make a row: four-patch, pinwheel, four-patch, pinwheel, four-patch. Make two of these. They should each measure 48-1/2" long.
- Stitch a row to the top and bottom of the quilt.
- Stitch blocks together in the following manner to make a row: appliqué block, four-patch, pinwheel, four-patch, pinwheel, four-patch, appliqué block. Make two of these. They should each measure 72-1/2" long.
- Stitch a row to each side of the quilt.
Step 10: (Outer Borders)
- From the basket weave print, cut (8) strips 3-1/2" x WOF. Stitch two strips together at short ends and trim to make border 3-1/2" x 72-1/2". Make two of these. Stitch one to the top and one to the bottom of the quilt.
- Stitch two strips together at short ends and trim to make border 3-1/2" x 78-1/2". Make two of these. Stitch one to each side of the quilt.
- From the large floral, cut (9) strips 6-1/2" x WOF. Stitch two strips together at short ends and trim to measure 6-1/2" x 78-1/2". Make two of these. Stitch one to the top and one to the bottom of the quilt.
- Stitch remaining 5 strips together. From this, cut two borders each measuring 6-1/2" x 90-1/2". Stitch one border to each side of the quilt.
Step 11: (Finishing the Quilt)
Layer quilt top, batting, and backing. Quilt using desired method.
For more star quilt ideas, check out our list of 29 Star Quilt Patterns: Free Block Designs and Quilt Ideas.
Read NextRoyal Mirage Quilt Pattern
Your Recently Viewed Projects
Thanks for your comment. Don't forget to share!
Dsenters 7107700
Apr 22, 2019
I found the section of the quilt with the handle! Think I am going to tackle this pattern without adding it to that section. However is there a way to download a PDF of this pattern? Donna
Rhonlynn
Dec 16, 2014
Are you sure these are the right templates? I don't think there's an arch in any of the blocks.
FaveQuilts Editor MHS
Dec 18, 2014
Hi, Webrstraw. I'm not sure I understand your question. Do you mean the arch of the basket block handle? It's hard to see in the picture, but it is there!
pammenix 3635373
Sep 24, 2014
I would love to make this quilt if I had the correct instructions. The one I click on isn't what comes up. This one does. The one that I click on is a big star in the middle with 8 squares of smaller stars around the big one with borders around that.
FaveQuilts Editor MHS
Oct 06, 2014
Hi, Pammenix. I'm not sure I understand the issue. Do you name of the quilt that you are looking for?
motherofmany13
Jun 30, 2014
Not correct instructions for the picture shown!
FaveQuilts Editor MHS
Oct 06, 2014
Hi Motherofmany13! I assure you that the instructions given are for the pattern shown. If you find a specific error or discrepancy, don't hesitate to contact us via customer service! Thanks!
Quilter Person
Jan 04, 2013
These are not the correct instructions for this quilt. Please repost with correct instructions.
FaveQuilts Editor MHS
Oct 06, 2014
Hi Quilter Person! I assure you that the instructions given are for the pattern shown. If you find a specific error or discrepancy, don't hesitate to contact us via customer service! Thanks!
snicktrain 5688154
Apr 11, 2012
I'm not sure the instructions are for the picture shown.
JessiCAN
Apr 17, 2012
@snicktrain - The instructions given are for the pattern shown. If you find a specific error or discrepancy, don't hesitate to contact us via customer service! Thanks! -- Editor of FaveQuilts
Report Inappropriate Comment
Are you sure you would like to report this comment? It will be flagged for our moderators to take action.
Thank you for taking the time to improve the content on our site.