Royal Mirage Quilt Pattern

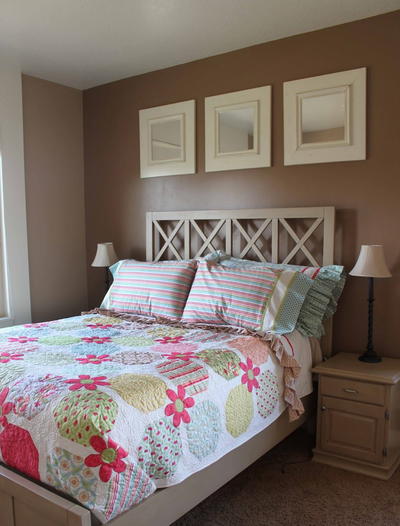
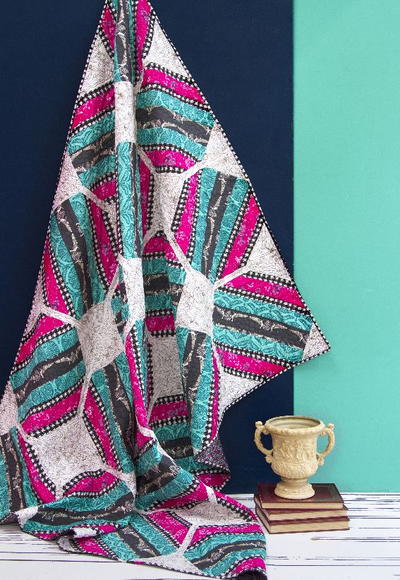
This gorgeous bed quilt pattern was inspired by 18th-century art and style. The Royal Mirage Quilt Pattern measures in at 63" × 79", making it the perfect size for queen beds, which is perfect because you'll feel like royalty snuggled up under this quilt! Complete with full piecing instructions, this free quilt pattern also features a printable PDF pattern, so that you can create a beautiful quilt without any stress.
Made with the Decadence fabric line from Art Gallery Fabrics, this pattern features pretty peacocks, fabulous florals and various tones of pink and teal against charcoal and ivory backgrounds. Treat yourself to this stunning bed quilt pattern today! You can find the full pattern below!
Click Here to Download the PDF Pattern!
Fabrics Used in This Pattern
This quilt pattern features Art Gallery Fabric's Decadence Collection. You can find the Decadence Fabric Collection here.

Fabric Requirements
Fabric A: DCD-21602 - 1 1/2 yd.
Fabric B: DCD-31608 - 2 yd.
Fabric C: DCD- 31607 - 1 1/6 yd.
Fabric D: DCD-31610 - 2 yd.
Fabric E: DCD-31613 - 1 1/2 yd.
Binding Fabric
Fabric C: DCD- 31607 (Included)
Recommended Backing Fabric
DCD-31604 - 4 yds.
Cutting Directions
Notes: ¼" seam allowances are included. WOF means width of fabric.
Eleven (11) 3½" x WOF strips from fabric A sub-cut into (20) 3 ½" x 22' strips
Forty (40) 2½" x 20" strips from fabric B.
Eighty (80) 16" x 1½" strips from fabric C
Forty (40) 4" x 8" strips from fabric D
Twenty (20) 5 3/8" squares from fabric D
Fifteen (15) 15½" x 1½" strips from fabric D
Six (6) 1½" x WOF strips, attach and sub-cut into four (4) 63" strips from fabric D
Forty (40) 14½" x 2½" strips from fabric E
Construction
Notes: Sew all rights sides together with 1/4" seam allowance.
1. There is just one block combination for this quilt top, follow the instructions below and repeat the block to complete a total of twenty blocks in order to complete the quilt top.
2. To complete one block you will need two 4" x 8" strips from fabric D, four 16" x 1½" strips from fabric C, two 14½" x 2½" strips from fabric E, two 2½" x 20" strips from fabric B and one 3 ½" x 22 strip from fabric A
3. Starting with the middle attach the strips in the order: DCECBABCECD

4. Cut a 15 ½" square on point
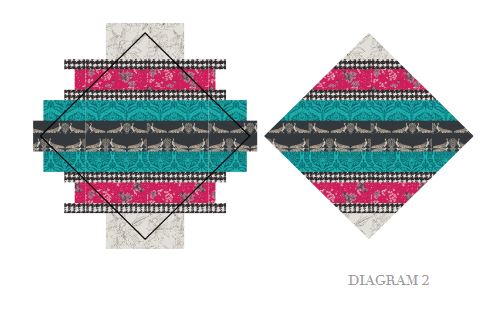
5. Take one 5 3/8" square from fabric D.
6. Cut it diagonally to end up with two half triangles.
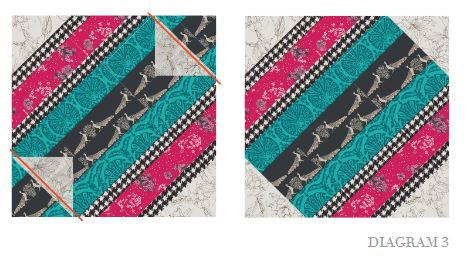
7. Place them on top of the two opposite corners and sew it as shown in the diagram below.
8. Trim excess fabric and press.
9. Repeat the block until you have a total of twenty blocks
Top Assembly
Notes: ¼" seam allowances are included. WOF means width of fabric.
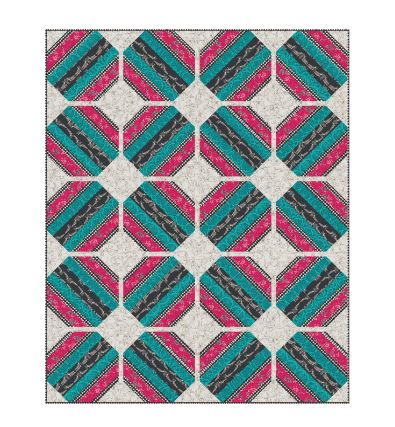
1. There is a total of five rows made out of four blocks each.
2. Take the remaining strips from fabric D and Alternate sashing in-between the blocks and columns.
3. Follow the diagram below for block placement.
Quilt Assembly
Notes: Sew rights sides together
1. Place backing fabric on a large surface wrong side up. Stretch it with masking tape against that surface.
2. Place batting on top of backing fabric.
3. Place top on top of the batting with right side facing up. Smooth away wrinkles using your hands.
4. Pin all layers together and baste with basting thread, using long stitches. You can also use safety pins to join the layers.
5. Machine or hand quilt starting at the center and working towards the corners. Remember that quilting motifs are a matter of personal preference. Have fun choosing yours!
6. After you finished, trim excess of any fabric or batting, squaring the quilt to proceed to bind it.
Binding
Notes: Sew rights sides together.
1. Cut enough strips 1 ½" wide by the width of the fabric C to make a final strip 294" long. Start sewing the binding strip in the middle of one of the sides of the quilt, placing the strip right side down and leaving an approximated 5" tail. Sew with ¼" seam allowance (using straight stitch), aligning the strip’s raw edge with the quilt top’s raw edge.
2. Stop stitching ¼" before the edge of the quilt (DIAGRAM B 1). Clip the threads. Remove the quilt from under the machine presser foot. Fold the strip in a motion of 45° and upward, pressing with your fingers (DIAGRAM B2). Hold this fold with your finger, bring the strip down in line with the next edge, making a horizontal fold that aligns with the top edge of the quilt (DIAGRAM B3). Start sewing at ¼" of the border, stitching all the layers. Do the same in the four corners of the quilt.
3. Stop stitching before you reach the last 5 or 6 inches. Cut the threads and remove the quilt from under the machine presser foot. Lay the loose ends of the binding flat along the quilt edge, folding the ends back on themselves where they meet. Press them together to form a crease. Using this crease as the stitching line, sew the two open ends of the binding with right sides together (you can help yourself marking with a pencil if the crease is difficult to see).
4. Trim seam to ¼" and press open. Complete the sewing. Turn binding to back of the quilt, turn raw edge inside and stitch by hand using blind stitch.

Read NextSpontaneous Strip Quilt Pattern
Your Recently Viewed Projects
Thanks for your comment. Don't forget to share!
Lynn K
Nov 21, 2018
Oh my word! This stunning quilt design looked impossibly difficult until I looked at the instructions and discovered that it doesn't seem at all tricky. I really love this design and the colors are fabulous so am really pleased I didn't just move on to the next page. Can't WAIT to get started!
Report Inappropriate Comment
Are you sure you would like to report this comment? It will be flagged for our moderators to take action.
Thank you for taking the time to improve the content on our site.