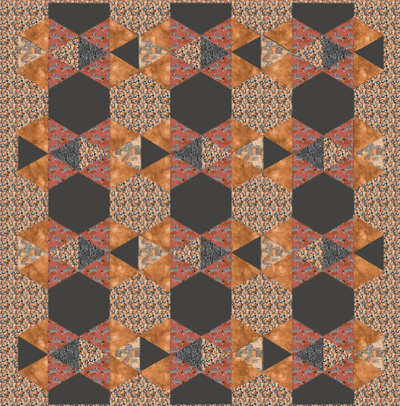
Seasonal Safari Hexi Quilt Pattern Free
This pretty safari quilt pattern is subtle yet full of rich and earthly colors and themes.

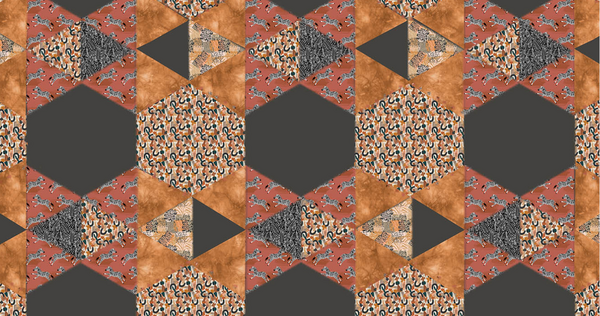
This pretty hexagon quilt pattern is full of subtle fall colors and animal prints combined with pleasing geometric shapes and animals often found on safari or during fall zoo trips. Some might find themes invoking Africa because of the colors and prints used.
No matter how this Seasonal Safari Hexi Quilt Pattern inspires you, it's a gorgeous 79" x 78" blanket that will keep you warm or decorate your home for the season or theme.
The fabric collection from Camelot Fabrics includes gorgeous prints that come together magically for a finished quilt you will love. This DIY quilt features eight unique and attractive fabrics that come together in a satisfying way within the hexagons.
This isn't just any safari quilt pattern. You might not even see the zebras, animal prints, or leaves at first glance but the more you look, the more you discover the unique beauty of this large quilt.
It's thanks to Camelot's Ubud collection. According to the collection description, "Rich earthy tones, distinct flora, zebras, parrots, wild cats, and mangos jump off these prints to offer you an exotic collection that will tempt you to travel and unleash your creative ideas."
While this earthy safari hexagon quilt doesn't have all these fabrics, the collection is celebrated in style. The black, orange, red, and russet colors pull in autumn and will remind you of breezy walks and changing trees.
Sign Up For More Free Patterns
Seasonal Safari Hexi Quilt Pattern Free
Skill Level: Intermediate
Project Type: Make a Project
Time to Complete: Weekend Project
Sewn By: Machine
Materials List:
• Fabric A: 50220601-01 - 1-1/4 yards
• Fabric B: 21009-0044 - 1-1/4 yards
• Fabric C: 50220608-01 - 1/2 yard
• Fabric D: 214-0085 - 1/2 yard
• Fabric E: 50220607-01 - 1/2 yard
• Fabric F: 50220606-01 - 1/2 yard
• Fabric G: 214-0085 - 1-1/2 yards
• Fabric H: 50220606-01 - 2-1/2 yards (includes binding)
• Suggested Backing: 50220603-01 - 5 yards
• Basic sewing/quilting supplies: needle and coordinating thread, sewing machine, iron & pressing surface, rotary cutter and mat, fabric shears, straight pins
Notes:
• For best results, read through all instructions before starting.
• Please wash, dry & iron your fabrics before beginning, and trim selvages.
• Unless otherwise indicated, sew all seams with a 1/4” seam allowance.
• Press your seams open as you go.
• WOF = width of fabric.
• Finished size: 79" w x 78" l
Cutting Instructions:
- Fabric A & B: Cut (6) 7" x WOF Strips from each Fabric. Sub-cut each strip into (8) triangles.
Note: Follow the instructions on How To Cut Equilateral Triangles found below and on p.6 of the PDF, which can be downloaded near the bottom of this page.
- Fabric C-D-E & F: Cut (2) 7" x WOF strips from each fabric. Sub-cut to make (12) triangles from each fabric.
Note: Follow the instructions on How To Cut Equilateral Triangles found below and on p.6 of the PDF, which can be downloaded near the bottom of this page.
- Fabric G: Cut (8) 7" x WOF strips. From (6) of the strips, sub-cut 18 trapezoids.
Note: Follow the instructions on How To Cut Trapezoids found below and on p.8 of the PDF, which can be downloaded near the bottom of this page.
- Sub-cut the (2) remaining strips into (12) "half trapezoids."
Note: Follow the instructions on How to Cut Half Trapezoids found below and on p.9 of the PDF, which can be downloaded near the bottom of this page.
- Fabric H: Cut (8) 7" x WOF strips. From (6) of the strips, sub-cut (18) Trapezoids.
- Sub-cut the (2) remaining strips into (12) "half trapezoids".
- Cut (4) 4” x WOF strips. Sew (2) of these strips together, end to end, and trim to 78-1/2" long. Repeat with the (2) remaining strips. These will be referred to as the side borders.
- Cut (9) 2-1/2" x WOF strips. Set aside for binding.
Piecing Instructions:
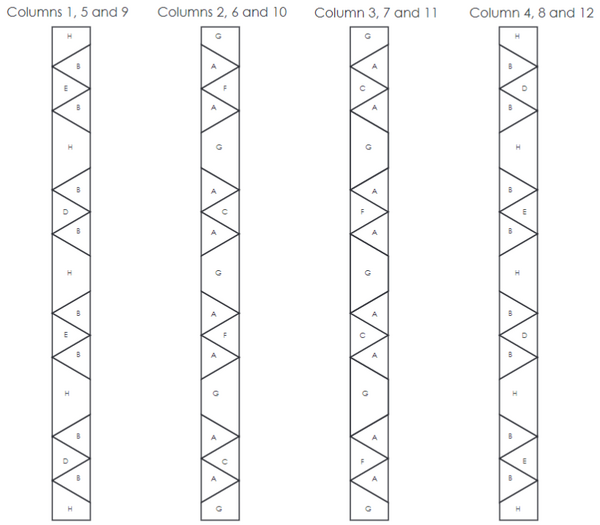
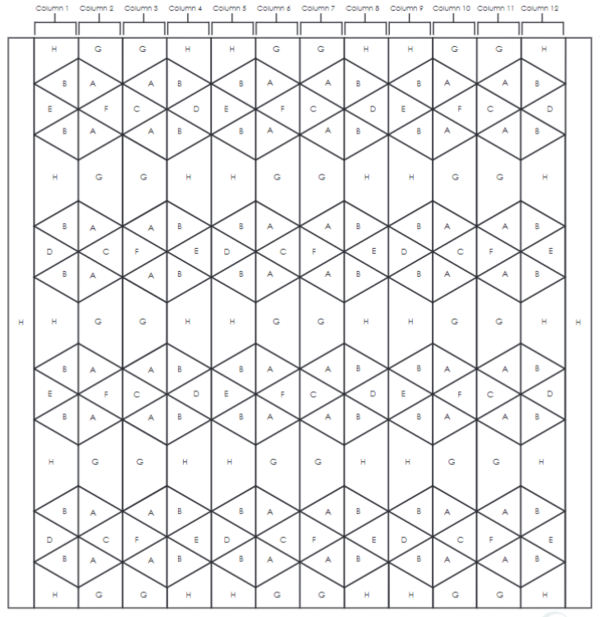
The following steps describe how to piece triangles and trapezoids side by side. Once you learn the technique, you can follow the assembly layout on p.5 and on the cover page to piece the columns for the quilt top.
Piecing Triangles:
- Place (2) triangles one over the other, Right Sides Facing, making sure to line up all edges. Sew a seam along one edge. Press seams open.
Note: if you are working with a DIRECTIONAL print, be sure to orient your fabrics correctly.

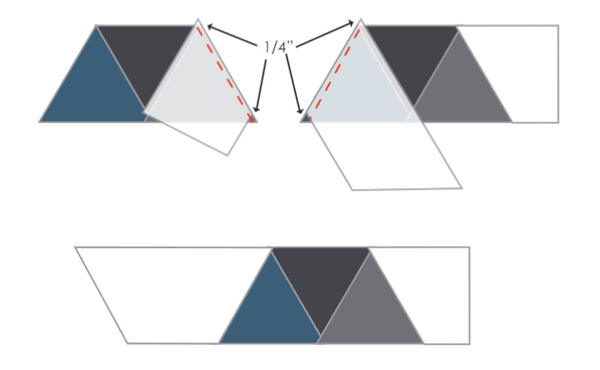
Piecing Triangles and Trapezoids:
- Place (1) trapezoid over (1) triangle, right sides facing, making sure to line up the edges that will be sewn.
Note: Line up the trapezoid along the triangle's edge so that it extends 1/4" off the top. Consequently, the triangle's corner will protrude off the bottom of the trapezoid by 1/4".
Piecing the Columns:
- Follow the assembly layout below, on p.5, as well as the cover page, when piecing the columns.
Note: Columns 1, 5, and 9 are the same, as are: 2, 6, and 10; 3, 7, and 11; 4, 8, and 12.
Assembly Instructions:
- Sew all columns together from left to right. Pin the columns before sewing, making sure to match your seams.
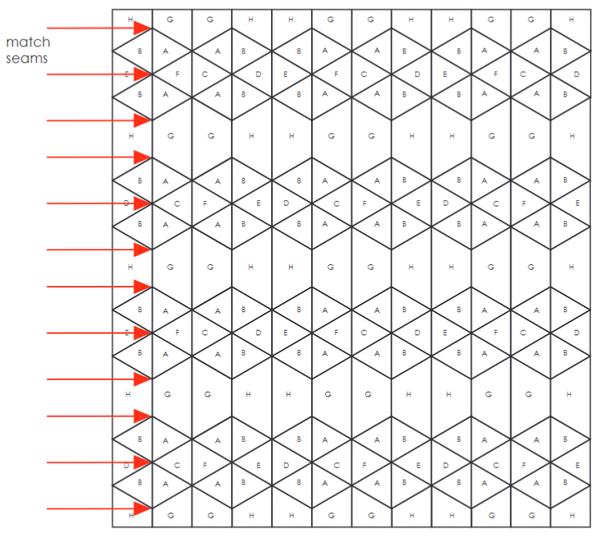
- Sew (1) side border to either side of the unit created in Step 1. This completes the quilt top.
Finishing Instructions:
- Layer the quilt top with batting and backing. Baste and quilt as desired.
- Sew the Fabric H binding strips together end-to-end and press seams open. Bind the quilt using your favorite method.

Helpful Guides for Quilting the Seasonal Safari Hexi Quilt Pattern Free
ASSEMBLY LAYOUT
WORKING WITH THE 60° LINES ON YOUR QUILTING RULER
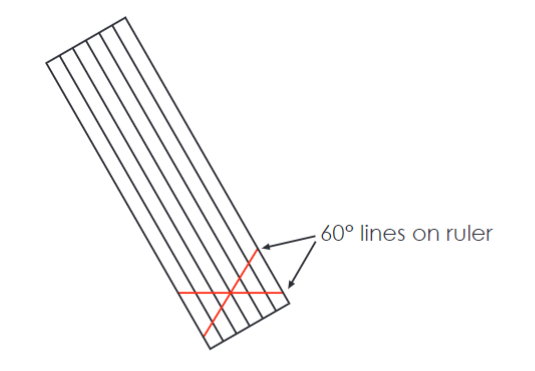
HOW TO CUT EQUILATERAL TRIANGLES USING THE 60° LINES ON YOUR RULER
- Lay your ruler on the fabric strip, making sure to align the 60° line with the bottom edge of your strip.
The ruler should be tilted towards the right and the left side of your ruler should line up with the lower left corner of the fabric strip, as shown.
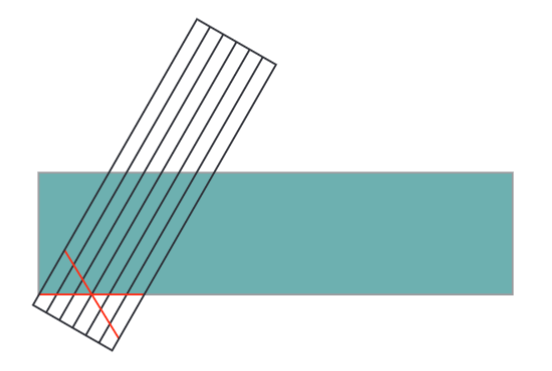
- Cut along the left side of your ruler.
Note: For this step, it helps to have a table that you can walk around so that you are not cutting toward yourself.
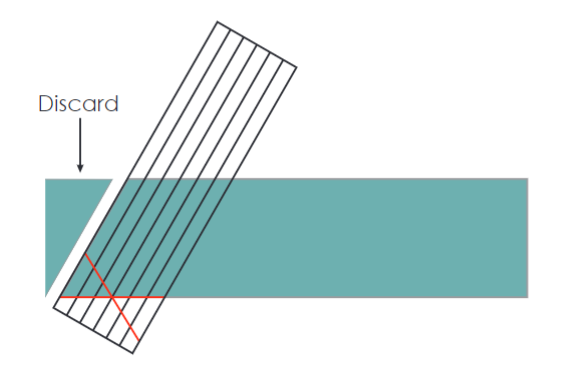
- Tilt your ruler towards the left and line up the other 60° line with the bottom edge of the strip. The right side of the ruler should be lined up with the top point of the triangle.
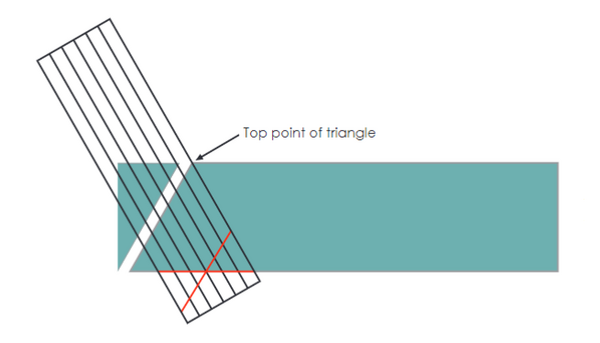
- Cut along the right side of your ruler.

- Continue to cut triangles along the fabric strip by tilting your ruler towards the right & left as needed and lining up the 60° lines of your ruler as you did in the previous steps.
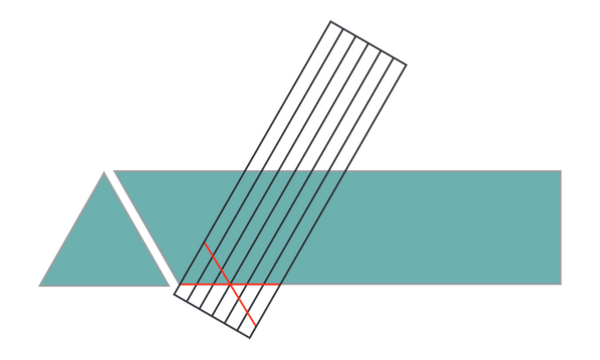
HOW TO CUT TRAPEZOIDS USING THE 60° LINE ON YOUR RULER
- Begin by following Steps 1 & 2 from the instructions for cutting triangles.
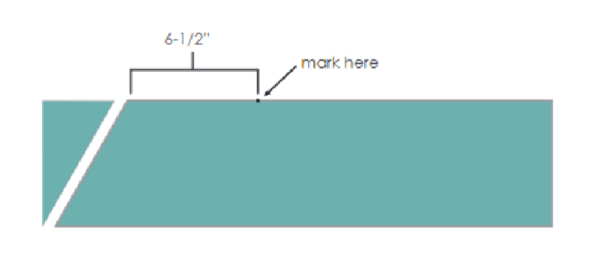
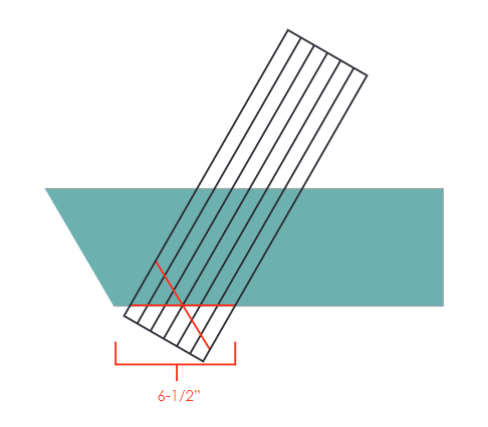
- Measure 6-1/2" away from the top corner of the first cut and mark it with a fabric marker.
- Tilt your ruler towards the left and line up the 60° line with the bottom edge of the strip.
The right-hand side of your ruler should be lined up with the top edge of the fabric strip at the 6-1/2" mark that you made in Step 2. Cut along the right side of the ruler.
- Tilt and slide your ruler towards the right. Line up the 60° line with the bottom edge of the fabric. The right side of the ruler should be 6-1/2" away from the bottom left corner of the fabric strip.
Cut along the right side of the ruler. Continue to cut trapezoids in this manner along the rest of the fabric strip.
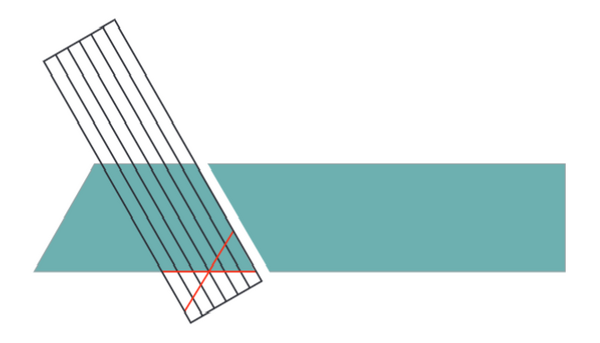
HOW TO CUT "HALF TRAPEZOIDS" USING THE 60° LINES ON YOUR RULER
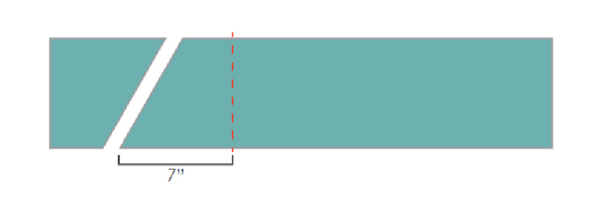
- Trim the short edge on the left side of the fabric strip so that you have a neat 90° cut.

- Tilt your ruler towards the right and line up the 60° line with the bottom edge of the strip. The left side of your ruler should be 7" away from the top left corner of the fabric strip. Make a cut on the left side of your ruler.
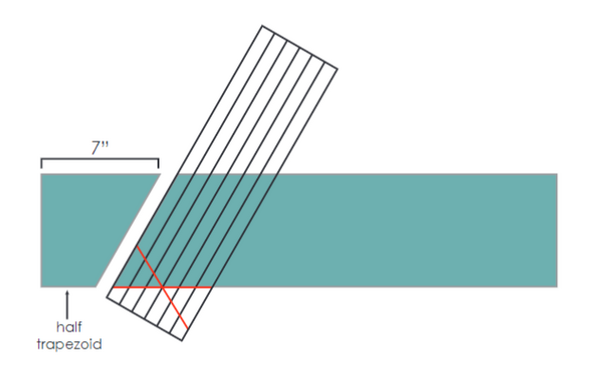
- Tilt your ruler so that it is perpendicular to the fabric strip and slide it towards the right. Make a cut 7" away from the bottom left corner, as shown.
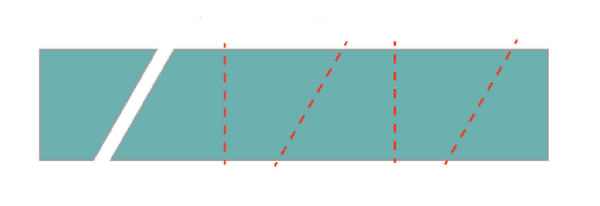
- Repeat Steps 3 & 4 to cut all of your half trapezoids.
Seasonal Safari Hexi Quilt Pattern Free Printable PDF
Click the button below to download the PDF so that you can keep this pattern handy when you need it. Feel free to print the pages you need to keep in your sewing room or keep it digital on your computer or phone.
Click Here to Download the Free Printable PDF

Want More?
11 Free Hexagon Quilt Patterns >>
What safari animals do you like the most?
Let us know in the comments!
Read NextDancing Colors Quilt