Wedding Ring Motif Wall Hanging

The double wedding ring quilt pattern is one of the most timeless quilt patterns, but you don't have to make a full-size quilt to display this lovely motif in your home. Make the Wedding Ring Motif Wall Hanging as a vintage-inspired quilt wall display.
Project TypeMake a Project
Quilt Size29 inches wide x 29 inches long
Time to CompleteWeekend project
Primary TechniquePieced

MATERIALS:
- 8 or more fat quarters
- Binding—½ yard
- Backing—1 yard
- Batting—36" x 36"
- Coordinating Thread
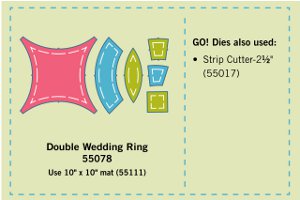
- Accuquilt die cutting machine
- Accuquilt Double Wedding Ring die (#55078)
- Accuquilt 10" x 10" mat (#55111)
- Accuquilt Strip Cutter - 2-1/2" (#55017)
INSTRUCTIONS:
Fat Quarters:
- Cut 4—Shape A
- Cut 24—Shape B
- Cut 12—Shape C
- Cut 72—Shape D
- Cut 24—Shape E
- Cut 24—Shape E Reverse
Binding Fabric:
- Cut 120" of 2½" bias binding
Sewing Instructions:
Whenever possible sew with the concave "(" curved shape
on top.
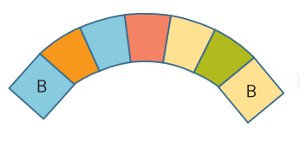
- Layout shapes for one arc—three D shapes and one pair of shape E as shown.
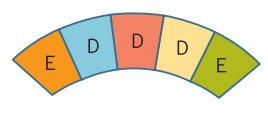
- Pin and sew together with accurate ¼" seam allowances. Press seams in one direction. (It does not matter which direction, but be consistent. Press carefully to avoid distortion of shapes.)
Tip: Cut out one Total Arc Shape F from paper. Position pieced fabric arc on top of paper total arc. They should match; if not, adjust seam allowance.
- Mark ¼" points on square B as shown.

- Pin and sew one square B to each end of one combined arc unit. Start and stop stitching at ¼" markings. Press seams toward squares.
- Mark ¼" points on shape C as shown.

- Pin and sew one shape C to one combined arc unit matching ¼" points and notches, starting and stopping stitching at ¼" points. Press seams toward shape C.
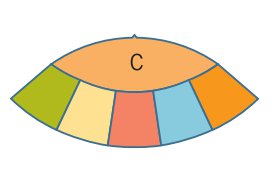
- Pin and sew one combined arc with corner squares to combined arc with shape C starting and stopping stitching at ¼" points of square B. Press seam toward shape C.
- Make 12 combined units.
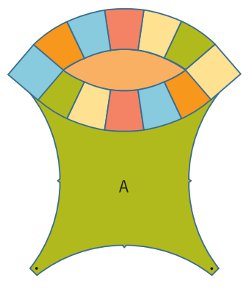
- Mark ¼" points on tips of shape A.
- Pin and sew one combined arc unit to one shape A matching notches and ¼" points. Start and stop stitching at ¼" points. Press seams toward shape A or in the direction that creates the least bulk at intersections.
- Pin and sew another combined arc unit to another side of shape A. Start and stop stitching at ¼" points. Pin and sew edges of square B shapes together, raw edge to ¼" point.
- Continue to add combined arc units and A shapes in this manner to complete quilt top.
- Press completed quilt top.
Quilting and Finishing:
- Layer quilt top with batting and backing.
- Quilt as desired.
- Bind with bias binding.
Read NextOh My Strippy Stars Quilt Pattern
Your Recently Viewed Projects
Thanks for your comment. Don't forget to share!
vanessa_beam
Jan 09, 2015
What about those of us who don't have an Accuquilt? I wish there were templates or instructions for those of us who cut without a machine.
Craftycasey
Jan 11, 2014
I love this! It would be great if I could get a larger pattern for a bed quilt using the accuquilt -Go machine. I'm trying to make one, and hope I don't botch it up. I have all my pieces cut out, now for the hard part, putting it all together!
goldylocks432001 3 325879
Mar 06, 2013
I think this is one of the most beautiful quilts ever made :)
Report Inappropriate Comment
Are you sure you would like to report this comment? It will be flagged for our moderators to take action.
Thank you for taking the time to improve the content on our site.