Curious Nature Target Quilt
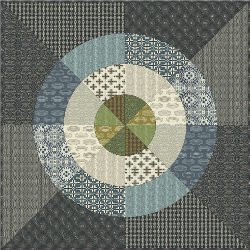
Make a manly quilt with fabrics from Parson Gray. In rich shades of charcoal grey, moss green, and slate blue, this Curious Nature Target Quilt is just the quilt for the man in your life. Its subdued, graphic pattern is right on target!
Project TypeMake a Project
Quilt Size62 inches wide x 62 inches long
Time to CompleteA week or two
Primary TechniquePieced

Note: This pattern was designed using fabrics from Parson Gray for FreeSpirit Fabrics. Fabrics are coded in materials list.
MATERIALS:
- 1 yd. Fabric A (#PG002-Royalty)
- 1 yd. Fabric B (#PG003-Tail Coat)
- 1-1/2 yd. Fabric C (#PG007-Night), cut into (7) 2-1/2" x WOF strips
- 1 yd. Fabric D (#PG005-Stones)
- 5/8 yd. Fabric E (#PG009-Tin)
- 5/8 yd. Fabric F (#PG001-Dark Water)
- 5/8 yd. Fabric G (#PG006-Steel)
- 5/8 yd. Fabric H (#PG004-Arctic)
- 3/8 yd. Fabric I (#PG002-Silver)
- 3/8 yd. Fabric J (#PG006-Oyster)
- 3/8 yd. Fabric K (#PG001-Bone)
- 3/8 yd. Fabric L (#PG009-Bone)
- 1 Fat Quarter Fabric M (#PG001-Pines)
- 1 Fat Quarter Fabric N (#PG003-Forest)
- 1 Fat Quarter Fabric O (#PG002-Pines)
- 1 Fat Quarter Fabric P (#PG009-Brush)
- 4 yds. Backing Fabric, cut into (2) 70" x WOF
- 70" x 70" quilt batting
INSTRUCTIONS:
Notes:
- Templates are reduced - be sure to enlarge as described on page of templates.
- Templates are to be laid on fabric with the arrow along the straight or cross grain of fabric (refer to quilt graphic for direction of each piece).
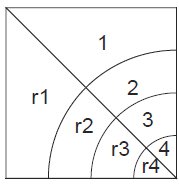
- Templates are numbered. Placement of the templates within a block are shown in this graphic. Pieces with an "r" in front of the number are cut with the template face down on the fabric (so it is the reverse of the template).
Cutting and Piecing:
- Cut the fabrics with templates as listed:
From Fabrics A and C - cut (2) r1
From Fabrics B and D - cut (2) 1
From Fabrics E and G - cut (2) r2
From Fabrics F and H - cut (2) 2
From Fabrics I and K - cut (2) r3
From Fabrics J and L - cut (2) 3
From Fabrics M and O - cut (2) r4
From Fabrics N and P - cut (2) 42.
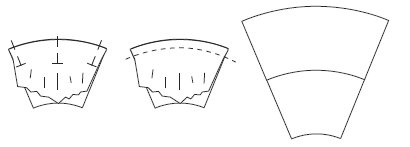
- Piecing curves requires a little care. Be sure not to stretch the bias cut edges except when easing seams together. When pinning and sewing curves, work from the side of the inner curve so it is easier to ease in seams. Mark the center point of each curve with a pin or mark. Place two curves to be sewn together, right sides together matching their center points and pin.


- Fold the inner curve corners down and pin to the outer curve corners. Stitch curved seam, easing the fabrics together. Press open.
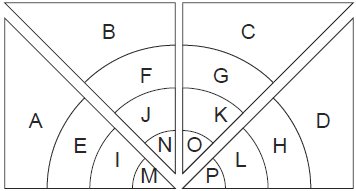
- Referring to the placement chart below, sew the pieces into two of each triangle, then join the triangles into the blocks.
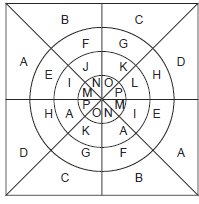
- Piece blocks into quilt top as shown:
Finishing:
- Piece backing along selvage edges.
- Layer backing, batting and quilt top. Quilt or tie as desired. Trim batting and backing even with quilt top.
- Make binding from (7) Fabric C 2-1/2" x WOF strips. Apply to raw edges of quilt.
Read NextPinkie Swear Quilt Pattern
Your Recently Viewed Projects
Member 4833743
Jun 17, 2014
I have not been able to find the actual templates. Or do I just need to enlarge the piecing diagrams?
Report Inappropriate Comment
Are you sure you would like to report this comment? It will be flagged for our moderators to take action.
Thank you for taking the time to improve the content on our site.

