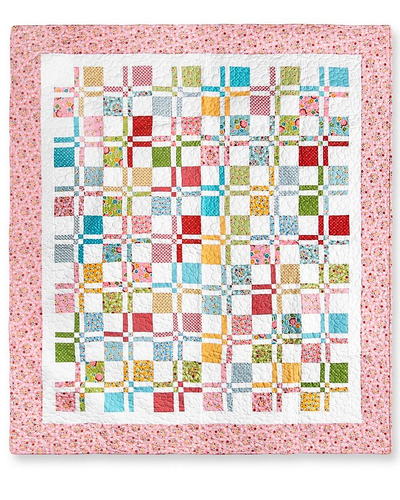
Rain Drops Bargello Quilt Tutorial

Some see rain as a gift and some as a curse, but everyone will agree that the Rain Drops Bargello Quilt Tutorial is a gorgeous way to make a quilt pattern. It looks like rain drops on a window pane, which is quite a zen image. Made with strips of fabric, you will find it difficult to find a bargello DIY quilt more simply beautiful than this one. The blue colors may be somber, but you could always make it in different colors to brighten up your home with a quilt pattern.
Project TypeMake a Project
Time to CompleteWeekend project

Materials List
- PC6307 Blue Raindots - 2 yards - (11) 3 3/4” x 40 1/2” (center on dot stripe) - (4) 2 1/2” x 40 1/2” (cut from leftover strips).
- ‘A’ SC5333 Breeze Cotton Couture - 5/8 yard - (2) 2 1?2” x W.O.F. (binding) - (1) 3 3/4” x 8 1/2” - (1) 3 3/4” x 10 1/2” - (1) 3 3/4” x 4 1/2” - (1) 3 3/4” x 7 1/2” - (1) 3 3/4” x 9 1/2” - (1) 3 3/4” x 14 1/2” - (1) 3 3/4” x 13 1/2” - (1) 2 1/2” x 8 1/2”.
- ‘B’ SC5333 Boy Cotton Couture - 1/2 yard - (1) 2 1/2” x W.O.F. (binding) - (1) 3 3/4” x 11 1/2” - (1) 3 3/4” x 6 1/2” - (1) 3 3/4” x 161/2” - (1) 3 3/4” x 10 1/2” - (1) 2 1/2” x 5 1/2” - (1) 2 1/2” x 7 1/2” - (1) 2 1/2” x 12 1/2”.
- ‘C’ SC5333 Cobalt Cotton Couture - 1/2 yard - (1) 2 1/2” x W.O.F. (binding) - (1) 3 3/4” x 9 1/2” - (1) 3 3/4” x 14 1/2” - (1) 3 3/4” x 4 1/2” - (1) 3 3/4” x 10 1/2” - (1) 2 1/2” x 15 1/2” - (1) 2 1/2” x 12 1/2” - (1) 2 1/2” x 13 1/2” - (1) 2 1/2” x 8 1/2”.
- ‘D’ SC5333 Midnite Cotton Couture - 1/2 yard - (1) 2 1/2” x W.O.F. (binding) - (1) 3 3/4” x 12 1/2” - (1) 3 3/4” x 10 1/2” - (1) 3 3/4” x 16 1/2” - (1) 3 3/4” x 11 1/2” - (1) 3 3/4” x 13 1/2” - (1) 3 3/4” x 6 1/2”.
- 48” x 65” backing
- 48” x 65” batting
- Threads to match
- Scissors
- Straight pins
- Rotary cutter
- Acrylic ruler
- Mat
Want more quilt patterns like this one? Check out:
Rain Drops Bargello Quilt Tutorial
Instructions
-
Row #1 – sew one ‘A’ 3 3/4” x 8 1/2” piece to the light end of one PC6307 3 3/4” strip. Sew one ‘D’ 3 3/4” x 12 1/2” piece to the dark end.
-
Row #2 – sew one ‘B’ 3 3/4” x 11 1/2” piece to the light end of one PC6307 3 3/4” strip. Sew one ‘C’ 3 3/4” x 9 1/2” piece to the dark end. Sew to Row #1.
-
Row #3 – sew one ‘C’ 2 1/2” x 15 1/2” piece to the dark end of one PC6307 2 1/2” strip. Sew one ‘B’ 2 1/2”x 5 1/2” piece to the light end. Sew to Row #3 inverting the color sequence as shown.
-
Row #4 – sew one ‘A’ 3 3/4” x 10 1/2” piece to the light end of one PC6307 3 3/4” strip. Sew one ‘D’ 3 3/4” x 10 1/2” piece to the dark end of the strip. Sew to Row #3.
-
Row #5 – sew one ‘B’ 3 3/4” x 6 1/2” piece to the light end of one PC6307 3 3/4” strip. Sew one ‘C’ 3 3/4” x 14 1/2” piece to the dark end. Sew to Row #4.
-
Row #6 – sew one ‘A’ 3 3/4” x 4 1/2” piece to the light side of one PC6307 3 3/4” strip. Sew one ‘D’ 3 3/4” x 16 1/2” piece to the dark end. Sew to Row #5.
-
Row #7 – sew one ‘C’ 2 1/2” x 12 1/2” piece to the dark end of one PC6307 2 1/2” strip. Sew one ‘A’ 2 1/2” x 8 1/2” piece to the light end. Sew to Row #6. Inverting the color as in step #3.
-
Row #8 – sew one ‘B’ 3 3/4” x 16 1/2” piece to the light end of one PC6307 3 3/4” strip. Sew one ‘C’ 3 3/4” piece to the dark end. Sew to Row #7.
-
Row #9 – sew one ‘A’ 3 3/4” x 9 1/2” piece to the light end of one PC6307 3 3/4” strip. Sew one ‘D’ 3 3/4” x 11 1/2” piece to the dark end. Sew to Row #8.
-
Row #10 – sew one ‘C’ 2 1/2” x 13 1/2” piece to the dark end of one PC6307 2 1/2” strip. Sew one ‘B’ 2 1/2” x 7 1/2” piece to the light end. Sew to Row #9 as in step #3.
-
Row #11 – sew one ‘A’ 3 3/4” x 7 1/2” piece to the light end of one PC6307 3 3/4” strip. Sew one ‘D’ 3 3/4” x 13 1/2”piece to the dark end. Sew to Row #10.
-
Row #12 – sew one ‘B’ 3 3/4” x 10 1/2” piece to the light end of one PC6307 3 3/4” strip. Sew one ‘C’ 3 3/4” x 10 1/2” piece to the dark end. Sew to Row #11.
-
Row #13 – sew one ‘A’ 3 3/4” x 14 1/2” piece to the light end of one PC6307 3 3/4” strip. Sew one ‘D’ 3 3/4” x 6 1/2” piece to the dark end. Sew to Row #12.
-
Row #14 – sew one ‘C’ 2 1/2” x 8 1/2” piece to the dark end of one PC6307 2 1/2” strip. Sew one ‘B’ 2 1/2” x 12 1/2” piece to the light end. Sew to Row #13.
-
Row #15 – sew one ‘A’ 3 3/4” x 13 1/2” piece to the light end of one PC6307 3 3/4” strip. Sew one ‘D’ 3 3/4” x 7 1/2” piece to the dark end. Sew to Row #14.
-
Layer backing, batting, and quilt top. Baste.
-
Quilt as desired.
-
Bind the top edge of the quilt with ‘A’ 2 1/2” strip. Trim excess. Bind the bottom edge with ‘D’ 2 1/2” strip. Trim excess. Cut one ‘A’, ‘B’, and ‘C’ 2 1/2” x W.O.F. strip in half to make 2 1/2” x 22” pieces. For each side piece together (1) ‘A’, ‘B’, and ‘C’. Make two. Bind each side starting at the lower edge with ‘C’. Trim excess ‘A’ away at the top edge. Trim under all raw edges to finish.
Abbreviations
- WOF
- Width of Fabric
Read NextWindow Box Scrapbuster Quilt
Your Recently Viewed Projects
Thanks for your comment. Don't forget to share!
vwpilegard
Aug 10, 2017
Found fabric on 'rain cotton fabric" Esty. Lots of cute rain fabrics there.
rightwheel
Aug 10, 2017
I went to Michael Miller Fabrics online store. The fabric is not available.
JustOneVoice
Dec 17, 2016
There is not mention of where to find this faric. If I can't find it, I can't make it.
SiteEditorAshley
Dec 21, 2016
Hi JustOneVoice, the fabrics are listed above in the Materials list. If you visit the Michael Miller Fabrics site, you can order the fabrics directly. Just type the name of the fabric in the search bar. Thanks!
Report Inappropriate Comment
Are you sure you would like to report this comment? It will be flagged for our moderators to take action.
Thank you for taking the time to improve the content on our site.