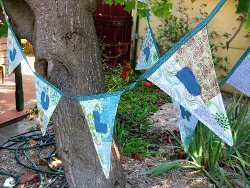
Urban Garden Swag Pattern

Add a little bit of greenery to your home or front door with this charm pack project from our friends at RJR Fabrics! This Urban Garden Swag Pattern is a charming way to use up your pretty spring charm packs, and is a quick sewing project that you can finish up in just a few hours. This tutorial for how to make a fabric door swag features in depth instructions and a printable template for completing your leaves, so that creating this DIY door swag is super simple. Are you ready for sunny spring weather? Then you won't want to miss this fun and colorful sewing project for springtime!
Click Here to Download the PDF Pattern!
This project finishes at approximately 12" x 18"
Fabrics Used in This Pattern
This sewing project features RJR's Urban Garden fabric collection. You can find the Urban Garden collection here.

Fabric Requirements and Cutting Instructions

How to Assemble Your Leaves
Finished leaf size approximately 4-1/2” square.
**Please note: The printable leaf template is located in the PDF download at the top of the page.
1. Trace around leaf template on the right side of (1) 5” charm square, using a removeable marking pen. For more variety, try freesketching a leaf shape that fills the charm square.

2. Place (1) 5” charm square, right side down. Place (1) 5” square batting on top. Top with marked charm square, right side up.

3. Sew on the line, leaving a 2” opening for turning. Backstitch at the beginning and end of your stitching.
4. Trim seam allowance to 1/8”.

5. Turn right side out. Use a chopstick, knitting needle, or similar tool to gently poke out the leaf points. Press.

6. Turn under the opening and pin. Edge-stitch using matching thread to close the leaf opening.
7. Stitch leaf veins using contrasting thread. I used monofilament (clear) thread in my bobbin, but you can match your top and bottom threads if you like. Make 13 leaves.

How to Assemble Your Swag
1. Fold (1) 2” x 8” felt rectangle in half, right sides together. Stitch along the open side, stopping and starting 1” from each end.
2. Turn the loop right side out and press.
3. Overlap the open ends of the loop and pin. Stitch the loop to the top of swag back as shown.

4. Lay (1) leaf at the bottom of (1) 5” x 13” felt rectangle as shown. Stitch by machine or by hand to attach the leaf to felt base.
5. Repeat Step 4, arranging leaves one at a time and stitching them to the base.

6. Stitch (3) 3-1/2” x WOF fabric strips together, end to end.
7. Press fabric ribbon in half lengthwise. Sew along the open edge, leaving an opening for turning.
8. Turn the fabric ribbon right side out and press. Hand-stitch the opening closed.
9. Form a bow and stitch it to the top of the swag by hand.

What projects are you making for spring? Let us know below in the comments!
Read NextComfy College T-Shirt Pattern