Sugar Crystal Quilt Pattern
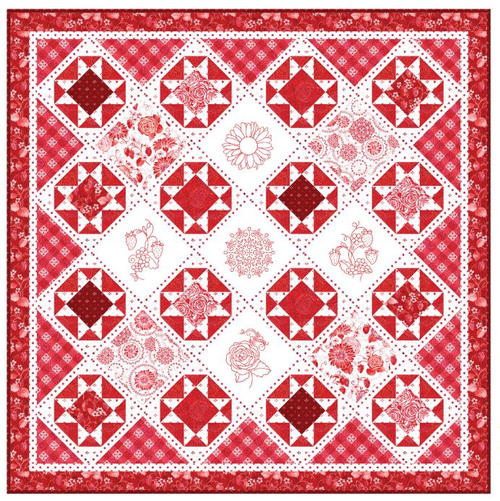
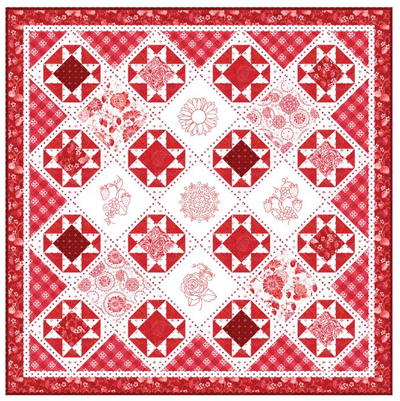
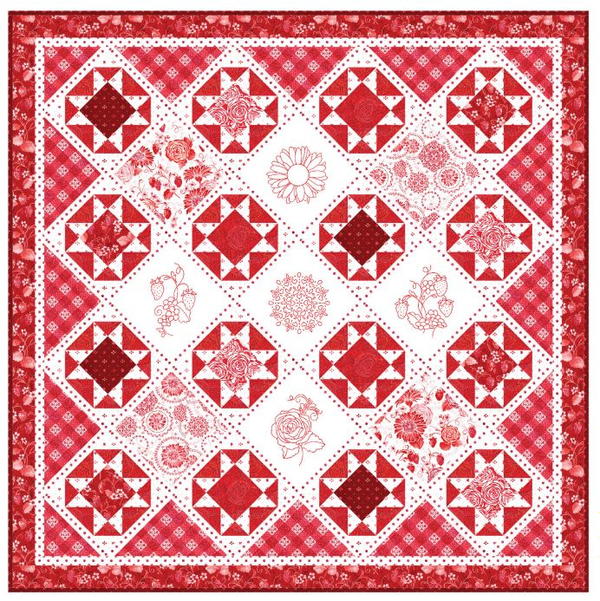
Add some major sweetness to your life with this gorgeous free quilt pattern from RJR Fabrics. Finishing at the perfect size for a large throw quilt, this printable quilt pattern uses flying geese to create a classic 8 point star design with a square center, so it's great for showcasing any pretty fabrics that you love. This throw quilt pattern also features Redwork embroidery, so it's a fantastic way to brush up on your hand sewing skills. Complete with full piecing instructions, this quilt pattern also features printable embroidery patterns, so that you can create a beautiful quilt without any stress. Treat yourself to the sweeter things in life with this free quilt pattern.
Click Here to Download the PDF Pattern!
This quilt finishes at a 64" x 64" square.
Fabrics Used in This Pattern
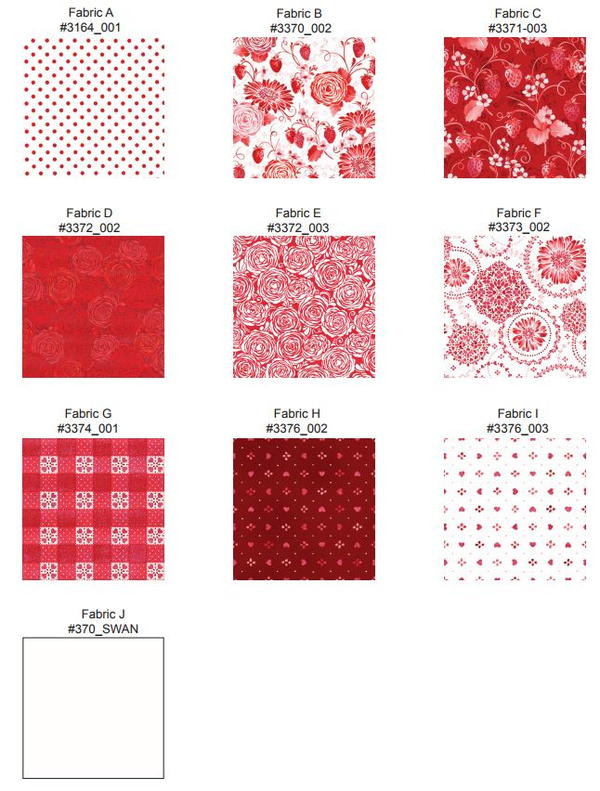
This quilt pattern features RJR's Sugar Berry collection. You can find the Sugar Berry collection here.
Yardage Requirements
(Sugar Berry collection)
- 1 fat eighth Fabric E: 3372_003
- 1 fat quarter each:
Fabric B: 3370-02
Fabric F: 3373_002
- 5/8 yard Fabric J: 370_SWAN
- 3/4 yard Fabric H: 3376-002
- 7/8 yard each:
Fabric C: 3371_003
Fabric G: 3374_001
- 1-1/8 yards each:
Fabric A: 3164_001
Fabric D: 3372_002
Fabric I: 3376_003
- 4 yards backing fabric
- 70” x 70” square of batting
- Red embroidery floss or perle cotton
- Embroidery hoop and needle
- Basic sewing supplies
Cutting Instructions
Note: All strips are cut across the width of the fabric (perpendicular to the selvages) unless noted otherwise. Seams are 1/4".
From Fabric A, cut:
Twenty-three 1-1/2" x WOF strips. Subcut eight strips into thirty-two 1-1/2" x 9-1/2" strips. Piece remaining strips short ends together and cut:
- Two 1-1/2" x 72-1/4" strips
- Two 1-1/2" x 59-1/2" strips
- Two 1-1/2" x 57-1/2" strips
- Two 1-1/2" x 52-1/4" strips
- Two 1-1/2" x 32-1/4" strips
- Two 1-1/2" x 12-1/4"strips
From Fabric B, cut: Two 9-1/2" squares.
From Fabric C, cut:
- One 5" x WOF strip; subcut four 5" squares.
- Seven 3" x WOF strips. Piece strips short ends together and cut two 3" x 64-1/2" strips and two 3" x 59-1/2" strips.
From Fabric D, cut:
- One 5" x WOF strip; subcut four 5" squares.
- One 3-1/8" x WOF strips; subcut thirty-two 3-1/8" squares.
- Eight 2-3/4" x WOF strips; subcut sixty-four 2-3/4" x 5" rectangles.
From Fabric E, cut: Four 5" squares.
From Fabric F, cut: Two 9-1/2" squares.
From Fabric G, cut: Two 14" x WOF strips; subcut three14" squares and two 7-1/4" squares. Cut each 14” square diagonally twice to yield twelve quarter-square triangles. Cut each 7-1/4" square diagonally once to yield four half-square triangles.
From Fabric H, cut:
- One 5" x WOF strip; subcut four 5" squares.
- Seven 2-1/2" x WOF strips for binding.
From Fabric I, cut:
- Ten 2-3/4" x WOF strips; subcut one hundred twenty-eight 2-3/4" squares.
- Three 3-1/8" x WOF strips; subcut thirty-two 3-1/8" squares.
From Fabric J, cut: Two 10" x WOF strips; subcut five 10" squares.
Making the Star Blocks
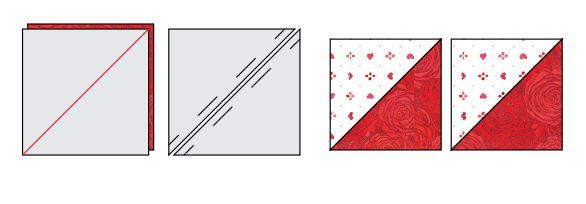
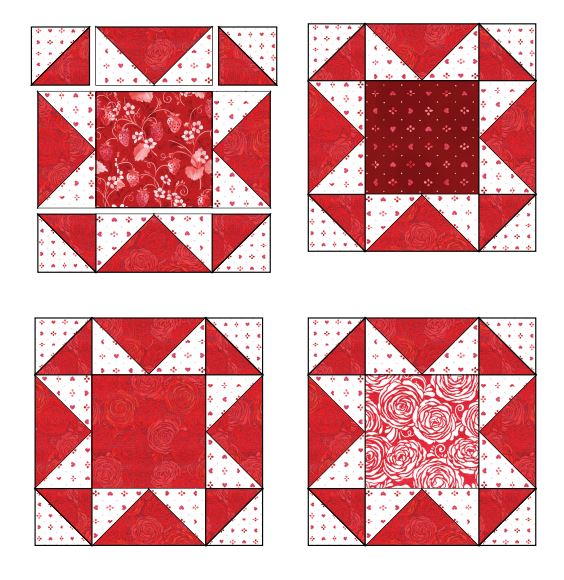
1. Draw a diagonal line on the back side of one 3-1/8" I square. Place right sides together with one 3-1/8"D square. Sew 1/4" to each side of drawn line. Cut apart on line. Repeat to create sixty-four half-square triangle units. Square to 2-3/4".
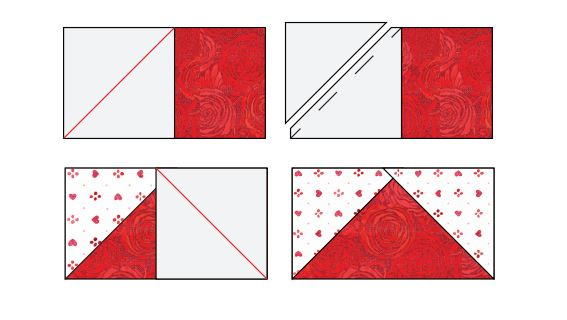
2. Draw a diagonal line on the back side of two 2-3/4" I squares. With right sides together, place one marked square at one end of one 2-3/4" x 5" D rectangle. Sew on the drawn line. Trim 1/4" away from stitching. Press seam toward resulting F triangle. Repeat for other end of rectangle. Repeat to create sixty-four flying-geese units. Square to 2-3/4" x 5".
3. Assemble one block using four half-square triangle units, four flying-geese units and one 5" center square. Sew units into rows; press. Sew rows together; press. Repeat to make sixteen Star Blocks: four each with 5-1/2" C, D, E and H center squares. Square to 9-1/2".
Making the Embroidery Blocks
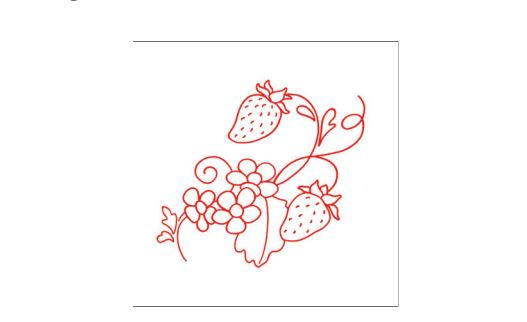
1. Using your preferred transfer method, center embroidery design on one 10" J square and transfer design. Stitch design using 2-3 strands of red embroidery floss or perle cotton.
2. Trim completed block to 9-1/2" square, keeping design centered. Make a total of five blocks (one of each design).
Note: All embroidery patterns can be found in the downloadable PDF at the top of this page.
Assembling Your Quilt
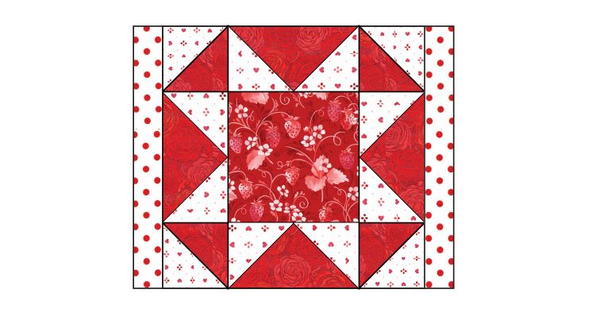
1. Sew one 1-1/2" x 9-1/2" A strip to opposite sides of one Star Block. Press toward the sashing strips. Repeat for each of the sixteen blocks.
2. Referring to the Quilt Assembly Diagram (located in the downloadable PDF), lay Star Blocks, embroidery blocks, alternate 9-1/2" squares, sashing strips and H setting triangles into correct placement.
3. Sew into diagonal rows and press toward the sashing strips. Sew rows together and continue to press toward sashing strips. Trim all four quilt sides to create straight edges, at least 1/4" past block points.
4. Sew one 1-1/2" x 57-1/2" A strip to opposite sides of the quilt center. Press toward the inner border strips. Sew one 1-1/2" x 59-1/2" A strip to the top and bottom of the quilt. Press toward inner border strips.
5. Sew one 3" x 59-1/2" C strip to opposite sides of the quilt. Press toward the outer border strips. Sew one 3" x 64-1/2" C strip to the top and bottom of the quilt. Press toward outer border strips.
Finishing Your Quilt
1. Prepare backing by pressing well to remove any creases.
2. Layer backing, batting and runner top. Baste and quilt as desired. Trim layers even with runner top squaring corners.
3. Prepare binding using 2 1/2" x WOF H strips. Sew binding to quilt using your preferred method.
What types of quilt patterns would you like to see on FaveQuilts? Let us know below in the comments!
Read NextHappy Glow Japanese Lantern Quilt

