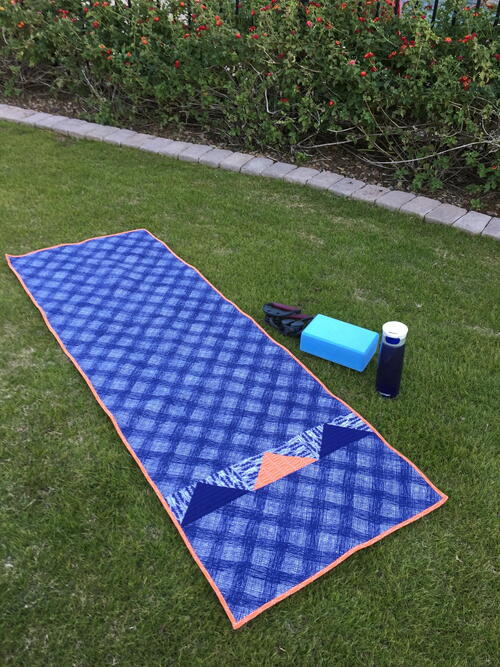
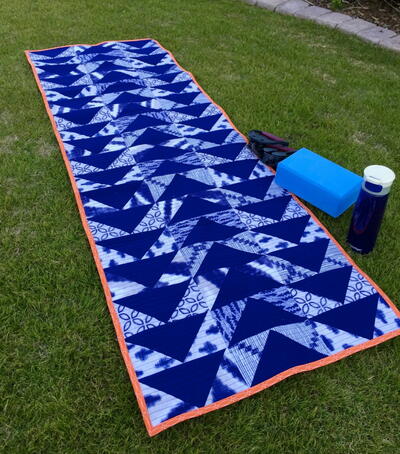
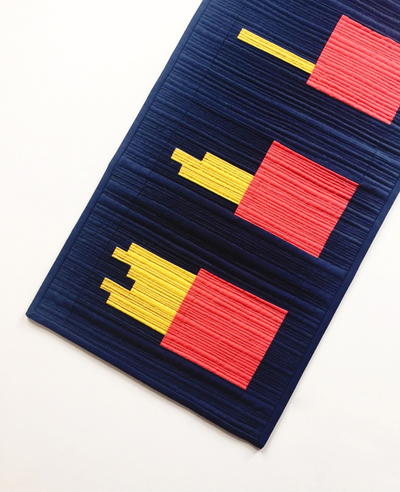
Zen Path Quilted Yoga Mat Pattern

As spring blossoms anew, it's the perfect time to embrace fresh quilting patterns and invigorate your creative spirit. To kick off the season, why not combine the tranquility of yoga with the artistry of quilting? Imagine rolling out a beautifully quilted yoga mat, each stitch a testament to your dedication to wellness and creativity. As you flow through your practice, surrounded by vibrant colors and soft, cushioned support, you'll feel inspired and rejuvenated. Whether you're a seasoned yogi or just beginning your journey, a quilted yoga mat adds an extra layer of comfort and motivation to your practice. So, as you welcome the arrival of spring, let this be the season where you nourish both body and soul, finding harmony and inspiration in every stitch of your quilted yoga mat pattern!

Materials List
-
Items:
- Fabric A – 1 1/8 yards solid (I used Michael Miller Cotton Couture in Midnight.)
- Fabrics B – 5 coordinating fat quarters (I used Indigo by Michael Miller.)
- Backing – 2 ½ yards backing fabric (I used a print from Indigo by Michael Miller.)
- Binding – ½ yard (I used a print from For You by Zen Chic.)
- Batting – 2 yards
- Coordinating thread
- Basic sewing and quilting supplies
-
Machine and accessories:
- MC15000
- 1/4 “ seam foot O
- AcuFeed Flex Dual Feed Foot
INSTRUCTIONS
Cutting:
Note: The cutting directions are for the no waste four at a time flying geese
From fabric A (solid):
- Cut 4 -‐ 9 ¼” strips along the width of fabric.
- Subcut the strips into 14 – 9 ¼” squares
From fabrics B (fat quarters):
- Cut 3 – 5” strips along the width of fabric (longest side) for each fat quarter
- Subcut the strips from each fat quarter into 4 – 5” squares for a total of 60 squares (Note: you will end up with 4 extra squares. I used them to create additional geese for the back.)
Piecing and quilting:
-
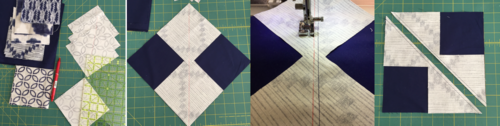
Draw a diagonal line across the back of the 5” squares.
-
Place two of the smaller squares on top of the larger squares as shown.
-
Stitch using a scant ¼” seam with the ¼” seam foot along either side of the diagonal line and cut apart on the center diagonal line.
-
Press the seams towards fabric B.
-
Place a 5” square on the geese unit as shown and stitch using a scant ¼” seam along either side of the diagonal line.
-
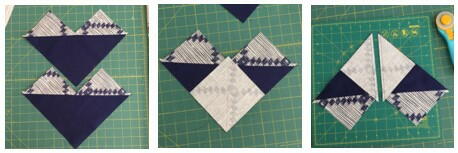
Cut along the center diagonal line and press towards fabric B.
-
Trim each flying geese unit to 4 ½ ” x 8 ½. (Note: you will end up with 2 extra flying geese units. I used them for the pieced back.)
-
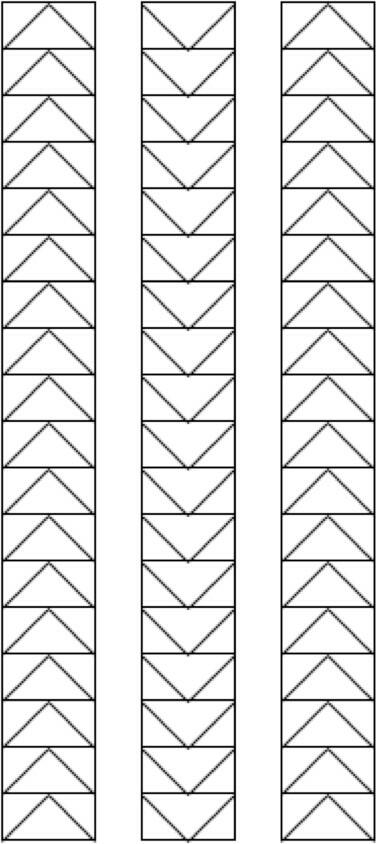
Lay out the blocks in a grid that has three blocks across and eighteen blocks down as shown in the diagram.
-
Stitch each column using a regular 1/4 “ seam, pressing towards the bottom of each flying geese unit.
-
Stitch the columns together using a regular ¼” seam. The seams will nest together for more accurate points.
-
Piece back as desired or if preferred use a whole piece for the back. I pieced three geese units together using leftover geese. Create a quilt sandwich and baste using your preferred method.
-
Quilt in horizontal lines ½” apart using the AcuFeed Flex Dual Feed Foot.
-
Attach binding using your preferred method.
-
Find a peaceful spot or your favorite class and find your zen!
-
Your project is finished! If you love this tutorial, be sure to check out Janome.com for even more inspiration.