Spooky Wreath Halloween Quilt
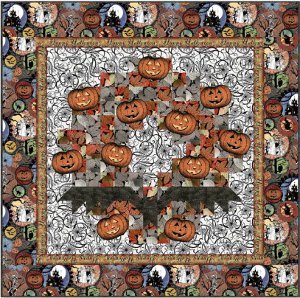
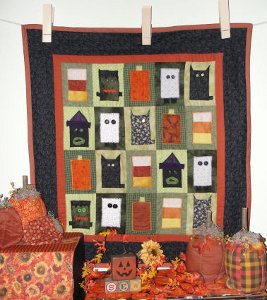
Your two favorite crafty decorations come together in this Spooky Wreath Halloween Quilt. This collage of Halloween fabrics functions as both a wreath and a wall hanging, all in one. Jack-o-lantern appliques on the wreath give it a haunting feel that's just right for All Hallows' Eve.
Project TypeMake a Project
Quilt Size40.5 inches wide x 40.5 inches long
Time to CompleteA week or two
Primary TechniquePieced

Note: This patterned was designed using fabrics from the Hallowgraphix collection by In The Beginning Fabrics. Fabrics are coded in materials list.
MATERIALS:
Note: Yardage requirements are based on 40" fabric width.
- 3/4 yd. Black/Tan Spider Web (5HG1) for wreath background and inner border
- 1/2 yd. Orange Leaves (3HG1) for wreath
- 1/2 yd. Taupe Leaves (3HG2) for wreath
- 1/2 yd. Jack-o-Lanterns (4HG1) for appliqué (Yardage is generous to allow for selective cutting.)
- 2/3 yd. Dark Brown Tonal (6HG3) for bat and binding
- 1 yd. Halloween Stripe (2HG1) for middle border
- 1-1/2 yds. Collage (1HG1) for outer border
- 2-7/8 yds. for backing (If you don’t prewash your fabric, and if you don’t mind working with a smaller-than-usual margin of backing fabric in your “quilt sandwich,” it’s possible to get the backing out of one length – rather than two – of 44-45"-wide fabric. In that case, you’ll need 1-3/8 yds. of backing fabric.)
INSTRUCTIONS:
Cutting:
From Black/Tan Spider Web, cut in order given:
- 4 strips, 1-3/4" x width of fabric, for wreath background
- 1 square, 6-1/2" x 6-1/2", for wreath background
- 4 rectangles, 4-1/2" x 6-1/2", for wreath background
- 8 rectangles, 2-1/2" x 4-1/2", for wreath background
- 8 squares, 2-1/2" x 2-1/2", for wreath background
- 2 squares, 2-7/8" x 2-7/8"; cut each square once diagonally to make 4 triangles for wreath background
From Orange Leaves, cut:
- 3 squares, 2-7/8" x 2-7/8"; cut each square once diagonally to make 6 triangles for wreath
- 44 squares, 2-1/2" x 2-1/2", for wreath
- 1 rectangle, 1-1/2" x 2-1/2", for wreath
From Taupe Leaves, cut:
- 1 square, 2-7/8" x 2-7/8"; cut square once diagonally to make 2 triangles for wreath
- 46 squares, 2-1/2" x 2-1/2", for wreath
From Jack-o-Lanterns, selectively cut:
- 11 Jack-o-Lanterns, for appliqué (If using fusible appliqué, follow instructions on your fusible product, and cut out Jack-o-Lanterns along edges of motifs. If using a traditional hand-appliqué technique, be sure to leave a 1/8"-1/4" seam allowance around each Jack-o- Lantern motif as you cut it out.)
From Dark Brown Tonal, cut in order given:
- 5 strips, 2-1/2" x width of fabric, for double-fold binding
- 6 squares, 2-7/8" x 2-7/8"; cut each square once diagonally to make 12 triangles for bat
- 2 rectangles, 2-1/2" x 8-1/2", for bat
- 1 square, 2-1/2" x 2-1/2", for bat
- 1 rectangle, 1-1/2" x 2-1/2", for bat
- 4 squares, 1-1/2" x 1-1/2", for bat
From Halloween Stripe, selectively cut:
- 4 strips, 1-3/4" x length of fabric, for middle border (Refer to quilt photograph to see portion of design that is needed for middle border, and selectively cut your border strips accordingly.)
From Collage, cut in order given:
- 2 strips, 5" x width of fabric, for outer border (top and bottom)
- 2 lengthwise strips, 5" x 33", for outer border (sides)
Quilt Top Assembly:
Note: All seams 1/4". Press seams in direction of arrows unless otherwise instructed.
-
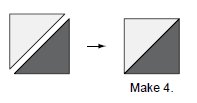
Sew a Black/Tan Spider Web triangle to a Dark Brown Tonal triangle. Press seam toward Dark Brown Tonal triangle. Repeat to make a total of 4 triangle units.
-
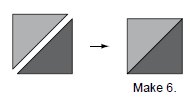
Sew an Orange Leaves triangle to a Dark Brown Tonal triangle. Press seam toward Dark Brown Tonal triangle. Repeat to make a total of 6 triangle units.
-
Sew a Taupe Leaves triangle to a Dark Brown Tonal triangle. Press seam toward Dark Brown Tonal triangle. Repeat to make a total of 2 triangle units.
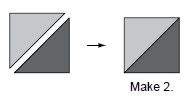
-
Using a pencil, draw a diagonal line, from corner to corner, on the wrong side of 4 Dark Brown Tonal 1-1/2" squares.

-
With right sides together, place one of the marked 1-1/2" squares on one bottom corner of an Orange Leaves 2-1/2" square. Sew on the drawn line. Trim as shown, leaving a 1/4" seam allowance. Press seam toward triangle. Repeat technique on adjacent bottom corner to complete a bat ear unit as shown.
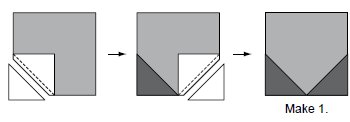
-
With right sides together, place one of the marked 1-1/2" squares on one side of an Orange Leaves 1-1/2" x 2-1/2" rectangle. Sew on the drawn line. Trim as shown, leaving a 1/4" seam allowance. Press seam toward triangle. Repeat technique on opposite end of rectangle to complete a bat feet unit as shown.

-
Sew the bat feet unit from Step 6 to a Dark Brown Tonal 1-1/2" x 2-1/2" rectangle as shown.
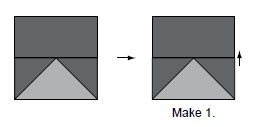
-
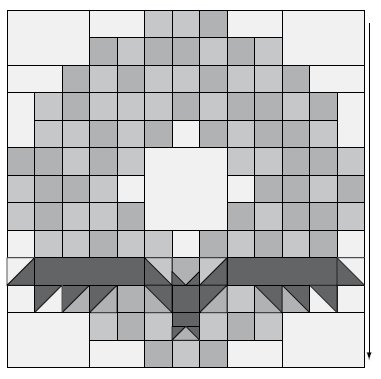
Referring to photo for placement, arrange all of the assorted-print 2-1/2" squares, all of the Black/ Tan Spider Web wreath background squares and rectangles, and all of the units made in Steps 1, 2, 3, 5, and 7 on a design wall or other flat surface. Work on one horizontal row at a time, and sew together all of the pieces in that row, as shown below. (In some areas, you’ll need to sew two or three shorter horizontal rows together, then add larger squares or rectangles to finish the section.) Press seams in opposite directions from row to row.
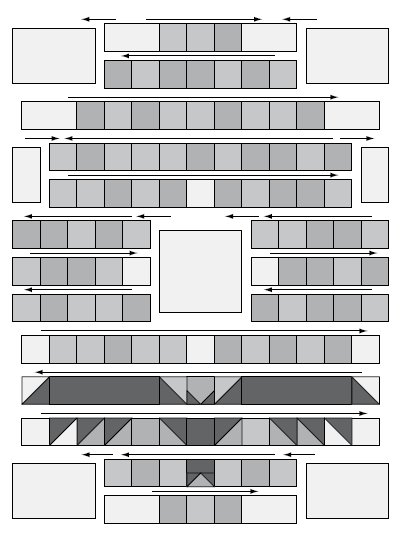
-
Sew horizontal rows together. Press all seams downward, toward bottom of quilt top.
-
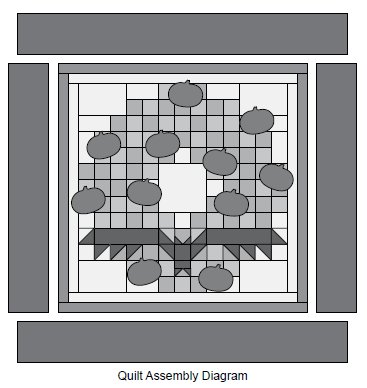
Measure length of quilt top through center. Trim 2 of the Black/Tan Spider Web 1-3/4"-wide strips to this measurement, and sew to sides of quilt as shown in the Quilt Assembly Diagram. Press seams toward strips.
- Measure width of quilt top, including strips just added, through center. Trim remaining 2 Black/Tan Spider Web 1-3/4"-wide strips to this measurement, and sew to top and bottom of quilt. Press seams toward strips.
Borders and Applique:
-
Measure length of quilt top through center. Trim 2 Halloween Stripe middle border strips to this measurement, and sew to sides of quilt. Press seams toward middle borders.
-
Measure width of quilt top, including borders just added, through center. Trim remaining 2 Halloween Stripe middle border strips to this measurement, and sew to top and bottom of quilt. Press seams toward middle borders.
-
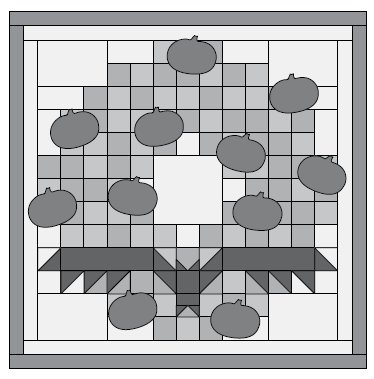
Arrange Jack-o-Lanterns on your quilt top as shown in the illustration at upper right. Using your favorite appliqué technique, appliqué each Jack-o-Lantern to the quilt top.
-
Measure length of quilt top through center. Trim 2 lengthwise Collage outer border strips to this measurement, and sew to sides of quilt. Press seams toward outer borders.
-
Measure width of quilt top, including borders just added, through center. Trim 2 widthwise Collage outer border strips to this measurement, and sew to top and bottom of quilt. Press seams toward outer borders.
Finishing:
Layer quilt top, batting, and backing. Quilt as desired. Bind. Don’t forget to sign and date your finished quilt.
Read NextJack O’Lantern Mini Quilt Pattern

