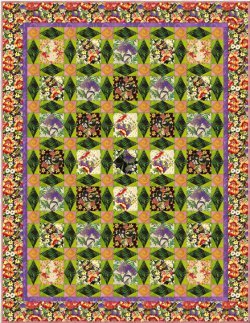
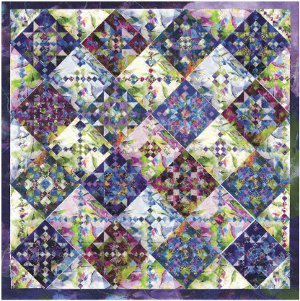
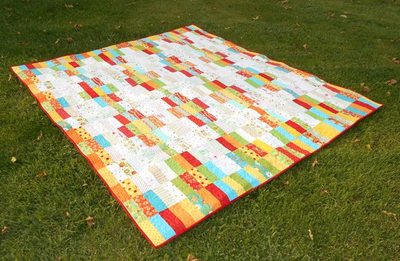
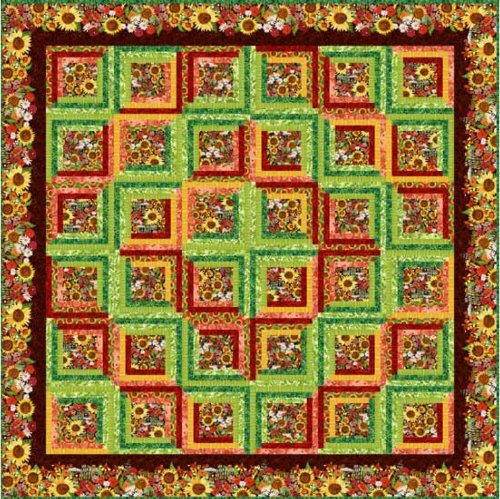
My Sunshine Log Cabin Quilt

The gorgeous My Sunshine Log Cabin Quilt is a log cabin quilt pattern with a barn raising setting in a beautiful large print floral fabric with prominent sunflowers. Make this full size bed quilt in blue and green or red and green color schemes. Putting illusions into your quilts can be easy just be placing your log quilt block patterns in a particular direction, you'll be able to bring out the real gem within this already very vibrant pattern. Bring sunshine into your home even when it's dark and dreary with a theme that will remind you of a summer garden quilts pattern.
Project TypeMake a Project
Quilt Size88.5 inches wide x 88.5 inches long
Time to CompleteA month or more
Primary TechniquePieced

Notes:
- A separate materials list is given for each of the two quilts (blue/green or red/green).
- Yardages are based on 40" fabric width
- Pattern uses fabrics from In The Beginning Fabrics. Fabrics are coded in materials list.
MATERIALS:
Blue/Green Quilt:
- 1-3/8 yds. Blue Large Floral (1KDA1) for blocks
- 1 yd. Blue Floral Tonal (4KDA1) for blocks
- 7/8 yd. Blue Daisies (3KDA1) for blocks
- 1 yd. Blue Stripe Tonal (7KDA1) for blocks
- 2/3 yd. Orange Stripe Tonal (7KDA2) for blocks
- 1-1/4 yds. Green Floral Tonal (4KDA3) for blocks
- 1-1/8 yds. Green Stripe Tonal (7KDA3) for blocks
- 2 yds. Green Dots Tonal (6KDA1) for blocks and binding
- 2-7/8 yds. Blue Floral Border Stripe (2KDA1) for border
- 8-1/2 yds. for backing
Red/Green Quilt:
- 1-3/8 yds. Red Large Floral (1KDA2) for blocks
- 1 yd. Red Floral Tonal (4KDA2) for blocks
- 7/8 yd. Red Daisies (3KDA2) for blocks
- 1 yd. Red Dot Tonal (6KDA2) for blocks
- 2/3 yd. Orange Stripe Tonal (7KDA2) for blocks
- 1-1/4 yds. Green Floral Tonal (4KDA3) for blocks
- 1-1/8 yds. Green Stripe Tonal (7KDA3) for blocks
- 2 yds. Green Dots Tonal (6KDA1) for blocks and binding
- 2-7/8 yds. Red Floral Border Stripe (2KDA2) for border
- 8-1/2 yds. for backing
INSTRUCTIONS:
Cutting:
Notes:
- One set of cutting instructions is given, and can be used for either of the quilts.
- Fabrics are cut in order given in Materials lists.
- Cut strips across width of fabric, unless otherwise instructed.
From Large Floral, cut:
- 36 squares, 6-1/2" x 6-1/2", for center of blocks
From Floral Tonal, cut:
- 18 strips, 1-1/2" x 40", for blocks
From Daisies, cut:
- 17 strips, 1-1/2" x 40", for blocks
From Blue Stripe Tonal (Blue Quilt) –OR– Red Dot Tonal (Red Quilt), cut:
- 19 strips, 1-1/2" x 40", for blocks
From Orange Stripe Tonal, cut:
- 12 strips, 1-1/2" x 40", for blocks
From Green Floral Tonal, cut:
- 23 strips, 1-1/2" x 40", for blocks
From Green Stripe Tonal, cut:
- 22 strips, 1-1/2" x 40", for blocks
From Green Dots Tonal, cut:
- 10 strips, 2-1/2" x 40", for double-fold binding
- 23 strips, 1-1/2" x 40", for blocks
From Floral Border Stripe, selectively cut:
- 4 strips, 8-1/2" x length of fabric, for border (Note: Selectively cut each border strip so that the design is the same in each strip, as shown in the photo. This will make the design match at the mitered corners.)
Block Assembly:
Notes:
- All seams 1/4". Press seams in direction of arrows unless otherwise instructed. Assembly instructions are the same for both quilts.
- Before starting to sew, divide 1-1/2"-wide strips into two stacks: one stack with green strips, and one stack with blue and orange strips (Blue Quilt) – OR – red and orange strips (Red Quilt). Refer oſten to photographs for fabric placement.
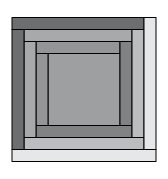
- With raw edges even and right sides together, position a Large Floral 6-1/2" square at one end of an assorted-print 1-1/2" x 40" strip (use a blue or orange strip if making the Blue Quilt – OR – a red or orange strip if making the Red Quilt). Stitch square to strip as shown, starting and stopping your stitching about 1/8" before and aſter the square. Using a ruler and rotary cutter, trim the strip edges even with the square. Press seams toward strip.
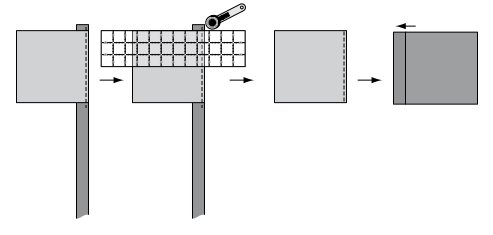
- Rotate the unit made in Step 1 as shown and, with right sides together, sew it to the same strip. Trim strip edges even with the square. Press seams toward strip.

- Rotate the unit again, and sew it to a green assortedprint 1-1/2" x 40" strip. Trim and press as on previous steps.
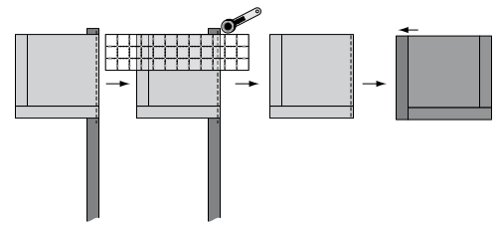
- Rotate the unit again, and sew it to the same strip used in Step 3. Trim and press.
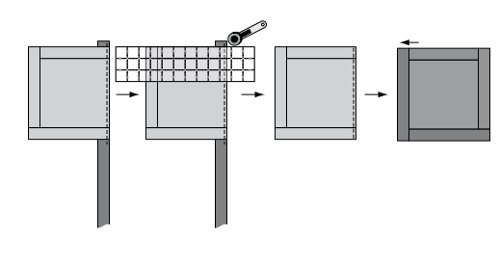
- Repeat Steps 3-4 until you have a total of 3 logs on each side of your center square as shown. (Again, please refer to the photos for fabric placement.) Continue to press seams away from center of block.
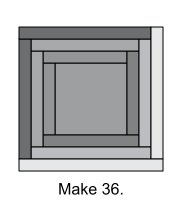
- Repeat Steps 1-5 to make a total of 36 blocks.
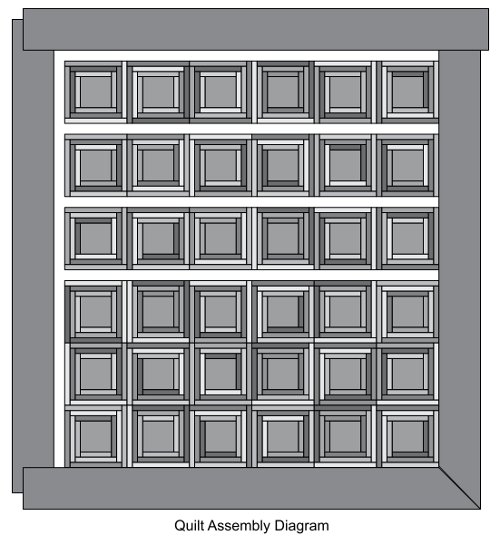
- Sew the blocks together in rows as shown in the Quilt Assembly Diagram on back page; press for opposing seams from row to row. Sew the rows together. Press seams in one direction.
Mitered Borders:
With right sides together (and making sure that the design is oriented correctly, with the tonal portion of the design at the inner border), pin border strips to sides of quilt top (border strips should extend approximately equally beyond top and bottom of quilt; it’s easiest if you start pinning at the center of border and work outward). Sew border strips to sides of quilt top, beginning and ending 1/4" from raw edges of quilt. Backstitch to secure. Press seams toward borders. Now pin and sew the top and bottom border to the quilt top; start and stop your seams at the point where the side borders join the quilt (1/4" from edges). Backstitch to secure. Press seams toward borders. Miter corners using your favorite technique.
Finishing:
Layer quilt top, batting, and backing. Quilt as desired. Bind. Don’t forget to sign and date your finished quilt.
There are even more patterns like this in our 15 Free Log Cabin Quilt Patterns collection.
Read NextMy Blue Heaven Bed Quilt
Your Recently Viewed Projects
Thanks for your comment. Don't forget to share!
Tammy
Feb 05, 2017
Looking at this quilt, I would never think it to be considered an easy pattern. I love, love, love this in the blue colors. I have always loved a blue and yellow combination in home decorating. Has anyone else made this and would you mind sharing a photo if you can? I am in love with this quilt!!
bellwether3 997707 1
Feb 26, 2016
This is a wonderful looking quilt. Love the dimension using florals.
leona194465 281218 8
May 04, 2013
Love these quilts, especially the blue sunflower one: Sunshine Log Cabin.
Quilted Heart
Mar 11, 2013
Beautiful quilt...how did you achieve the look where the flowers appears to be spilling over the edge of the border?
cementbirdbath 168 2286
Mar 01, 2013
very pretty quilt. love love the sunflowers in a log CABIN
Report Inappropriate Comment
Are you sure you would like to report this comment? It will be flagged for our moderators to take action.
Thank you for taking the time to improve the content on our site.