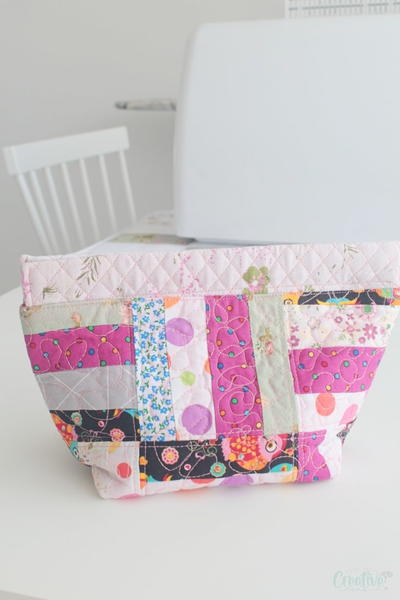
Fat Quarter Drawstring Bag

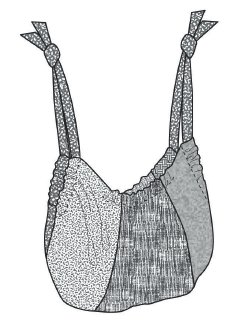
The Fat Quarter Drawstring Bag is the perfect project to make if you only have a few fat quarters left over from other fat quarter quilt patterns. This pretty patchwork quilt tote bag is extra roomy, and has an elastic opening that will keep all your belongings inside. This tote is so roomy that it works perfectly as an overnight bag, as well. It's one of the most popular free quilted bag patterns because it's extremely spacious, and the design is just the right size for constant carry. You'll have the most stylish bag around if you make this one-of-a-kind free patchwork quilt pattern.
Project TypeMake a Project
Time to CompleteIn an evening
Primary TechniquePieced

MATERIALS:
- 6 fat quarters
- 2-1/8 yds. 42" wide fabric for lining and handles
- 1/4 yd. 42" wide flannel for handles
- 22" of 1" wide non-roll elastic
INSTRUCTIONS:
Cutting:
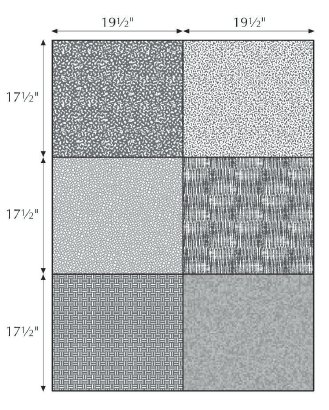
From each of the six fat quarters, cut:
- 1 rectangle, 17-1/2" x 19-1/2" (6 total)
From the lining fabric, cut:
- 1 rectangle, 38-1/2" x 51-1/2", for lining
- 4 strips, each 2-1/2" x 40", for handles. For longer handles, cut 8 strips.
From the flannel, cut:
- 2 strips, each 2-1/2" x 40". For longer handles, cut 4 strips.
Directions:
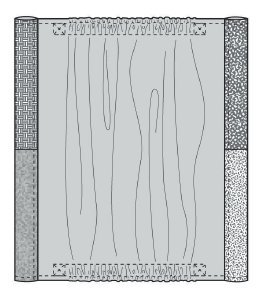
- Arrange the 6 fat quarter pieces as shown. Stitch or serge the pieces together. Press the seams to one side.
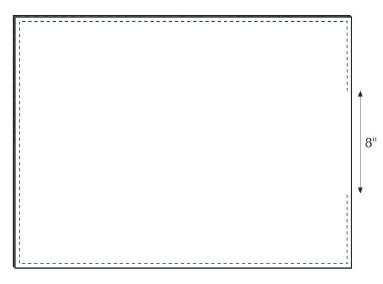
- Pin the lining and the joined fat quarters right sides together. Using a 1/4" seam allowance, stitch or serge around the edges. Leave an 8" opening near the center at one short end. Turn the bag right side out.
- To make the handles, place 2 lining strips right sides together and place a strip of flannel on top. Stitch or serge around 3 sides, leaving 1 short end open for turning. Turn the handles right sides out. Slipstitch the end of the handle closed. Topstitch 1/4" from the edge all around both handles.

Note: To make longer handles, join 2 strips of fabric end to end to make 1 long strip. Make 4 long strips. Repeat with pairs of flannel strips. Follow the directions in step 3 to make the handles.
- Press around the edge of the bag. Topstitch along the edge, beginning at the opening and ending at the other side of the opening. Do not stitch across the opening.
Tip: It helps to pin the pressed edges before you topstitch. The pins hold the layers firmly in place as you sew.
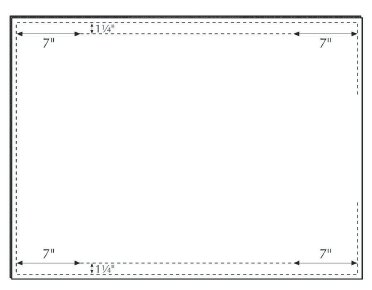
- To make casings for the elastic, measure 7" from the short ends of the bag on both long edges and mark. Stitch from point to point, 1-1/4" from the topstitching.
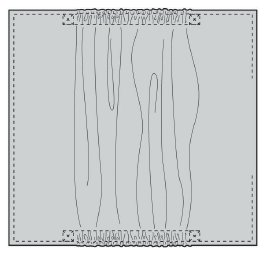
- Cut the elastic in half to yield 2 pieces, each 11" long. Working through the 8" opening, insert the elastic into both casings. Pin securely at both ends. Secure the ends of the elastic by stitching an X in a 1" square.
- Slipstitch the open end of the bag closed. Continue topstitching across the 8" span.
- To make the casing for the handles, fold 2" of both short ends toward the lining. Topstitch along the existing topstitching and 1/4" from the fold.
- Insert a handle into each casing. Holding handle pairs together, tie the ends in a knot.
 Be sure to check out our other 14 Fabulous Fat Quarter Patterns for more great fat quarter patterns that we know you'll love!
Read NextSimple Zippered Pouch
Your Recently Viewed Projects
Thanks for your comment. Don't forget to share!
rsrj317 1632981
Mar 24, 2018
It looks really cool. My grandaughters will love them. I have time to make for christmas
Mamexmas 6550193
Feb 01, 2017
After inserting handles into their channels, is there more to making it? Such as sewing up the sides between handle channels on each side? Or something?
tuckermagoo 335523 9
Apr 08, 2016
Have been wanting to make one of these for a while. It's nearly impossible to feed the elastic through according to the instructions. As one other person stated here, you have to cut a slit at one end of the lining at the end of the casing and feed it through with a safety pin. Otherwise it's a great bag. Yes very big but I intend to give it to my daughter to use when she goes to the beach and it'll hold a lot of stuff.
sewwhatbymaria
Mar 16, 2015
way tooo big, plus the instructions for the placement of the elastic was omitted. I cut a slit into the lining and slipped the elastic into that spot. I will make much smaller next time, if I put anything into the originial size, it will be tooooo heavy to carry
kw1lts
Dec 02, 2014
Very easy bag to make but MUCH bigger than I expected. I added pockets to the lining. Will downsize and use layer cakes to make others.
karenquilts 166697 5
Jan 22, 2014
I have made 4 of these and my daughter and nieces just LOVE it. It's perfect for laundry, clearing stuff off the floor when company is coming, using as a tote when shopping. I planned to make one for myself to use for taking quilts to show and tell, but as fast as I can make them, I give them away!
nicoleburgoz 30754 20
Nov 20, 2013
Just finished mine. Thanks a million for the pattern, love it! ( I changed things a bit, due to working with Leftovers and limited options, but it worked nonetheless :-) )
grandmak7 8759917
Aug 23, 2013
I hate to be rude, but this is just about the most unattractive bag pattern I have ever seen! I cannot believe someone would actually want to make this. sorry, I just had to speak my mind. Karen
white3 6756676
Aug 21, 2013
This is a great pattern! I have made three thus far, and they are fabulous. Thanks so very much for sharing. The best, Gail
gregneff 3072092
Jul 03, 2013
Hi there, Just finished this bag and it turned out really well. I am using it for a travel bag for short weekend flights. Thank!
Cchonbabe
Jun 07, 2013
I made one and used half (10 x 18) of the six fat quarters came out a perfect puse size.
arlebeckhusen 1814 825
May 08, 2013
This seems simple. I am doing a class project,as teacher helper.
dyaquash 9007193
Apr 28, 2013
Wow! I want to make one for my daughter and I. We would love it's size. :)
bfairless 0231491
Oct 22, 2012
I'm always on the lookout for simple bags I can use for shopping bags. I like this for that.
desmad 1299403
Jul 30, 2012
I made this delightful bag out of a quilting publication that slips my mind. I like it but it is so big that when it is filled it is too heavy to carry easily. I would like to have directions for making it about one third to half the size, then it would work for children to use as an overnighter as suggested by the designer who I think is from Washinton state.
winterchild 032425 8
Sep 17, 2012
I think if you cut the rectangles 9x10 inches and the lining accordingly then this would effectively half the size of the bag. Thanks for your helpful comment!
Report Inappropriate Comment
Are you sure you would like to report this comment? It will be flagged for our moderators to take action.
Thank you for taking the time to improve the content on our site.