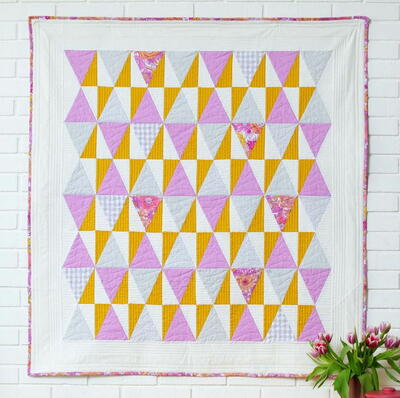
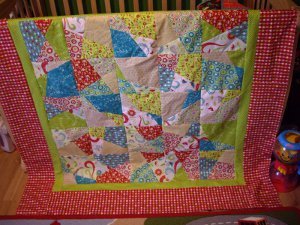
Tudor Bouquet Throw

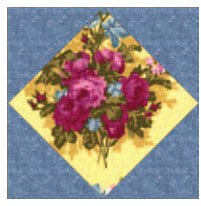
The Tudor Bouquet Throw is for quilters who love flower quilt patterns! Alternating fussy cut blocks show bouquets of flowers, while a floral border frames the whole quilt. You can choose from two color schemes to make this quilt scrappy or more subdued.
Project TypeMake a Project
Quilt Size57 inches wide x 57 inches long
Time to CompleteA week or two
Primary TechniquePieced

Notes:
- This pattern uses fabrics from Lecien. Fabrics are coded in materials list.
- All seams are ¼” unless otherwise stated.
- Instructions assume 42” of useable fabric.
- Arrows denote pressing directions.
MATERIALS (Scrappy Version):
- Caroline (for appliqué) - Fat eighth of each
30314-30
30314-60
30314-61
30314-70
30314-71

- Diana (for appliqué) - Fat eighth of each
30313-20
30313-50
30313-70

- Grace (for appliqué) - Fat eighth of each
30311-20
30311-51
30311-50
30311-71

- Mary (for appliqué) - Fat eighth of each
30312-20
30312-50
30312-60

- Kate (for appliqué) - Fat eighth of each
30315-21
30315-50
30315-70

- Kate (for appliqué background)
5/8 yard 30315-10
1 yard 30315-11

- Elizabeth (for center bouquets)
2 yards 30309-50

- Mary (for bouquet corners)
1-1/8 yards 30312-7

- Caroline (for inner border & binding)
3/4 yard 30312-70

- Catherine (for outer border)
7/8 yard 30312-70

MATERIALS (Second Version):
- Caroline (for 1st border, binding & appliqué)
3/4 yard 30314-71
1-1/4 yards 30314-60

- Kate (for appliqué background)
1-3/8 yards 30315-11

- Elizabeth (for center bouquets)
1-1/4 yards 30309-70

- Mary (for bouquet corners)
1-1/4 yards 30312-50

- Catherine (for outer border)
7/8 yard 30310-70

INSTRUCTIONS:
Cutting Instructions:
- Center Bouquets: Cut (18) 8-1/2” squares (I fussy cut my bouquets)
- Bouquet Corners: Cut (8) 4-1/2” strips; cut into (72) 4-1/2” squares. Draw a diagonal line from corner to corner on wrong side of squares.
- Appliqué Background: Cut (8) 8-1/2” squares from 30315-10 and (10) 8-1/2” squares from 30315-11 for scrappy version. For second version cut (18) 8-1/2” squares from 30315-11.
- Inner Border: Cut (5) 1” strips; piece together end to end.
- Outer Border: Cut (6) 4-1/2” strips; piece together end to end.
- Binding: Cut (6) 2-1/4” strips; piece together end to end.
Piecing Instructions:
- Following diagram and with right sides together, line up (2) 4-1/2” bouquet corner squares with an 8-1/2” center bouquet square. Sew diagonally across corner squares from corner to corner. Press following arrows in diagram. Trim middle layer if desired.
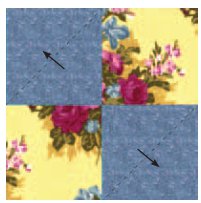
- Repeat with (2) more bouquet corner squares as shown in diagram.
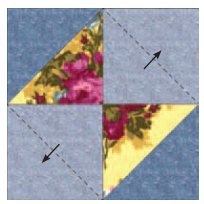
- Repeat for a total of (18) Bouquet Squares.
Applique Instructions:
Using template, appliqué petal shapes onto 18 background squares. I prepped my shapes with the starch method and then machine appliquéd the shapes using a small buttonhole stitch and silk thread.
Quilt Assembly:
- Using the picture on the first page, assemble blocks into rows, pressing seams towards appliqué blocks.
- Stitch rows together pressing seams in the same direction.
Borders:
- Measure through the center of your quilt top from the top to the bottom and cut two inner border lengths to that measurement. Pin side borders in place, matching centers and easing if necessary, to the sides of your quilt top. Sew and press toward border.
- Measure through the center of your quilt top from side to side and cut two inner border lengths to that measurement. Pin top and bottom borders in place, matching centers and easing if necessary, to the top and bottom of your quilt top. Sew and press toward border.
- Repeat above procedure for outer borders.
Quilting:
Layer, baste and quilt as desired. Attach binding using your favorite method.
Read NextTo the Point Quilt Pattern
Your Recently Viewed Projects
Thanks for your comment. Don't forget to share!
ffpaws
Oct 19, 2013
This is very gorgeous! I would love to make this one day when I am feeling much better :o) Sincerely, Karen M. Roth
Report Inappropriate Comment
Are you sure you would like to report this comment? It will be flagged for our moderators to take action.
Thank you for taking the time to improve the content on our site.