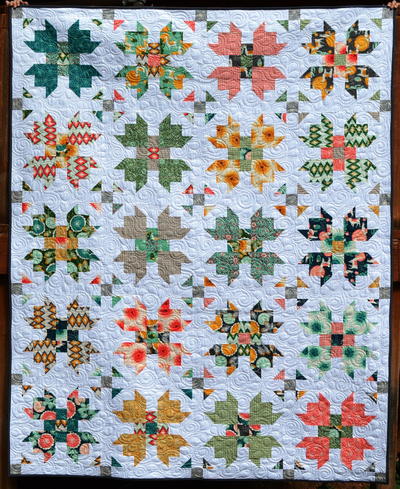
Morning Frost Quilt Pattern

Get the most out of the long winter months with a free PDF pattern for Morning Frost! Is winter your favorite season? Do you love waking up to see a layer of frost or snow blanketing your neighborhood? Then this quilt pattern is perfect for you!
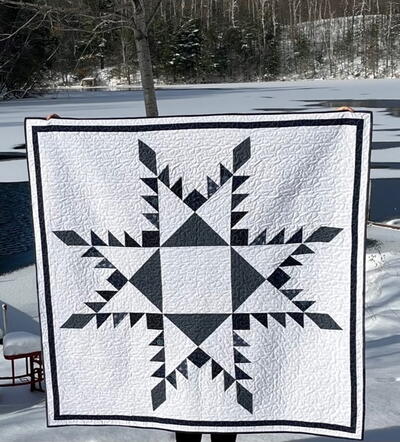
From the Designer: "The Morning Frost feathered star quilt makes a great lap quilt or larger wall hanging. It also looks lovely draped over the back of a couch or chair or hung on the rails of a ladder to add coziness to your winter décor! The finished size of the quilt is 56" x 56". If you'd like a larger quilt you can increase the size of the borders, adjust size of backing and batting accordingly."
Find more pretty patterns from our friend Bonnie over at her blog, Lakegirlquilts.
Click Here to Download the PDF Pattern!
Join Our 100,000+ Fans And Sign Up to Receive Your FREE eNewsletter!
Fabric Requirements
- White Fabric: 2 3/4 yards
- Blue Fabric: 1 1/4 yards total (I used a variety of dark blue prints)
- Batting: Twin Size (72" x 90")
- Backing Fabric: 4 yards
Cutting Directions
- Blue Fabric: Cut 8 – 3 3/8" x 3 3/8"; 2 – 1 1/2" x 50 1/2"; 2 – 1 1/2" x 52 1/2"; 5 – 8" x 8"; 1 – 12 3/4" x 12 3/4" cut into fourths diagonally to form 4 triangles; and 8 diamonds from template.

Making 8-at-a-Time Half Square Triangle (HST) Units
Using a washable marking pen and a straight edge draw diagonal lines corner to corner on the wrong side of the 8" white squares.
Place a white 8" square right sides together (RST) with a blue 8" square. With the diagonal lines facing up, sew 1/4" on each side of both lines.
Measure 4" in from side over and 4" from top down and cut into 4 – 4" squares. Then cut along drawn lines to separate into 8 HST. Press seams toward blue fabric.
Trim each to measure 3 3/8" x 3 3/8".
Repeat for other 8" white and blue pieces to make a total of 40 – 3 3/8" HST.

Sew Four Corner Units
Each corner unit is made from 1 – 3 3/8" blue square, 6 HST, 2 – 3 3/4" white triangle pieces, 2 blue diamonds, and 1 – 15 7/8" blue square.
Side Column – Following layout on diagram below sew together 3 HST, then sew white triangle on the top HST and the diamond onto the top of the triangle. Sew the side column onto the left side of the large white square. Press seam toward blue fabric.
Bottom Row – Following layout on diagram below sew 3 HST together. Sew the blue square onto the left side and sew white triangle onto the right side. Sew the diamond to the white triangle. Sew the bottom row onto the bottom of the large white square corner to finish the corner unit. Press the column and row seams toward white square. Repeat for the other 3 corner units.
Sew Four Center Units
Each center unit is made from 1 – 12 3/4" blue triangle piece, 2 – 12 3/4" white triangle pieces, 1 – 3 3/8" blue square, 4 HST, and 2 – 3 3/4" white triangle pieces.
- Following layout on diagram below sew 2 HST together. Sew the blue square onto the left side and sew small white triangle onto the right side. Sew this section onto the side of a large white triangle. Press toward white fabric.
- Following layout shown here sew other two HST together and sew small white triangle onto the bottom. Sew this section to the side of the blue square so it extends like a "tail". Press toward blue fabric.
- RST sew the blue and the other large white triangles together to form the bottom left part of the center unit. Press toward white fabric. RST sew the blue and the other large white triangles together to form the bottom left part of the center unit. Press toward white fabric.
- Repeat these steps to make the other 3 center units.
Sew Three Rows
You will need to indicate where the 1/4" seam allowance meets at the 90-degree corners of the four 18 7/8" white triangles.
To form the TOP ROW sew the center unit to each side of a corner unit RST following the layout shown below. Press seams toward corner units.
Then take a large white triangle with the dot in the corner and pin it to the left corner unit/center unit with RST. Sew along the left edge until you come up to the dot at the corner. STOP stitching just before you reach the dot and back stitch a few stitches.
Remove the row from the machine and pin the other side of the white triangle to the right corner unit/center unit. Start sewing from dot along the right edge, backstitching a few stitches when you begin sewing at the dot. Press seams toward white triangle.
Repeat these steps to sew together the BOTTOM ROW. Rotate BOTTOM ROW so it faces in the correct layout position as shown below.
Sew a center unit to the left and right sides of the 12" white square. Press seams toward white square
RST sew the TOP ROW to the CENTER ROW, then sew the BOTTOM ROW to the other side of the CENTER ROW. Press seams open.
Then take a large white triangle with the dot in the corner and pin it to the top left side of the CENTER ROW and the blue triangle of the TOP ROW. Sew along the edge until you come up to the dot at the corner. STOP stitching just before you reach the dot and back stitch a few stitches.
Remove the row from the machine and pin the other side of the white triangle to the bottom left side of the CENTER ROW. Start sewing from dot along the edge to the outside of the blue diamond on the BOTTOM ROW, backstitching a few stitches when you begin sewing at the dot. Press seams toward white triangle.
Repeat these steps to sew the other white triangle to the right side of the CENTER ROW.

Sew on the Borders to Finish Quilt Top
Sew the 1 1/2" x 48 1/2" white strips to each side of the quilt top. Sew the 1 1/2" x 50 1/2" white strips to the top and bottom. Press seams outward.
Sew the 1 1/2" x 50 1/2" blue strips to each side of the white border. Sew the 1 1/2" x 52 1/2" blue strips to the top and bottom. Press seams outward.
Sew the 1 1/2" x 52 1/2" white strips to the sides of the blue border. Sew the 1 1/2" x 54 1/2" white strips to the top and bottom. Press seams outward.
Prepare Backing and Batting
Cut 4 yards of backing fabric into 2 – 2 yard pieces. Trim off bias edges. RST sew these two pieces together along the long side. Press seam open. Keep the seam in the middle (it will run vertical down the middle of the quilt back) and trim this big piece to measure 63" x 63". Also trim batting to 63" x 63". Both backing and batting should extend 4" all around the outside edges of the quilt top

Finish Quilt
Baste, quilt, and bind layers of the quilt together using your favorite machine quilting design. Finish off with a label on the back. Finished size of the quilt is 56" x 56". If you'd like a larger quilt you can increase the size of the borders, adjust size of backing and batting accordingly. The "Morning Frost" feathered star quilt makes a great lap quilt or larger wall hanging. It also looks lovely draped over the back of a couch or chair or hung on the rails of a ladder to add coziness to your winter décor!
What's your favorite season to quilt for?
Read NextEasy as Pie Stash Quilt