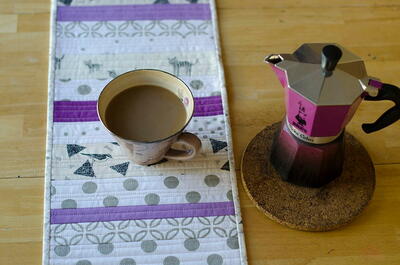
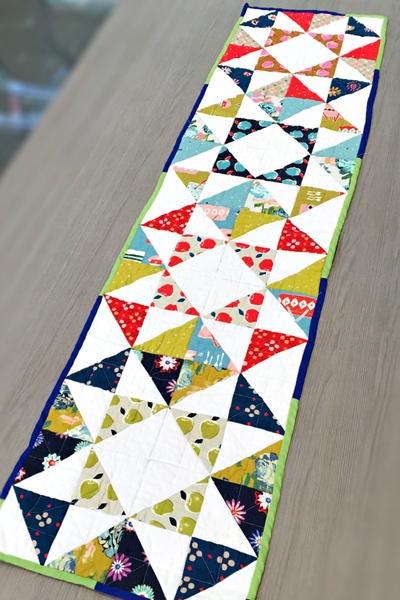
QAYG Winter Table Runner

This wonderful table runner is quick and easy to make. It relies on the popular “quilt-as- you-go” method which means that you piece and quilt your project in one step. A great method for making gifts for family and friends or add a holiday vibe to your home.
Hint: This is also a fabulous way to make placemats. Make your background fabric and batting about 15” x 21”, trim to 14” x 20” after piecing and quilting, bind and voila! A beautiful placemat.
The project dimensions are flexible. For the sample projects, Felicia started out with 12” wide backing and batting sandwich, then trimmed it to 10” after sewing. The table runner is 80” long. Look at the size of your table to determine how wide and long your project should be. For learning purposes, it may be best to stick with a shorter table runner about 30-40” long.
(The exact amounts will depend on the size of your project. The measures given here assume a table runner 10” x 40”.)
Materials List
- 1/2 yard of backing fabric
- Thin batting the size of your backing piece (Felicia used Quilter’s Dream Select)
- Variety of quilting cottons in coordinating colors (fat quarters and large scraps are fine)
- Thread to coordinate with your fabrics (contrasting thread can be really cool here)
- 1/3 yard of fabric for binding
-
Basting spray
-
Equipment:
- Sewing machine
- Walking foot (Felicia recommends Janome foot VD, OD or AD)
- Rotary cutting tools
- Ironing station
Directions:
-
Cut your backing fabric and batting 2” wider and longer than you want your finished table runner to be.
-
Lay the backing fabric, right side down, on a non-carpet floor or table top and lightly spray it with basting spray. Starting from the center, lay down the batting on the sprayed surface and smooth it outwards towards the edges. This is the quilt sandwich on which you will be piecing the top of the table runner.
-
With a pen and rotary cutting ruler, mark a few vertical lines on the batting a few inches apart. These are not sewing lines, but as your project progresses they are a nice visual cue that you are piecing your fabric strips vertically onto the sandwich and that they are not starting to tilt in one direction.
-
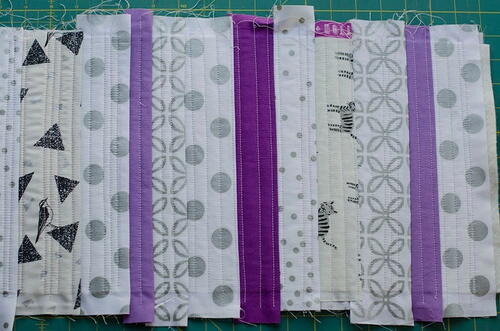
From your selected fabrics, cut a variety of fabric strips the same length as your table runner width. If your table runner sandwich is 12” x 42”, your fabric strips are going to be 12” long. Cut them in a few different widths for variety. The sample projects shown here used widths between 2” and 3 1/2”. The amount of fabric strips will depend on how wide they are and how long your table runner is. Start with a few of each color and cut more if you run out. In the photos that follow, you can see that Felicia used many strips that were longer than 12”. They were leftovers from a previous project and will be trimmed down when the quilting and piecing is complete.
-
Attach a walking foot to your sewing machine. Felicia used the Janome AD foot for the sample projects. Set your straight stitch to about 2-2.5, depending on preference.
-
Pick your first fabric strips and layer them right sides together. Lay them on top of the backing-batting sandwich, visually align them to the vertical lines you drew and piece them together onto the backing-batting sandwich. (If the walking foot doesn’t have a 1/4” seam allowance marked on it, that is fine. Pick some other marker on the foot to use as a guide instead. It will have no impact on the project if the seam allowances are a bit larger than 1/4”.).
-
Press open the seam. It is not always necessary to use an iron for this step. Many fabrics will finger open press quite nicely. If you feel that your seams are opening nicely and laying pretty flat, feel free to skip the iron.
-
Quilt straight vertical lines onto both fabric pieces. (Play with varying the spacing between the quilt lines for fun effects.).
-
Add the 3rd fabric piece by placing it face down edge-to-edge with the second piece. Piece it down on top of your sandwich as you did in step 6. Press the seam open and add quilting lines as in steps 7 and 8. Repeat until you reach the end of the sandwich.
-
On the rotary mat, carefully line up the table runner and trim each side down to the desired size. It is easiest to trim the long side first and do the ends last.
-
Bind the table runner using your favorite binding technique. The sample project was bound with double-folded binding from 2 1/2” strips.
-
Your project is finished! If you love this tutorial, be sure to check out Janome.com for even more inspiration.
Read NextElegant French Lilacs Table Runner