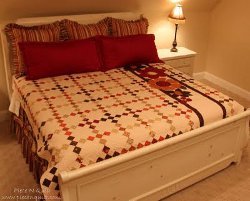
Blazing Stars Quilt

This rustic king quilt pattern will give your master bedroom a Western feel, with its lone star quilt blocks, brown and gold colors, and floral prints. As a bedspread, the Blazing Stars Quilt is the perfect centerpiece to a room. Each of the star quilt blocks you make for this pattern are impressive and intricate, making this star quilt pattern a real challenge. Free bed quilt patterns like this look just as expensive and high-quality as anything you'd find in a home decor store.
Project TypeMake a Project
Quilt Size108 inches wide x 108 inches long
Time to CompleteA month or more
Primary TechniquePieced

Note: This quilt is designed using RJR fabrics from the Cabin Fever collection from Celebrating Style. Fabrics are coded in materials list.
TIPS:
- Precision cutting and an accurate 1/4" seam are essential to the success of this quilt.
- Use “measure as you sew” when piecing sections – this will insure that the finished pieces fit together. Adjust seam if necessary.
- There are many bias seams, therefore finger pressing is recommended until whole sections are completed.
- Use a dry iron to avoid stretching seams. Only use steam for blocking sections if needed. Press on a grid to insure accurate sizing and angles.
- For the half-square triangles – instructions call for cutting individual triangles; you can use your favorite method for piecing (triangle paper, triangles on a roll, etc.) or cut strips slightly bigger and trim to size.
- Please refer to the Fabric Requirements chart on the back before beginning.
 MATERIALS:
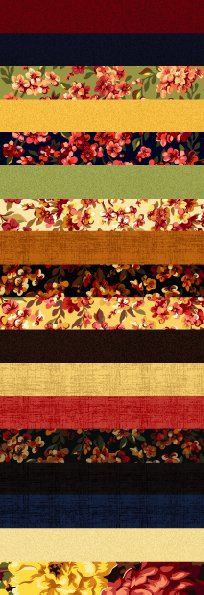
Note: Swatches at right show Fabrics A - R in alphabetical order.
- 1-1/2 yds. Fabric A (5325-4) for lone star, small stars, and border
- 2/3 yd. Fabric B (5325-3) for lone star, small star
- 5/8 yd. Fabric C (5320-3) for lone star, small star
- 2/3 yd. Fabric D (5325-2) for lone star
- 7/8 yd. Fabric E (5320-5) for lone star, small star
- 3/4 yd. Fabric F (5325-6) for lone star, small star
- 3/4 yd. Fabric G (5320-1) for lone star, small star
- 1-5/8 yd. Fabric H (5324-5) for lone star, small star, and border
- 3 yds. Fabric I (5320-2) for lone star, small star, border, and binding
- 3/4 yds. Fabric J (5320-4) for lone star, small star
- 1/2 yd. Fabric K (5325-5) for small star, border
- 1/4 yd. Fabric L (5324-2) for small star
- 1/4 yd. Fabric M (5324-4) for small star
- 1/4 yd. Fabric N (5320-6) for small star
- 1/2 yd. Fabric O (5324-6) for small star, border
- 1/4 yd. Fabric P (5324-3) for small star
- 3-1/8 yd. Fabric Q (5325-1) for background small stars and border
- 3-7/8 yd. Fabric R (5319-1) for background small stars and border
INSTRUCTIONS:
Cutting Directions:
LONE STAR (trim the width of each fabric to 30"):
- A – Cut section 25" x 30"; cut (12) 2" x 30" strips
- B – Cut section 21" x 30"; cut (10) 2" x 30" strips
- C – Cut section 17" x 30"; cut (8) 2" x 30" strips
- D – Cut section 21" x 30"; cut (10) 2" x 30" strips
- E – Cut section 25" x 30"; cut (12) 2" x 30" strips
- F – Cut section 21" x 30"; cut (10) 2" x 30" strips
- G – Cut section 15" x 30"; cut (7) 2" x 30" strips
- H – Cut section 21" x 30"; cut (10) 2" x 30" strips
- I – Cut section 25" x 30"; cut (12) 2" x 30" strips
- J – Cut section 19" x 30"; cut (9) 2" x 30" strips
SMALL STARS Cut the following fabrics into strips as indicated. WOF=width of fabric. When cutting strips in half, cut crosswise, to measure 1-3/4" x 1/2 WOF.
- A – (8) 1-3/4" x WOF
- E – (2) 1-3/4" x WOF
- G – (4) 1-3/4" x WOF (cut two strips in half)
- I – (3) 1-3/4" x WOF (cut one strip in half)
- K – (2) 1-3/4" x WOF (cut one strip in half)
- M – (2) 1-3/4" x WOF (cut one strip in half)
- N – (2) 1-3/4" x WOF (cut one strip in half)
- O – (2) 1-3/4" x WOF (cut one strip in half)
- C – (2) 1-3/4" x WOF (cut one strip in half)
- F – (2) 1-3/4" x WOF (cut one strip in half)
- H – (2) 1-3/4" x WOF (cut one strip in half)
- J – (2) 1-3/4" x WOF (cut one strip in half)
- L – (2) 1-3/4" x WOF (cut one strip in half)
- P – (3) 1-3/4" x WOF (cut one strip in half)
- Q – (7) 8" strips; cut into (32) 8" squares
- (3) 12-1/2" strips; cut into (8) 12-1/2" squares then (32)
- quarter-square triangles.
BORDER
- A, O & K – (4) 2-7/8" strips each; cut each color into (47) 2-1/2" squares then (94) half-square triangles
- H – (10) 2-7/8" strips; cut into (120) 2-7/8" squares then (240) half-square triangles
- I – (3) 12-5/8" strips; cut into (8) 12-5/8" squares, then (32) quarter-square triangles
- (1) 9-3/4" strip; cut into (2) 9-3/4" squares, then (4) half-square triangles
- (11) 2-1/4" strips for binding
- Q – (2) 9-3/4" strips; cut into (8) 9-3/4" squares, then (32) quarter-square triangles
- R – These are large sections for the background surrounding the lone star and small
Sewing Directions:
LONE STAR
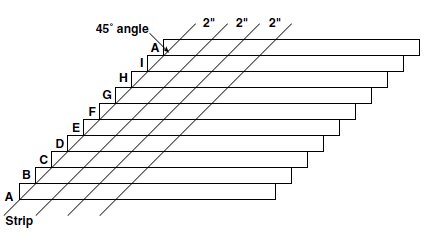
Make (10) strip sets, each containing (10) strips. Sew the strips together as shown in Illustration #1, offsetting each strip by 11/2" and following the chart order. Press the seam allowances open.
Strip sequence for sets:
- Set 1: ABCDEFGHIA
- Set 2: BCDEFGHIAJ
- Set 3: CDEFGHIAJB
- Set 4: DEFGHIAJBE
- Set 5: EFGHIAJBED
- Set 6: FGHIAJBEDC
- Set 7: GHIAJBEDCF
- Set 8: HIAJBEDCF I
- Set 9: IAJBEDCF IH
- Set 10: AJBEDCF IHA
- Trim the strip sets at a 45° angle to even out the staggered edge. Use the 45° line on your ruler to keep the angle true and frequently check for 45° alignment to ensure perfect diamonds. Continue cutting every 2" for a total of (8) segments (one for each star point).
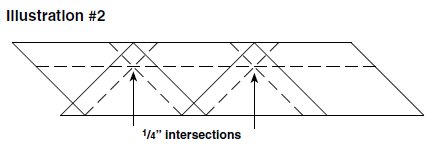
- Use one segment from each of the (10) strips sets to make a lone star point. Align the seams (remember, they will not match like in straight seams) and pin at each seam intersection. Use a 1/4" gauge to see where the intersections will cross. (Illustration #2) Baste first to check for matching until you get the hang of matching seams. Basted stitches are easier to remove than regular stitches! Press all seams open.
- Follow the illustration for the order to sew your sets. As you press seams open, keep in mind each row should continue to keep on the 45° angle. Be careful as you press seams open due to bias edges. The finished sections should be the same measurement on all (4) edges (21-1/4" from seam line to seam line….NOT point to point, width should be 15-1/2" including seam allowance). Using a marking instrument, mark the 1/4" seam at all four points. It is at this point you may want to block the sections with steam.

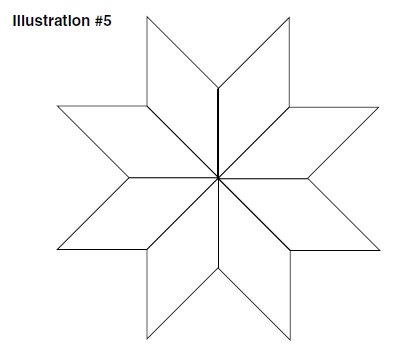
- Sew the lone star points together into pairs to make (4) quarters, matching seams. Sew from seam line to seam line (where you marked points) starting and stopping 1/4" from each end and backstitching at the beginning and end of each seam. Press all seams open. The angle at the center of the star should be 90° and the points should lie flat. (see illustration.)
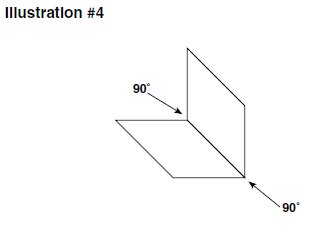
- Sew the quarters together to form (2) halves, and then sew the final center seam following the same directions as above. The star should lie flat. (see illustration)

SMALL STARS
These are just smaller versions of the lone star, and instructions are the same for construction. Sew strip sets for each star as follows. Off-set the strips by 1-1/4", trim sets at 45°
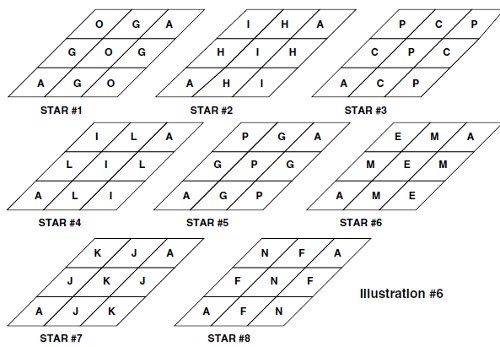
angle, and cut into 1-3/4" sections. See Illustration for placement of strip sets for all (8) stars.
- Star 1: Sew (1) strip set AGO with the full length of the strips, and (1) set GOG with the half length. Cut AGO into (16) 1-3/4" sections, and GOG into (8) 1-3/4" sections.
- Star 2: Sew (1) strip set AHI (full length) and (1) set HIH (half length). Cut AHI into (16) 1-3/4" sections, and HIH into (8) 1-3/4" sections.
- Star 3: Sew (1) strip set ACP (full length) and (1) set CPC (half length). Cut ACP into (16) 1-3/4" sections, and CPC into (8) 1-3/4" sections.
- Star 4: Sew (1) strip set ALI (full length) and (1) set LIL (half length). Cut ALI into (16) 1-3/4" sections, and LIL into (8) 1-3/4" sections.
- Star 5: Sew (1) strip set AGP (full length) and (1) set GPG (half length). Cut AGP into (16) 13/4" sections, and GPG into (8) 1-3/4" sections.
- Star 6: Sew (1) strip set AME (full length) and (1) set MEM (half length). Cut AME into (16) 13/4" sections, and MEM into (8) 1-3/4" sections.
- Star 7: Sew (1) strip set AJK (full length) and (1) set JKJ. Cut AJK into (16) 1-3/4" sections, and JKJ into (8) 1-3/4" sections.
- Star 8: Sew (1) strip set AFN (full length) and (1) set FNF (half length). Cut AFN into (16) 1-3/4" sections, and JKJ into (8) 1-3/4" sections.
Assembly:
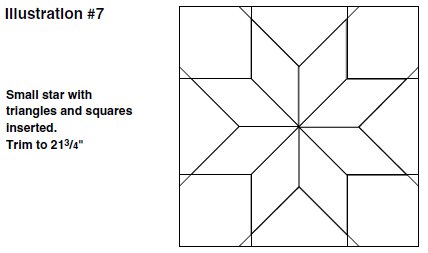
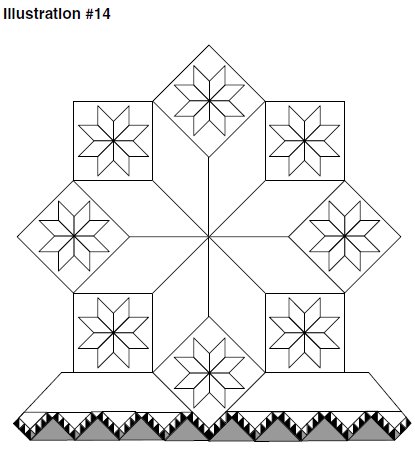
- Mark the corners of each Q – 8" square and the Q – 12-1/2" quarter-square triangles at the seam line. Sew these into the small stars, starting and stopping at 1/4" with a backstitch. Sew the squares in first, trim corners off to match the edges of the star, and then sew in the triangles. The small star will float in the large square. Trim the square to 213/4" evenly around the star. (See illustration)
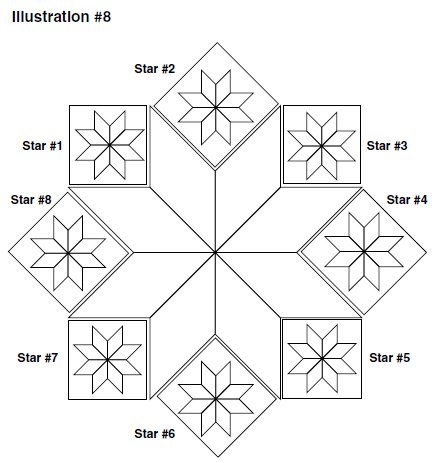
- Mark the corners of the seam lines. Sew these stars around the large lone star, starting with #1 at the top left corner and following around clockwise with #2, #3, etc. Again starting and stopping at 1/4" seam lines with a back stitch. Quilt should still lie flat.
Borders:
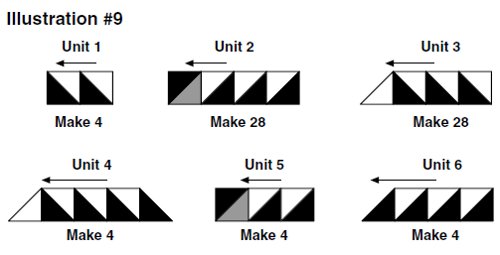
- (light small triangles are H, light large triangles are Q.) With the A, H, K and O - 27/8" half-square triangles, make (70) A/H, (69) K/H, and (69) O/H to equal 2-1/2" squares. Make (32) more squares with just the dark fabrics (A, K, and O). Press towards dark triangles.
- With these squares make the following border units, alternating block colors. Press following arrows. (See Illustration)
- Sew these units together with Q – 9-3/4" quarter-square triangles to make larger border sections as shown in illustration.
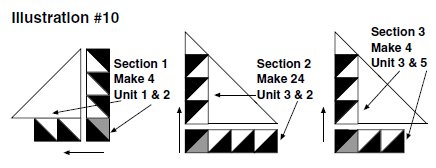
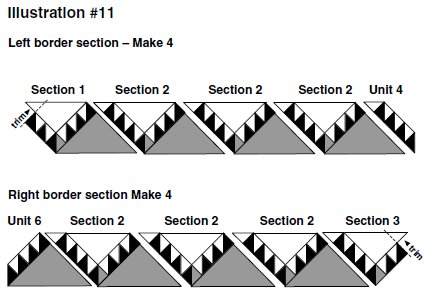
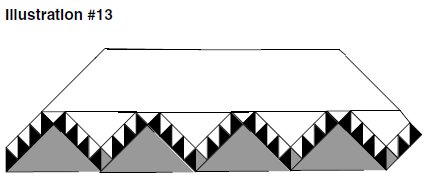
- Sew these sections together with I – 12-5/8" quarter-square triangles, to create the left and right border sections. Press to large triangles. Trim off excess triangles Q to be even with small triangle edge.(See Illustration)
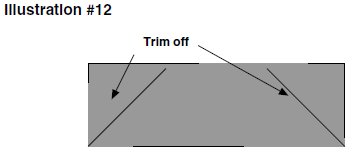
- Cut each corner of the R - 43-3/4" x 11-1/4" sections off using the 45° angle on the ruler (starting at the corner) and creating a trapezoid. (See Illustration) Mark the inside (short side) points at the seam intersections.
- Sew the trapezoids to each border section to create a larger trapezoid, being sure to continue the 45° angle at each end. (See Illustration)
- Sew these sections to the center lone star section, starting and stopping at the 1/4" intersections with a backstitch and sewing corners and centers of sections with a “Y” seam. (See Illustration)
Finishing:
- Finish by sewing on the I – 9-3/4" half-square triangles to each of the quilt’s corners. Center the triangles on the corner, and trim to square off corners even with the rest of the quilt.
- Layer, baste, and quilt. Bind with I – 2-1/4" strips, sewing them together with a bias seam, folding them in half, wrong sides together, and sewing on to the quilt, matching raw edges, with a 1/4" seam.
- ENJOY!
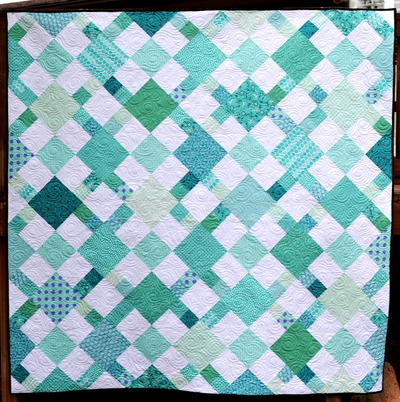
For more star quilt ideas, check out our list of 29 Star Quilt Patterns: Free Block Designs and Quilt Ideas.
Read NextDrift Away
Your Recently Viewed Projects
Thanks for your comment. Don't forget to share!
Report Inappropriate Comment
Are you sure you would like to report this comment? It will be flagged for our moderators to take action.
Thank you for taking the time to improve the content on our site.