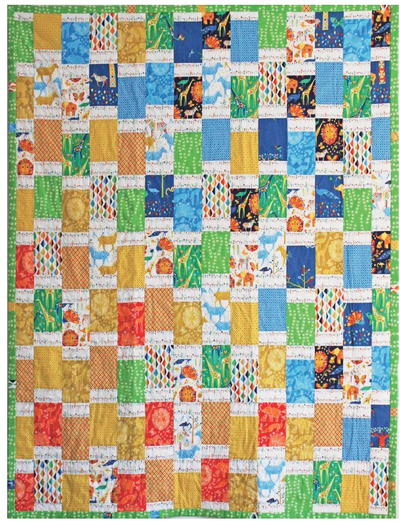
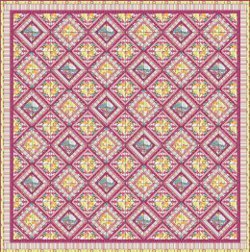
African Jungle Bargello Quilt Pattern

Because the new Disney's The Jungle Book just came out, everyone will go wild for this African Jungle Bargello Quilt Pattern. This bargello quilt tutorial features a fabric collection with prints of African animals like zebras, elephants, and giraffes along with other more basic prints. Despite looking complex, this quilt pattern is for beginners, so don't be intimidated if you're starting out. There are about 130 rectangles you will need to measure and cut, so this quilt tutorial will be time consuming, but it will turn out an amazing creation.
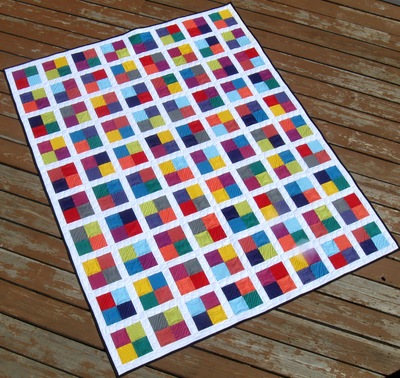
Quilt Size56 inches wide x 72 inches long
Time to CompleteLonger than a weekend

Materials List
-
Fabric Requirements:
DC6394 NAVY PRIDE - 1/2 yard
DC6407 BLUEBERRY OASIS BORDER - 1/2 yard
DC6406 BLUE SPOT - 1/2 yard
DC6399 BLUE FOLD - 1/2 yard
DC6398 BLUE SHOW YOUR COLORS - 1/2 yard
DC6395 LIME CROSSING PATHS - 1/2 yard
DC6399 CLEMENTINE FOLD - 1/2 yard
DC6400 NAVY MOUNTAIN AND VALLEY - 1/2 yard
DC6399 STARFRUIT FOLD - 1/2 yard
DC6401 PRIMARY FLORET - 1 1/4 yard
DC6395 LIME CROSSING PATHS 1/4” WIDE BINDING: 1/2 yard OR 1” WIDE BINDING: 1 1/4 yard
BACKING FABRIC: 56” x 72” (of your choice)
DC6394 PRIMARY PRIDE - 1/2 yard
DC6406 STARFRUIT SPOT - 1/2 yard
DC6397 GRASS STAND TALL - 1/2 yard - 56” x 72” quilt batting
- Rotary cutter
- Acrylic ruler
- Cutting mat
- Thread
- Scissors
- Pins
Cutting Instructions
Piece A - First 13 fabrics listed above: Cut an average of 10 rectangles (6 1/2” high x 4 1/2” wide) of each fabric, fussy cutting as desired. (I used between 8 and 13, depending on the print). You will need 126 pieces in total.
Piece B - DC6401- Floret: Cut 14 strips 2 1/2” x width of fabric (WOF), being sure to center 2 rows of flowers in each row, as below. Sub-cut the strips into 4 1/2” wide rectangles, resulting in 126 rectangles (2 1/2” high x 4 1/2” wide).
Binding: For 1/4” Binding: Cut 7 strips 2 1/2” x WOF. OR For 1” Binding: Cut 7 strips 6” x WOF.
Piecing Quilt Top:
All seams are 1/4”. Make sure all pieces will lie with printed pattern facing the same direction when piecing.
Using the finished quilt photo as a reference, lay out Pieces A in 14 vertical rows of 9 pieces, to show a gradual movement of color, starting with reds/oranges in the bottom left corner, through to darkest blues in the top right, with whitebackground fabrics interspersed throughout.
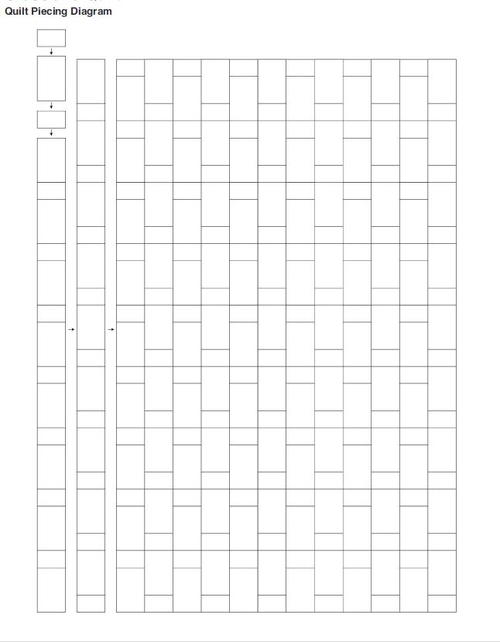
Follow Quilt Piecing Diagram: With right sides together, lay a piece B upside-down at the top of the first piece A of the first row. Sew along top edge. Continue in this fashion to form long rows, alternating pices A and B, so that you have 14 rows, each containing 9 pieces A and 9 pieces B. Seven of these rows should start with a piece B and seven should start with a piece A.
Press all seams away from pieces B.
Pin these rows together in the right sequence and stitch. Press seams open.
Assembling Quilt
Square up quilt top. Layer backing, batting and quilt top. Baste or pin. Quilt as desired.
Join binding strips together, end to end, randomly interspercing small pieces of first 13 fabrics if desired.
Bind in your preferred fashion for 1/4” binding.
For 1” binding, use the same method, but with a 1” seam when attaching the binding to the quilt, stopping 1” before the end of the quilt to mitre corners.
-
Quilt Piecing Diagram
Read NextMy Blue Heaven Bed Quilt