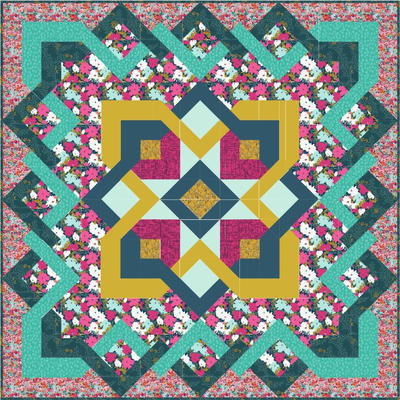
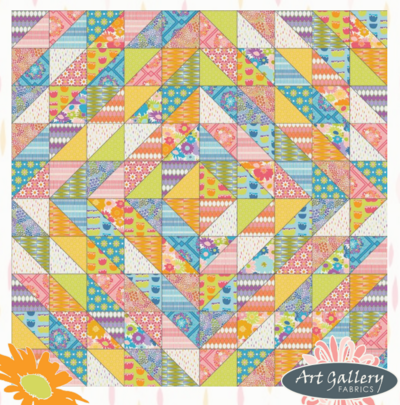
Coquet Bed Quilt Pattern

The beautiful and bold floral fabrics used in this free quilt pattern give the Coquet Bed Quilt Pattern an elegant style that is absolutely stunning. Featuring gorgeous jewel tones like sapphire, turquoise, and magenta, this bed quilt, measuring in at 80” x 80”, would be a wonderful gift for your granddaughter's bedroom. Complete with full piecing instructions, this quilt pattern also features a printable PDF pattern, so that you can create a beautiful quilt without any stress. Treat yourself to this stunning bed quilt pattern today.
Click Here to Download the PDF Pattern!
Fabrics Used in This Pattern
This quilt pattern features Art Gallery Fabric's Splendid Fusion Collection. You can find the Splendid Fusion Fabric Collection here.

Fabric Requirements
Fabric A: DCD-21602 - 1 1/2 yd.
Fabric B: DCD-31608 - 2 yd.
Fabric C: DCD- 31607 - 1 1/6 yd.
Fabric D: DCD-31610 - 2 yd.
Fabric E: DCD-31613 - 1 1/2 yd.
Binding Fabric
Fabric C: DCD- 31607 (Included)
Recommended Backing Fabric
DCD-31604 - 4 yds.
Cutting Directions
Notes: ¼" seam allowances are included. WOF means width of fabric.
Fabric A:
Thirty six (36) 4½” x 4½” squares
Four (4) 12½” x 4½” rectangles
Four (4) 16½” x 4½” rectangles
Ten (10) 9¾“ x 9¾” squares
Two (2) 10½” x 10½” squares
Eight (8) 5¼” x 5¼” squares
Fabric B:
Twenty four (24) 4½” x 4½” squares
Four (4) 12½” x 4½” rectangles
Four (4) 16½” x 4½” rectangles
Three (3) 9¾” x 9¾” squares
Two (2) 10½” x 10½” squares
Fabric C:
Four (4) 4½” x 4½” squares
Four (4) 8½” x 4½” rectangles
Six (6) 9¾” x 9¾” squares
Sixteen (16) 4⅞” x 4⅞” squares
Two (2) 10½” x 10½” squares
Fabric D:
Four (4) 8½” x 4½” rectangles
Four (4) 12½” x 4½” rectangles
Six (6) 9¾” x 9¾” squares
Sixteen (16) 4⅞” x 4⅞” squares
Two (2) 10½” x 10½” squares
Fabric E:
Twelve (12) 4½” x 4½” squares
Eight (8) 5¼” x 5¼” squares
Fabric F:
Four (4) 4½” x 4½” squares
One (1) 9¾” x 9¾” squares
Fabric G:
Four (4) 8½” x 4½” rectangles
Four (4) 9¾” x 9¾” squares
Fabric H:
Four (4) 8½” x 4½” rectangles
Four (4) 12½” x 4½” rectangles
Two (2) 9¾” x 9¾” squares
Eight (8) 4 7/8” x 4 7/8” squares
Eight (8) 5¼” x 5¼” squares
Fabric I:
Four (4) 9¾” x 9¾” squares
Construction
1. Sew all rights sides together with ¼"seam allowance.
2. Take ten (10) 9¾” x 9¾” squares from fabric A, three (3) 9¾” x 9¾” squares from fabric B, six (6) 9¾” x 9¾” squares from fabrics C and D, one (1) 9¾” x 9¾” square from fabric F, four (4) 9¾” x 9¾” squares from fabrics G and I, and two (2) ¾” x 9¾” squares from fabric H.
3. We will be starting by applying the Four Half Squares Triangles (HSTs) at a time technique: Take one pair of 9¾” x 9¾” squares and place the fabrics face to face.
4. Draw two lines on the diagonal and stitch at ¼” from each side of each line.
5. Cut following the red lines.
6. Open and press.
7. You should get eight (8) 4½” x 4½” half square triangles.

8. Place the squares in the following way to get 4½" x 4½" squares.

9. Take two (2) 10½” x 10½“ squares from fabrics A, B, C, and D.
10. Using the Four Half Squares Triangles (HSTs) at a time technique, pair the squares in the following way to get 4⅞” x 4⅞” HST:

11. Take sixteen (16) 4⅞” x 4⅞” squares from fabrics C and D.
12. Pair them with the 4⅞” x 4⅞” HSTs following the diagram to get 4½” x 4½” HST.
13. Make sure to draw and stitch on the diagonal that crosses both fabrics.

14. Take eight (8) 5¼” x 5¼” squares from fabrics A, E, G, and H.
15. We will be making a Half Square Triangle (HST) technique:
16. Place the squares face to face.
17. Draw a diagonal line and stitch at ¼" from each side.
18. Trim on the drawn line.
19. Open and press the resulting two HSTs.

20. Pair the squares in the following way to get 4⅞” x 4⅞” HSTs:

21. Take eight (8) 4⅞” x 4⅞” squares from fabrics G and H and pair them following the diagram with the 4⅞” x 4⅞” HSTs to get 4½” x 4½” HSTs.
22. Make sure to draw and stitch on the diagonal that crosses both fabrics.

Block A:
23. Take four (4) 16½” x 4½” rectangles from fabric B, four (4) 12½” x 4½” rectangles from fabrics B and D, four (4) 8½” x 4½” rectangles from fabric D and C, and four (4) 4½” x 4½” squares from fabrics A and C.
24. For fabric placement and attachment follow Diagram 8. Make four (4) blocks:

Block B:
25. Take twelve (12) 4½” x 4½” squares from fabrics A and B, and the HSTs following the diagram.
26. For fabric placement and attachment follow Diagram 9. Make six (6) blocks:

Block C:
27. Take four (4) 4½” x 4½” squares from fabrics A and B, and the HSTs following the diagram.
28. For fabric placement and attachment follow Diagram 10. Make two (2) blocks:

Block D:
29. Take four (4) 4½” x 4½” squares from fabrics A and B, and the HSTs following the diagram.
30. For fabric placement and attachment follow Diagram 11. Make two (2) blocks:

Block E:
31. Take four (4) 4½” x 4½” squares from fabrics A and B, and the HSTs following the diagram.
32. For fabric placement and attachment follow Diagram 12. Make two (2) blocks:

Block F:
33. Take four (4) 16½” x 4½” rectangles from fabric A, four (4) 12½” x 4½” rectangles from fabrics A and H, four (4) 8½” x 4½” rectangles from fabric H and G, and four (4) 4½” x 4½” squares from fabrics G and F.
34. For fabric placement and attachment, follow Diagram 13. Make four (4) blocks:

Block G:
35. Take eight (8) 4½” x 4½” squares from fabrics A and E, and the HSTs following the diagram.
36. For fabric placement and attachment follow Diagram 14. Make four (4) blocks:

Block H:
37. Take four (4) 4½” x 4½” squares from fabric E, and the HSTs following the diagram.
38. For fabric placement and attachment follow Diagram 15. Make four (4) blocks:

Top Assembly
Notes: ¼" seam allowances are included. WOF means width of fabric
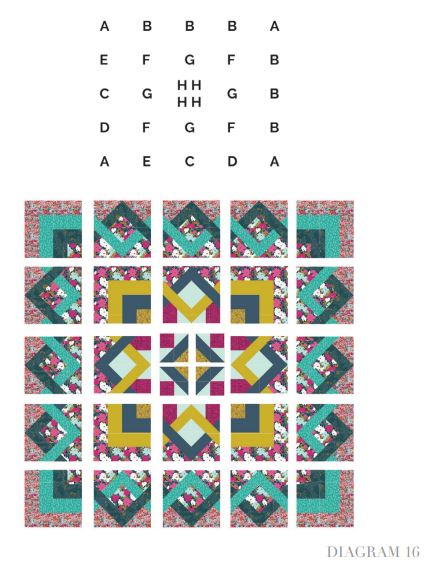
Join the blocks as follows:
Quilt Assembly
Notes: Sew rights sides together.
1. Place BACKING FABRIC on a large surface wrong side up. Stretch it with masking tape against that surface.
2. Place BATTING on top of backing fabric.
3. Place TOP on top of the batting with right side facing up. Smooth away wrinkles using your hands.
4. Pin all layers together and baste with basting thread, using long stitches. You can also use safety pins to join the layers.
5. Machine or hand quilt starting at the center and working towards the corners. Remember that quilting motifs are a matter of personal preference. Have fun choosing yours!
6. After you finished, trim excess of any fabric or batting, squaring the quilt to proceed to bind it.
Binding
Notes: Sew rights sides together.
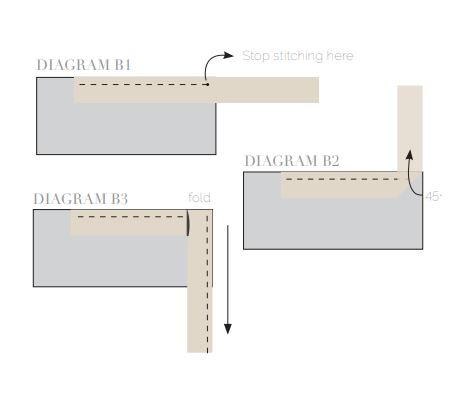
1. Cut enough strips 1½" wide by the width of the fabric C to make a final strip 330" long. Start sewing the binding strip in the middle of one of the sides of the quilt, placing the strip right side down and leaving an approximated 5" tail. Sew with ¼" seam allowance (using straight stitch), aligning the strip’s raw edge with the quilt top’s raw edge.
2. Stop stitching ¼" before the edge of the quilt (DIAGRAM B 1). Clip the threads. Remove the quilt from under the machine presser foot. Fold the strip in a motion of 45° and upward, pressing with your fingers (DIAGRAM B2). Hold this fold with your finger, bring the strip down in line with the next edge, making a horizontal fold that aligns with the top edge of the quilt (DIAGRAM B3). Start sewing at ¼" of the border, stitching all the layers. Do the same in the four corners of the quilt.
3. Stop stitching before you reach the last 5 or 6 inches. Cut the threads and remove the quilt from under the machine presser foot. Lay the loose ends of the binding flat along the quilt edge, folding the ends back on themselves where they meet. Press them together to form a crease. Using this crease as the stitching line, sew the two open ends of the binding with right sides together (you can help yourself marking with a pencil if the crease is difficult to see).
4. Trim seam to ¼" and press open. Complete the sewing. Turn binding to back of the quilt, turn raw edge inside and stitch by hand using blind stitch.