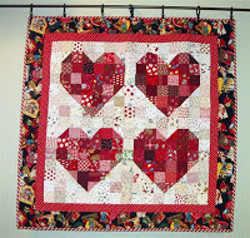
Heart of My Heart Valentine Quilt
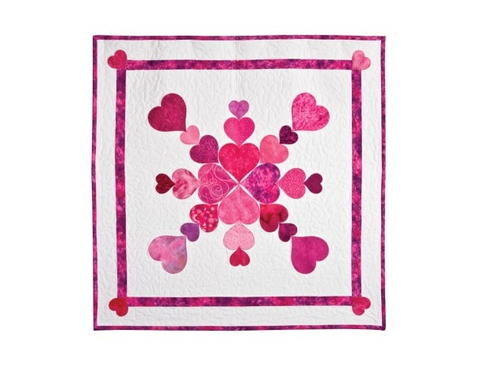
Put together this simple valentine quilt pattern as a quick decoration for Valentine's Day. Valentine's Day appliques make this quilt a quick project. Hang the Heart of My Heart Valentine Quilt on the wall or set it out as a table decoration.
Project TypeMake a Project
Quilt Size28.5 inches wide x 28.5 inches long
Time to CompleteWeekend project
Primary TechniqueApplique

MATERIALS:
- Background fabric —1-1⁄8 yards
- Border fabric—5⁄8 yard for appliqué, inner border and binding
- Appliqué fabrics—scraps, fat quarters, or 1⁄8 yard cuts; model used 28 different pinks
- Fusible web—1 yard
- Backing fabric—1 yard
- Batting—34" square
- Accuquilt Go! fabric cutter
- Accuquilt Go! Heart 2", 3", 4" (55029)
- Accuquilt Go! 6" x 12" mat (55112)
- Accuquilt Go! strip cutter 1-1/2" (55024)
- Accuquilt Go! strip cutter 2-/12" (55017)

CUTTING DIRECTIONS:
Background Fabric:
- Cut 1 —25" square
- Cut 4—21⁄2" strips across the width of the fabric (WOF) for outer border
Border Fabric:
- Cut 4—1-1⁄2" strips across WOF for inner border
- Cut 3—2-1⁄2" strips across WOF for binding
Appliqué Fabrics: Apply fusible web before cutting.
- Cut 8—4" hearts with fusible web backing
- Cut 8—3" hearts with fusible web backing
- Cut 12—2" hearts with fusible web backing
SEWING DIRECTIONS:
- Lightly press horizontal, vertical and diagonal centers of background square.
- Remove paper backing from all appliqué shapes.
- Lay background square on pressing surface.
- Position four, 4" hearts on background square center using diagram and pressed centers as a guide. Points of hearts should meet in center.
- Add 3" hearts into points of 4" hearts aligning center of hearts on horizontal and vertical pressed guides.
- Add 3" hearts between 4" hearts aligning center of hearts with diagonal pressed guides.
- Continue to add 2" and 4" hearts to complete appliqué design.
- Fuse in place following manufacturer’s directions.
- Machine appliqué around heart shapes using a narrow zigzag stitch and matching thread.
- Press background square.
- Trim to 23" square, centering appliqué.
- Trim two, 1-1⁄2" inner border strips to 23".
- Pin and sew trimmed inner borders to sides of background square matching center of inner border to center of square edge.
- Press seams toward inner borders.
- Measure horizontal center of background square with side inner borders. Trim two, 1-1⁄2" inner border strips to this measurement.
- Pin and sew trimmed inner border strips to top and bottom of quilt center matching center of inner border to center of square.
- Press seams toward inner borders.
- Measure vertical center of quilt center. Trim two, 2-1⁄2" outer border strips to this measurement.
- Pin and sew trimmed outer border strips to sides of quilt center matching center of outer border to center of quilt edge.
- Measure horizontal center of quilt with side inner borders. Trim two, 2-1⁄2" outer border strips to this measurement.
- Pin and sew trimmed outer border strips to top and bottom of quilt center matching center of outer border to center of quilt edge.
- Press seams toward inner border.
- Position and fuse four, 2" hearts to corners of inner border as shown on quilt diagram.
- Machine appliqué around heart shapes using a narrow zigzag stitch and matching thread.
QUILTING AND FINISHING:
- Remove any markings and press quilt top.
- Layer batting between quilt top and backing.
- Pin or baste layers together.
- Quilt as desired. Model was machine-quilted with medium stippling in background areas with matching thread.
- Remove any markings and press quilt if desired.
- Bind quilt with 2-1⁄2" border fabric strips, mitering corners. Add hanging sleeve if desired
Read NextModern Valentine Table Runner
Your Recently Viewed Projects
Thanks for your comment. Don't forget to share!
Report Inappropriate Comment
Are you sure you would like to report this comment? It will be flagged for our moderators to take action.
Thank you for taking the time to improve the content on our site.