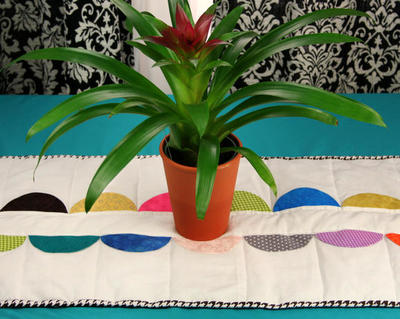
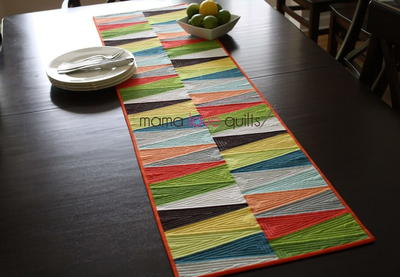
Trendsetter's Split Scallops Table Runner
Bring the chic spotty look of 60s era mod fashion right to your home decor with the Trendsetter's Split Scallops Table Runner. Free quilted table runner patterns like this demonstrate just how creative you can be with familiar designs; the scallops you usually use as borders for the edge of your quilt are used to make a modern look that can pop in so many different colors. This quilted table runner is simple enough to be part of your everyday decor, but can also be jazzed up for a special occasion.

Materials:
- Several ¼ yard cuts of coordinating fabrics
- Low-loft quilt batting
- 2 yards neutral fabric
- 1 yard backing fabric
- Bias Tape
- Pins
- Pencil
- Coordinating Thread
- Needle
- Thimble
Instructions:
1) Gather a handful of coordinating fabrics. If you need inspiration for color selection, you might find the Pantone website helpful. For this project, I specifically used the Pantone Fashion Color Report Fall 2012 for my color story. I just printed off the colors from the website and took the printout with me to shop for fabrics.

2) Using your rotary cutter, acrylic ruler and cutting mat, cut 7” squares of non-paper backed fusible interfacing (medium-weight). You need a total of 18.

3) Trace a 4.5” circle onto the smooth (non-shiny) side of the squares of interfacing. This is the inside circle of the smallest template in the Super Sized Circle Shape Template set. A pencil works best for tracing.

4) Cut 7”squares from coordinating fabrics using your rotary cutter, acrylic ruler and cutting mat. Again you’ll need a total of 18. More than one square from the same pattern is perfectly fine.
5) Layer a square of fusible interfacing (pencil traced side up) on top of a fabric square (right side up). Machine stitch the layers together, stitching a complete circle allowing your stitching to follow directly on top of the pencil marking.
6) Cut out around the stitched circles using your pinking shears, leaving approximately ¼” border between the stitching and the pinked edge.

7) Lay each circle onto your cutting mat and line up the top of the traced pencil line/stitched line of the circle along one of the solid horizontal line measurements on the cutting mat. It’s very important that you aren’t lining up the edge of the pinking, but the stitched line with the horizontal line (see arrows on image). Then, line your acrylic ruler up at 2 ¼” from that measurement to cut each circle in half using your rotary cutter. Repeat for all 18 circles.

8) Turn each half-circle right-side out and finger press the seam. Do not IRON press.

9) Then, match up the straight-edges (the fabric front and interfacing back) and pin together with a single pin running horizontal with the edge.Iron wrinkles, then cut three pieces of a neutral solid or tone-on-tone material to the following: one piece at 3 ½” x 71” and two pieces at 7 ¼ “ x 71”.

10) Pin half-circles side by side, using two pins on either side for each circle, without overlapping circles. Pin them down one long edge of BOTH 7 ¼” x 71” pieces.

I preferred for my scallops to be off-center from each other on the opposite sides, so when pinning the circles along the edge of the second 7 ¼” x 71” piece, I had it laying right beside the first piece so I could get the alignment exactly how I wanted it.
11) Then, take your pinned strips to the ironing board. Remove pins one circle at a time and iron/fuse the circles to the neutral fabric following package directions for the fusible interfacing you’ve chosen to use. Because of the extra layer of fabric over the interfacing, I found it most helpful to spritz my half-circles with water, then steam press for 10 seconds instead of using a damp press cloth. These instructions allow for an extra circle among the 18, so you can do a test run with your fusible interfacing onto a piece of scrap fabric and get your iron settings right before starting to fuse on your project.
12) Allow fabric to cool completely, and then check to make sure they are all completely bonded before moving on.
13) Pin right side of 3 ½” strip to right side of one scalloped border strip and machine stitch using ¼” seam allowance. Press the seam open. Pin the opposite side of the 3 ½” strip to the remaining scalloped border strip, right sides together. Machine stitch and press seam open.
14) Cut two pieces of backing fabric to 17” x 36”. Place two short ends right sides together and machine stitch using ½” seam allowance. Press seam open. This leaves you with a piece measuring 17” x 71”.
15) Lay your backing fabric right side down onto a flat surface and smooth all wrinkles. Layer with batting cut to the same size, and then add your scalloped border piece right side up on top. Match corners and sides at one end and begin placing pins at the corners, down the side edges and down the middle to pin all three layers together. Continue matching the edges of all three layers as you go. Sometimes as you do this the fabric gets pulled and stretched making the measurements slightly off. If this is the case, you can trim the extra and square it up at the opposite end.