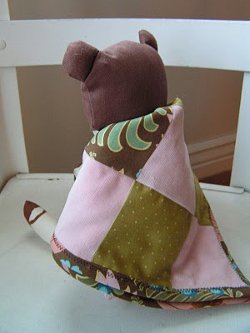
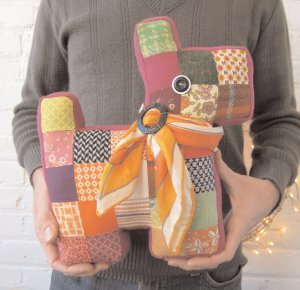
Piece a Patchwork Scottie Dog
Patchwork Scottie dogs have been around for decades and they're all different, since they're typically made from scraps. So round up your 2-1/4" squares and get piecing! Denyse Schmidt of Denyse Schmidt Quilts shares this pattern for quilting fabric toys.

Materials:
- Scrap fabric: 54 2-1/4" squares + one 55" x 2-1/4" strip
- Two 1/2" to 3/4" diameter buttons or felt scraps for eyes
- Scarves, ribbon, etc., for embellishment (optional)
- Fiberfill stuffing
- Scissors or rotary cutter, cutting mat, and ruler
- Sewing thread and hand-sewing needle
- Sewing machine
Size:
The finished Scottie Dog is approximately 11" wide x 12" tall.
Instructions:
- Cut the Fabric: Cut a total of fifty-four 2-1/4" squares of fabric – that's 27 squares each for the Dog Front and Dog Back. Make sure to cut on the straight grain of the fabric. We used a variety of colorful wools and cottons, vintage and new, and tried not to repeat any fabric (except on the other side of the dog). Cut the Side Strip of the dog, 55" x 2-1/4". If you need to piece the Strip, make sure the seam is perpendicular to the sides. If you want a smaller or larger dog, change the size of your squares accordingly.
 Design the Dog: Arrange the squares on a table in the shape of the Scottie Dog Front and Dog Back. Be sure to make them mirror images of each other (see Diagram A, right).
- Sew the Dog (ALL SEAM ALLOWANCES ARE 1/4"): With fabric right sides together, sew the squares together in vertical rows. Press the seam allowances either up or down, alternating the direction for each row (up on first row, down on second, etc). When all the vertical rows are assembled, stitch them together in order to make the Dog Front. Repeat for the Dog Back.
 Attach the Side Strip: Before you attach the Side Strip, stay-stitch 4" along the tail end of the Dog Back, and 3" along one long side of each end of the Side Strip (See Diagram B, right). This will serve as a guide for hand-sewing the opening closed later.
With fabric right sides together, and leaving 1” of the end free, sew Side Strip to Dog Front beginning below the tail end. Sew the non-stay-stitched side to the Dog Front. Take care when stitching the corners to make sure they stay square. At outside corners, stop stitching, pivot with needle down, and begin stitching again. Clip the corner of the side strip. At the inside corners, stop at the seam, back tack, take needle out and begin sewing again at the seam line on the next square. Be careful not to catch the seam allowances with your needle when stitching inside corners. When you are near the end, stop and sew together the ends of the Side Strip, trimming any excess fabric. Stitch the remainder of the Side Strip to the Dog Front. Repeat, and sew Side Strip to Dog Back, leaving a 3-square opening at the tail end to stuff the Dog. Back-tack at the start and end of the opening.
- Stuff the Dog: Stuff the dog with the stuffing of your choice. Turn under opening at the stay-stitching and hand-stitch closed.
- Attach the Eyes and Decorate: This is the fun part – bring your Scottie to life and bestow a unique personality with treasures from your stash of trimmings and do-dads! Button eyes are fun, or use felt if giving the Scottie to a small child. Ribbons and trim make great collars or scarves.
All contents ©2009 Denyse Schmidt Denyse Schmidt Designs, LLC. No part of this product may be reproduced in any form unless otherwise
stated. Items made from this pattern may not be produced for commercial resale. All rights reserved. Permission has been granted for FaveQuilts.com to post this project.
Read NextLittle Angel Softie
Your Recently Viewed Projects
Thanks for your comment. Don't forget to share!
Linda
Mar 03, 2017
So cute patchwork dog! Have some soft terry cloth in vibrant floral and striped lavender, white, and green that would be a quick trial to sew this toy with! For myself, then if I like the finished project, I'll make more. I really would like to make one in a solid color. Then two colors, just to see how it would turn out. In fact I plan to start right now.
micheles66 6963517
Feb 26, 2014
Have the dog all patched together but am having a struggle with the strips inside corners... Is there a trick to keeping them square and neat?
jeanbarb21 5478924
Jul 09, 2013
I am new to quilting and really love the look of this scottie dog. I have all the squares, front and back, sewn them together but now I am stuck!! HELP!! How do I sew the strip around the front of the dog, do I need to fold the fabric at the corner before I continue to sew? If so, surely I will run out of fabric from the 55 inch strip??? Any advice would be gratefully accepted. Thanks.
Hooked on Hens
Feb 22, 2013
I had one of these when I was a kid, except I think it was made with smaller squares. I can remember being sick with the flu once, and I enjoyed looking at the various fabric patterns that the blocs were comprised of. There was one fabric pattern that was only used once while all of the others were used multiple times. I liked to try to find all of the blocks made from the same pattern. Kinda weird I know, but that's the kind of thing a mathematical-minded kid does when sick with the flu.
dsnobles2 1130353
Nov 21, 2012
My mom made me one of these years ago and I still have it. Also have the one she made my grandmother, but it's missing the stuffing now.
lanarobt 5235235
Aug 31, 2012
I made this darling scottie dog for my niece. I don't know what I did wrong but the 55" strip was not long enough to go around the dog; was able to add a few more inches before finishing and it turned out cute! :)
jeanbarb21 5478924
Jul 09, 2013
Hi Lanarobt, Have you seen my recent comment? I noticed that you too had a short strip.....as I am new to quilting I am unsure about the corners. Do I need to fold the fabric at the corner in the same way as when attaching a binding to a quilt, if so, surely 55 inches is not enough!
missiejw55 4676579
Feb 21, 2012
Cute pattern but seriously, 2 1/4" squares? I teach my people to cut 2 1/2" squares from their scraps. Why didn't you just write the pattern for that size?
jeannemwallace 504 6464
Feb 20, 2012
I just love it reminds of my Scottie I had years ago, too cute and loving,,take care and Hugs,, jeanne
notsuzy3 2980461
Feb 06, 2012
Love it! Hope I finish B4 my Gdaughter's birthday. Valentine's Day!
Report Inappropriate Comment
Are you sure you would like to report this comment? It will be flagged for our moderators to take action.
Thank you for taking the time to improve the content on our site.