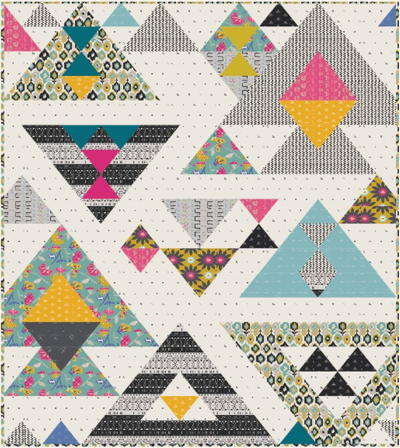
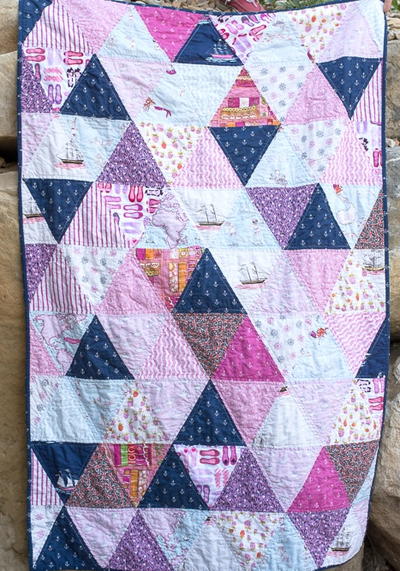
Pyramid Points Twin Quilt Pattern

Have you fallen in love with triangle quilt patterns? Maybe it’s time to learn how to make this modern design! Using a series of triangles, the Pyramid Points Twin Quilt Pattern finishes with a stunning tribal effect that you won't soon forget. This challenging tutorial comes with a free printable PDF pattern and printable triangle template, which help to make it a bit easier than it appears. It's a great way for quilters to get started on a fun and playful project that is sure to help further develop their skills.
Click Here to Download the PDF Pattern!
Fabrics Used in This Pattern
This quilt pattern features Art Gallery Fabric's Capsules Craft Bound collection. You can find the Capsules Craft Bound Fabric Collection here.

Fabric Requirements
Fabric A: CAP-CR-1202 - ⅜ yd
Fabric B: CAP-CR-1201 - ⅞ yd
Fabric C: CAP-CR-1208 - 1 ⅓ yd
Fabric D: CAP-CR-1207 - ⅜ yd
Fabric E: CAP-CR-1200 - ¾ yd
Fabric F: PRE-800 - ¼ yd
Fabric G: PRE-817 - ¼ yd
Fabric H: PE-418 - ¼ yd
Fabric I: PRE-807 - ⅜ yd
Fabric J: PE-407 - ¼ yd
Fabric K: CAP-CR-1209 - ⅜ yd
Fabric L: CAP-CR-1206 - ⅞ yd
Fabric M: PE-439 - ¼ yd
Fabric N: CAP-CR-1205 - ⅜ yd
Fabric O: CAP-CR-1203 - ¼ yd
Fabric P: CAP-CR-1204 - 5 1∕6 yd
Fabric Q: CAP-CR-1201 - 6 yd
Binding Fabric
Fabric C: CAP-CR-1208
Backing Fabric
Fabric Q: CAP-CR-1201 - 6 yd
Cutting Directions
Notes: ¼" seam allowances are included. WOF means width of fabric. RST means Right Sides Together.
- Nine (9) of Template 1 from Fabrics A, N
- Thirty five (35) of Template 1 from Fabric B
- Thirty eight (38) of Template 1 from Fabric C
- Fourteen (14) of Template 1 from Fabric D
- Thirty two (32) of Template 1 from Fabric E
- Five (5) of Template 1 from Fabrics F, H
- Two (2) of Template 1 from Fabrics G, J, M
- Ten (10) of Template 1 from Fabric I
- Eleven (11) of Template 1 from Fabric K
- Thirty four (34) of Template 1 from Fabric L
- Four (4) of Template 1 from Fabric O
- One Hundred and one (101) of Template 1 from Fabric P
1. Sew all rights sides together with ¼"seam allowance.
2. After cutting all your fabric pieces, follow the below Diagram for the quilt assembly.

3. Trim your quilt top to a 70 ½'' x 90 ½'' as in Diagram below:

Quilt Assembly
Notes: Sew rights sides together.
4. Place BACKING FABRIC on a large surface wrong side up. Stretch it with masking tape against that surface.
1. Place BATTING on top of backing fabric.
2. Place TOP on top of the batting with right side facing up. Smooth away wrinkles using your hands.
3. Pin all layers together and baste with basting thread, using long stitches. You can also use safety pins to join the layers.
4. Machine or hand quilt starting at the center and working towards the corners. Remember that quilting motifs are a matter of personal preference. Have fun choosing yours!
5. After you finished, trim excess of any fabric or batting, squaring the quilt to proceed to bind it.
Binding
Notes: Sew rights sides together.
1. Cut enough strips 1 ½" wide by the width of the fabric C to make a final strip 330" long. Start sewing the binding strip in the middle of one of the sides of the quilt, placing the strip right side down and leaving an approximated 5" tail. Sew with ¼" seam allowance (using straight stitch), aligning the strip’s raw edge with the quilt top’s raw edge.
2. Stop stitching ¼" before the edge of the quilt (DIAGRAM B 1). Clip the threads. Remove the quilt from under the machine presser foot. Fold the strip in a motion of 45° and upward, pressing with your fingers (DIAGRAM B2). Hold this fold with your finger, bring the strip down in line with the next edge, making a horizontal fold that aligns with the top edge of the quilt (DIAGRAM B3). Start sewing at ¼" of the border, stitching all the layers. Do the same in the four corners of the quilt.
3. Stop stitching before you reach the last 5 or 6 inches. Cut the threads and remove the quilt from under the machine presser foot. Lay the loose ends of the binding flat along the quilt edge, folding the ends back on themselves where they meet. Press them together to form a crease. Using this crease as the stitching line, sew the two open ends of the binding with right sides together (you can help yourself marking with a pencil if the crease is difficult to see).
4. Trim seam to ¼" and press open. Complete the sewing. Turn binding to back of the quilt, turn raw edge inside and stitch by hand using blind stitch.

Read NextPurple Stars Quilt Pattern