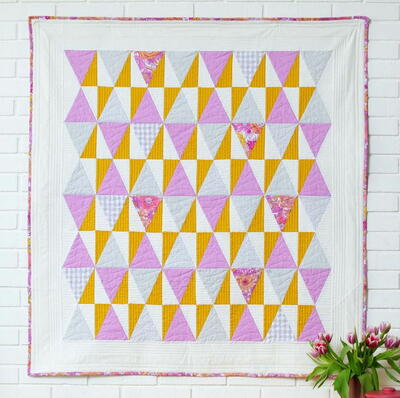
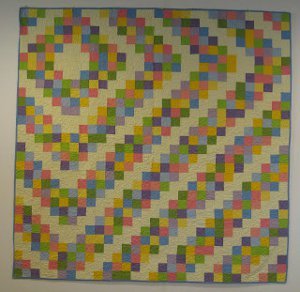
Sugar Cream Quilt Pattern
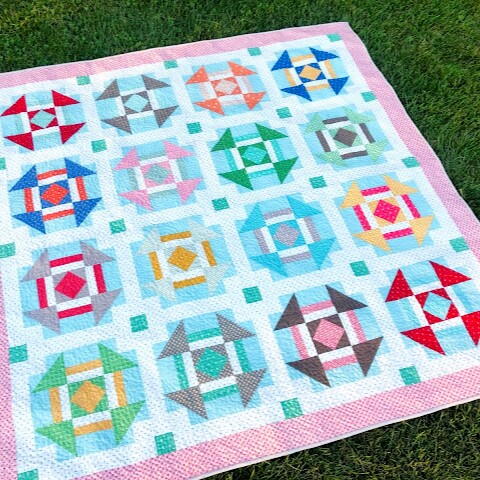
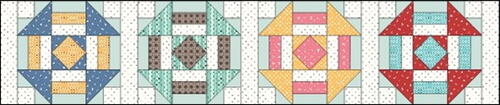
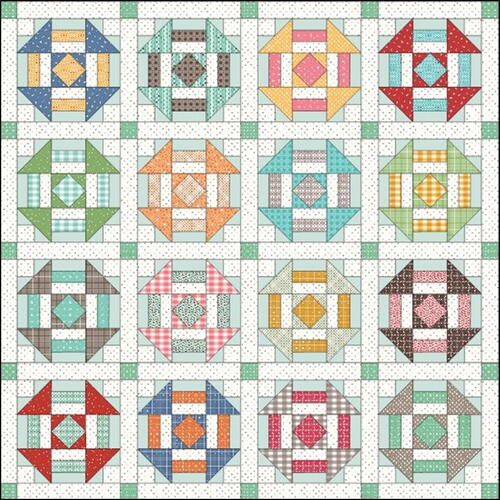
This delightful one-block quilt pattern will have you absolutely enchanted! The Sugar Cream Quilt Pattern is tailored for the vibrancy of spring, and it certainly gives off a burst of springtime energy! Using a serious of the same 12-inch quilt blocks, which use diamond-in-a-square and half-square triangle techniques, this intricate-looking pattern is easier and quicker than it seems! Follow along with the step-by-step guide below or print off your own copy of this absolutely free quilting pattern. Then, get ready to infuse your next quilting experience with some springtime energy as you bring this charming pattern to life.
Finished Quilt Size: 64.5” x 64.5”
Finished Block Size: 12” x 12”
Time to CompleteLonger than a weekend
MaterialsFabric
Primary TechniqueQuilting

SeasonSpring
Project TypeMake a Project
Materials List
-
Yardage is based on 42” -wide fabric. Fat quarters are 18” x 21”. Fat eighths are 9” x 21”.
- 32 - 10” squares (1 layer cake/10” stacker usually has 40- 10” squares)
- 1 7/8 yards of white background fabric
- 1 1/8 yards of songbird solid fabric
- 1/4 yard of turquoise fabric
- 3/4 yard of pink border fabric
- 5/8 yard of binding fabric
- 4 yards of fabric for backing fabric
- 72” x 72” piece of batting
-
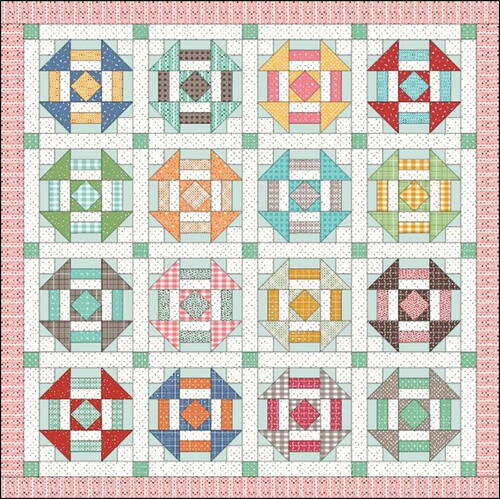
The Cover Quilt
To make the cover quilt, I used the following:
- 1 - 10” stacker of Prim by Lori Holt for Riley Blake Designs
- 1 7/8 yards of white background fabric
- 1 1/8 yards of Riley Blake Confetti Cottons in Songbird (SKU C120-SONGBIRD)
- 1/4 yard Prim Vintage Vivid (SKU C9706-VIVID)
- 3/4 yard Prim Stripe Coral (SKU C9705-CORAL)
- 5/8 yard Prim Ticking Peter (SKU C9707-PEWTER)
- 4 yards Riley Blake Confetti Cottons in Butterscotch (SKU C120-BUTTERSCOTCH)
- The Warm Company Warm & Plush batting
Note:
-
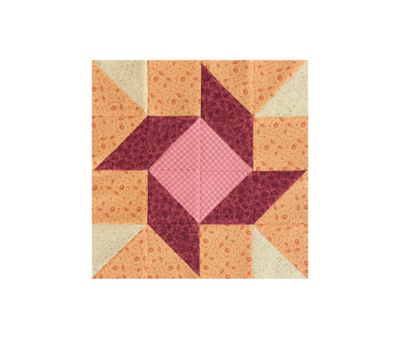
Separate the 10” squares into 2 piles- 16 squares will be for the A part of the block and 16 squares will be for the B part of the block. See below.
A = the pink portions of this block and is cut using the ‘A’ group cutting instructions
B = the yellow portions of this block and is cut using the ‘B’ group cutting instructions
C = White background
D = Songbird solid

Basics Instructions:
- Read through the instructions before beginning
- All seams are sewn with ¼” seam allowance unless noted
- RST means right sides together
- HST means half square triangles
- WOF means width of fabric
- Visit jessicadayon.blogspot.com and go to the Pattern Corrections tab to see if there have been any corrections made to this pattern.
Cutting:
From EACH of 16- 10” squares (A), cut:
1- 4 1/2” x 4 1/2”
4- 1 1/2” x 4 1/2” pieces
From EACH of 16- 10” squares (B), cut:
2- 4 7/8” x 4 7/8” squares, each square cut on one diagonal to yield 2 triangles per square
4- 2 1/2” x 2 1/2” squares
From the white background fabric (C), cut:
3 strips, 4 1/2” x 42”, crosscut into 64 pieces, 1 1/2” x 4 1/2”
4 strips, 2 1/2” x 42”, crosscut into 64 squares, 2 1/2” x 2 1/2”
3 strips, 12 1/2” x 42”, crosscut into 40 pieces, 2 1/2” x 12 1/2”
From the songbird solid fabric (D), cut:
5 strips, 2 7/8” x 42”, crosscut into 64 squares, 2 7/8” x 2 7/8”, cut each square on one diagonal to yield two triangles per squares for a total of 128 triangles
4 strips, 4 1/2” x 42”, crosscut into 64 pieces, 2 1/2” x 4 1/2”
From the turquoise print fabric, cut:
2 strips, 2 1/2” x 42”, crosscut into 25 squares, 2 1/2” x 2 1/2”
From the pink border fabric, cut:
7 strips, 3 1/2” x 42”
From the binding fabric, cut:
7 strips, 2 1/2” x 42”
Making the Blocks:
Use a 1/4” seam allowance. Press all seam allowances in the direction indicated by the arrows.
-
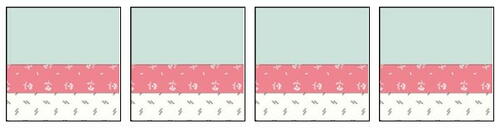
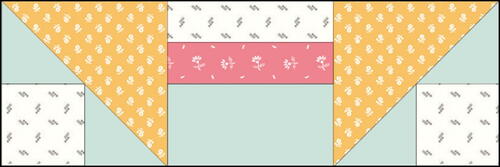
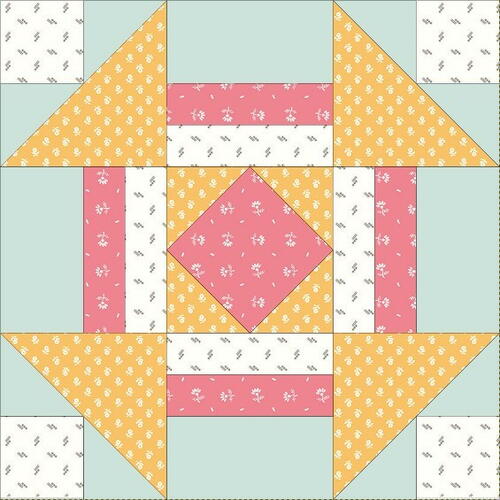
Using 4- 2 1/4” X 4 1/4” strips cut from the songbird solid (D), 4- 1 1/2” x 4 1/2” strips cut from (A), and 4- 1 1/2” x 4 1/2” strips cut from the white background fabric (C), piece 4 strip units as shown below. Each strip unit should measure 4 1/2” x 4 1/2”, including the seam allowances. Repeat these steps to make a total of 16 sets of 4 identical strip units, for a total of 64 strip units.
-
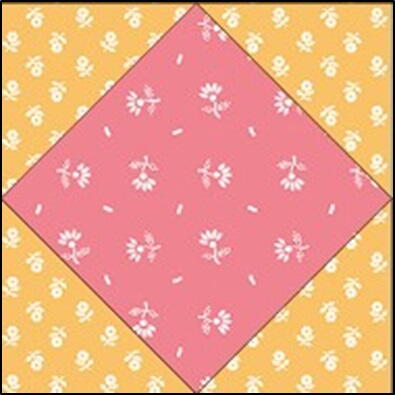
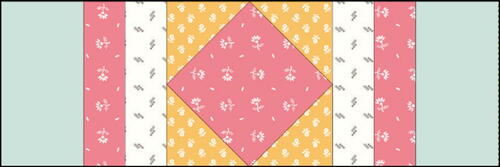
Using 1- 4 1/2” x 4 1/2” square cut from (A) and 4- 2 1/2” X 2 1/2” squares cut from (B), make a diamond in the square unit using the easy corner triangle method. The diamond in the square unit should measure 4 1/2” x 4 1/2”, including the seam allowances. Repeat these steps to make a total of 16 diamond in the square units.
-
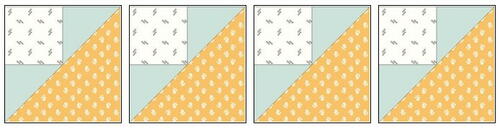
Using 4- 2 1/2” X 2 1/2” white background squares (C), 8 triangles cut from the 2 7/8” squares of songbird solid (D), and 4- triangles cut from the 4 7/8” squares from (B), piece 4 triangle units as shown below. Each triangle unit should measure 4 1/2” x 4 1/2”, including the seam allowances. Repeat these steps to make a total of 16 sets of 4 identical triangle units, for a total of 64 triangle units.
-
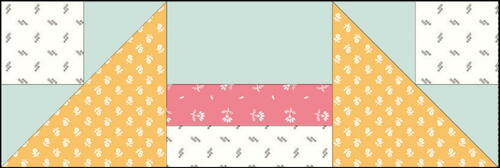
Gather the blocks made in steps 1, 2, and 3. Assemble the blocks as shown below. Repeat the steps to make a total of 16 blocks. Each block should measure 12 1/2” x 12 1/2”, including the seam allowances.
Assembling the Quilt Top:
-
Join five turquoise 2 1/2” squares and four white background 2 1/2” x 12 1/2” sashing strips to make a sashing row, as shown below. Press. The row should measure 2 1/2” x 58 1/2”, including the seam allowances. Repeat to make a total of five sashing rows.
-
Join five white background 2 1/2” x 12 1/2” sashing strips and four blocks to make a block row, as shown below. Press. The row should measure 12 1/2” x 58 1/2”, including the seam allowances. Repeat to make a total of four block rows.
-
Join the sashing rows and block rows, alternating them as shown below. The quilt center should measure 58 1/2” x 58 1/2”, including the seam allowances.
-
For the border, cut one 3 1/2” x 42” strip in half to yield 2- 3 1/2” x 21” strips. Piece 1- 3 1/2” x 21” strip to 1- 3 1/2” x 42” strip, end to end to yield a short pieced strip. Repeat once more to yield a second short pieced strip. Trim both short pieced strips to measure 3 1/2” x 58 1/2”. Sew these strips to the sides of the quilt top. Piece two 3 1/2” x 42” strips together end to end to yield a long pieced strip. Repeat once more to make a second long pieced strip. Trim both long pieced strips to 3 1/2” x 64 1/2” long. Sew these strips to the top and bottom edges of the quilt top. Press. The quilt top should now measure 64 1/2” x 64 1/2”, including the seam allowances.
Finishing the Quilt:
-
Prepare the quilt backing so it is about 3” larger in all directions than the quilt top.
-
Layer the quilt top, batting, and backing. Baste the layers together.
-
Hand or machine quilt as desired.
-
Using the 2 1/2” wide strips cut from the binding fabric, make the binding and attach it to the quilt.
-
Your project is finished! If you love this tutorial, be sure to check out Janome.com for even more inspiration.
If you love the Sugar Cream Quilt Pattern, we have some recommendations that you might enjoy working on next. For those who are looking for a traditional and timeless style, we recommend exploring Amish quilt patterns. These patterns often feature bold colors and geometric designs that would complement the classic look of the Sugar Cream Quilt.
If you are interested in expanding your quilting skills, consider trying your hand at cathedral window quilt patterns. This intricate and beautiful style is perfect for quilters who enjoy detailed and complex projects. The elegant look of the cathedral window pattern would make a stunning addition to your quilting repertoire.
For a fun and whimsical twist on the Sugar Cream Quilt, consider trying out butterfly quilt patterns. These patterns offer a playful and colorful design that would be perfect for adding a touch of whimsy to your quilting projects. The delicate beauty of butterfly patterns can bring a touch of nature-inspired charm to your quilting creations.
No matter which pattern you choose to work on next, we are excited for you to explore new and creative quilting possibilities. Happy quilting!
Read NextCinched Jelly Roll Quilt