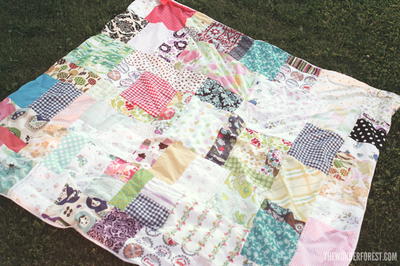
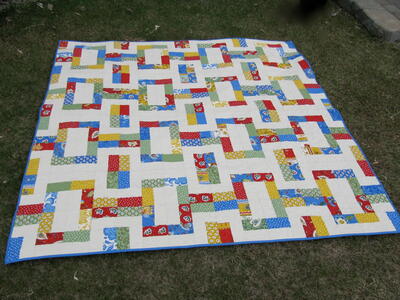
Garden District Picnic Quilt
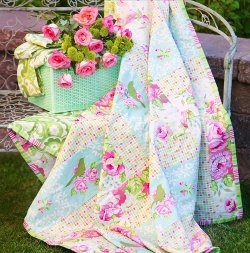
The Garden District Picnic Quilt uses beautiful fabrics from Heather Bailey's Garden District fabric line, which is perfect for quilts with summer themes. The pretty floral fabrics pieced similarly to a rail fence quilt pattern in this blanket. A convenient handmade carrying strap completes this perfect picnic quilt!
Project TypeLearn a Technique
Quilt Size64 inches wide x 64 inches long
Time to CompleteWeekend project
Primary TechniquePieced

Note: This free quilt pattern is designed using fabrics from the Garden District collection by Heather Bailey for FreeSpirit Fabrics. Fabrics are coded in materials list. Fabrics featured are 54/55” wide cotton sateens and cotton canvases. However, measurements work for 44/45” fabrics as well. Use 1/4” seam allowances throughout blanket instructions.
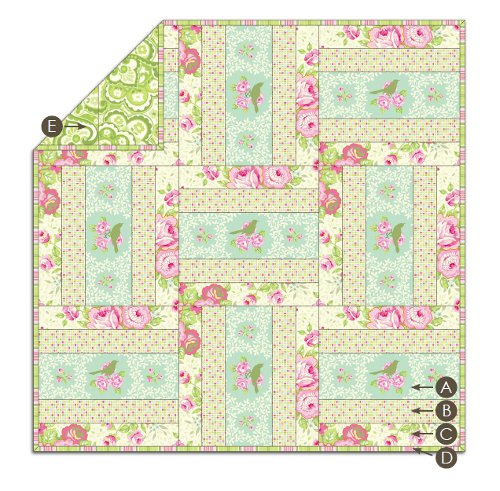
Garden District Fabrics Featured in Sample:
- A - Mocking Bird - HBHD04 Turquoise
- B - City Grid - HBHD03 Pink
- C - St. Charles Bouquet - HBHD02 Pink
- D - French Ribbon - HBHD05 Green
- E - Cakewalk - HBHD01 Green
MATERIALS:
- 1-1/8 yds fabric A* for block center (2-1/2 to 3 yds needed to center mockingbirds in blocks)
- 1-1/8 yds fabric B* for inner block pieces
- 1-1/8 yds fabric C* for outer block pieces
- 5/8 yd fabric D* for binding
- 3 yds fabric E* for back
- Thread
Plus, if you love this garden-inspired quilting pattern, check out our floral quilts tag for more flowerful ideas.
INSTRUCTIONS:
Blanket:
- Cut Out Pieces - See cutting list below for fabrics A-D. Align height measurements with grain of fabric.
{A} Cut 9 pcs. 21-1/2” x 7-1/2”.
{B} Cut 18 pcs. 21-1/2” x 4”.
{C} Cut 18 pcs. 21-1/2” x 4”.
{D} Cut 5 strips of 3-1/2” binding across width of fabric (55” x 3-1/2” each).
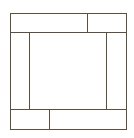
- Sew 9 Blocks - To complete each blanket block, sew 1 inner-block piece {B} to each side of each block center {A}. Then sew 1 outer-block piece {C} to each inner-block piece {B}. Press seams away from block centers.
- Assemble Blanket Top - Sew each row of 3 blocks together, alternating orientation of blocks as shown in diagram above. On top and bottom rows, press seams toward right. On middle row, press seams toward left. Matching corners, sew rows together to complete blanket top. Press.
- Assemble Blanket Back - Sew blanket back of fabric {E} to measure 66” x 66” as follows. Cut one 44” square. Cut four 11-1/2” border strips, 44” wide. Sew 1 border strip to each side of square. Cut one 11-1/2” border strip, 45” wide, and cut in half to create two pieces at 22-1/2” x 11-1/2”. Sew 1 half-strip to 1 end of each remaining 44” border strip. Sew one pieced strip to each remaining side of square, as shown.
- Layer Blanket Top and Back - With wrong sides together, center blanket top on blanket back. No batting is needed if medium-weight cotton sateen and/or cotton canvas is used. Safety-pin or baste layers together. Then baste around perimeter of blanket. To sew layers together, “stitch in the ditch” along piecing seams. Trim excess blanket-back fabric from around perimeter.
- Complete Blanket - Sew binding strips together short end to short end to create one long binding strip. With wrong sides together fold strips in half lengthwise & press. On top side, using 1/4” seam allowance, sew binding to outside edges of blanket. Wrap binding to back of blanket. Hand-sew binding fold to binding seamline to conceal raw edges.
Carrying Strap:
Note: Use 1/2” seam allowances throughout carrying strap instructions.
- Cut Out Pieces - Using scraps from picnic blanket, piece or cut 2 rectangles to 36” x 9”. Align height measurements with grain of fabric.
- Sew Together at Ends - Sew rectangles together end to end to create one long piece, 71” x 9”. Press seam open.
- Form Tube - With right sides together, fold strap in half along length and sew through all layers along length to form 71” tube. Do not sew at ends.
- Turn and Press - Turn tube right-side-out. Press tube so lengthwise seam runs along one edge of tube. (Seam is NOT centered on tube.)
- Complete Strap - At one end of tube, fold raw edges inside 1/2”. Press. Insert unfolded end of tube into folded end of tube 1/2” and pin. Make sure tube is not twisted. To join ends together, hand-sew along fold – or machine-sew through all layers along fold. Press.
- Wrap Strap Around Blanket - Fold blanket into thirds and roll into a log. Lay strap on flat surface. Place blanket at center of strap. Pull one loop end of strap through other loop end of strap. Pull loop snugly to form handle.

Why You'll Love This Quilt
Are you looking for the perfect summer quilting project? Look no further than the Garden District Picnic Quilt! Here are the top 3 reasons why you should make this beautiful quilt:
1. Stunning Heather Bailey Fabrics: The Garden District fabric line by Heather Bailey boasts vibrant colors and pretty floral patterns that are perfect for a summer-themed quilt project. These high-quality fabrics will make your quilt pop and add a touch of sunshine to your picnic outings.
2. Easy Rail Fence Quilt Pattern: The Garden District Picnic Quilt features a rail fence quilt pattern that is perfect for quilters of all skill levels. This pattern is simple yet striking, making it a great project for beginners or experienced quilters looking for a quick and satisfying project.
3. Handy Carrying Strap: One of the best features of the Garden District Picnic Quilt is the handmade carrying strap that makes it easy to transport your quilt to your favorite picnic spot. This convenient strap adds a practical element to your quilt project and makes it perfect for outdoor gatherings.
Overall, the Garden District Picnic Quilt is a must-make project for any quilter looking to add a touch of summer charm to their quilting repertoire. So grab your fabrics, pick up your rotary cutter, and get ready to create a beautiful and practical quilt that will be the envy of all your friends at your next picnic!
Read NextChurch Picnic Quilt
Your Recently Viewed Projects
Thanks for your comment. Don't forget to share!
chefjoyln 7220594
Sep 03, 2025
I am new to quilting and this is perfect for a beginner. I love how mine turned out.Thanks for the pattern.
danielde 7778354
Mar 20, 2013
Prettiest quilt I've seen lately. Will definitely make this one.
Report Inappropriate Comment
Are you sure you would like to report this comment? It will be flagged for our moderators to take action.
Thank you for taking the time to improve the content on our site.