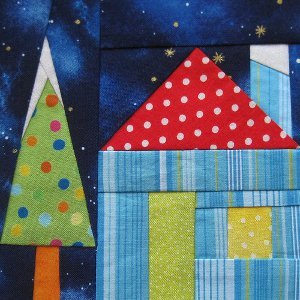
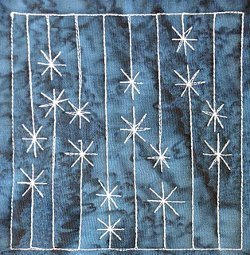
Winter Scene Wall Hanging

The Winter Scene Wall Hanging can hang in your house all winter long! You can hang winter scene quilts just in time for Christmas and then leave them on your walls to decorate your home for the season until the last snowfall. The evergreen trees, as well as both small and large snowflakes, are appliqued onto a background of powdery white snow and bright blue sky.
Project TypeMake a Project
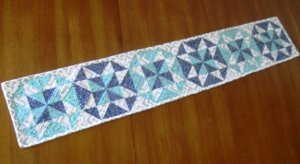
Quilt Size6 inches wide x 32 inches long
Time to CompleteWeekend project
Primary TechniquePieced & Appliqued

MATERIALS:
- Background sky fabric—1⁄4 yard
- Background snow, side binding and appliqué snow fabric—3⁄8 yard
- Tree appliqué fabrics—5 scraps at least 6" square
- Red fabric—1⁄4 yard or fat quarter (includes top and bottom binding)
- Solid white fabric—1⁄4 yard or fat quarter
- Fusible Web—3⁄4 yard
- Backing—1⁄4 yard
- Batting—10" x 36"
- Accuquilt die cutting machine
- Accuquilt Holiday Medley (55043)
- Accuquilt 6" x 12" mat (55112)
- Strip Cutter-2½" (55017)
- Half Square-2" Finished Triangle (Die packaged with die cutting machine)
INSTRUCTIONS:
Cutting Directions:
Background Sky Fabric:
- Cut 1—6-1⁄2" x 19" rectangle
Background Snow Fabric:
- Cut 1—6-1⁄2" x 10" rectangle
- Cut 2—2-1⁄2" strips for side bindings
- Cut 6—2" finished half square triangles
Note: Cut one each snow appliqué fabric, solid white fabric and two fusible web 6" x 18". Following manufacturer’s directions, fuse one fusible web rectangle to the wrong side of snow appliqué fabric. Remove backing paper. Layer and fuse solid white rectangle to wrong side of appliqué snow fabric. Layer and fuse second fusible web rectangle to wrong side of solid white/snow appliqué fabric rectangle. This makes a thicker white fabric that prevents shadowing of the background fabric through the appliqué snowflakes and circles.
- Cut 3 snowflakes and 20—1⁄2" circles from prepared fusible fabric
Red Fabric:
- Cut 2—2-1⁄2" x 10" strips for binding
- Cut 6—2" finished half square triangles
Appliqué Fabrics:
- Cut 5—trees with fusible web backing
Sewing Directions:
- Pin and sew six white and red half square triangles right sides together. Press seams toward red triangles.
- Pin and sew half square triangles into two sets of three following orientation in diagram. Press toward red triangles.
- Pin and sew background sky and background snow rectangles together along 6-1/2" edge. Press seam open.
- Remove paper backings from appliqué shapes.
- Position trees and snowflakes on background rectangle. Lift off top left snowflake (this makes the snowflake underneath much easier to sew around). Fuse remaining shapes according to manufacturer’s instructions. Trim
off shapes beyond edges of background rectangle.
- Machine appliqué edges of shapes with matching thread and a narrow zigzag or narrow satin stitch.
- Position third snowflake and 20 circles on wall hanging. Fuse and appliqué. Trim off excess snowflake.
- Layout half square triangle sections and wall hanging center according to diagram.
- Pin and sew sections together. Press seams toward half square triangle sections.
Quilting and Finishing:
- Layer batting between wall hanging top and backing.
- Pin or baste layers together.
- Model was machine quilted outlining appliqué shapes and half square triangles.
- Fold and press 2-1⁄2" binding strips in half lengthwise wrong sides together. Pin and sew white binding strips to sides of wall hanging. Press toward binding. Hand sew binding to back of wall hanging covering stitching line, or stitch in the ditch from the front catching back of binding in stitching. Trim binding even with top and bottom edges of wall hanging.
- Cut two red binding strips 2" longer than width of wall hanging. Press in half lengthwise wrong sides together. Pin one to bottom front of wall hanging, centering across width. Fold binding extensions around to back of wall hanging and pin. Stitch across bottom of wall hanging, stitching across all layers of binding and wall hanging.
- Press toward binding. Ends of strips should be neat folds. Pin binding to back of wall hanging. Hand stitch in place.
- Repeat for top edge of wall hanging, adding a hanging sleeve, if desired, before hand stitching binding to back of wall hanging.
Read NextFluttering Snowflakes Centerpiece
Your Recently Viewed Projects
Thanks for your comment. Don't forget to share!
charlie2000 001360 9
Nov 17, 2012
I love this It is just what I need to put in my front window. I am a new sewer as far as quilts go and I appreciate everything I see and I learn a lot from your emails. To the very talented staff: Thank You So Much. Happy Holidays Every one!
JessiCAN
Aug 24, 2011
Do you like the red triangle borders, or would you choose another color?
Report Inappropriate Comment
Are you sure you would like to report this comment? It will be flagged for our moderators to take action.
Thank you for taking the time to improve the content on our site.