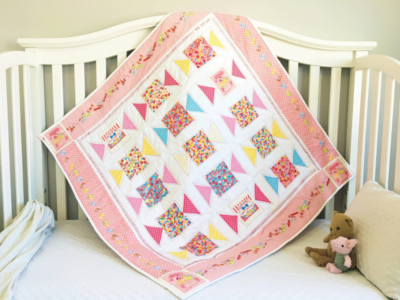
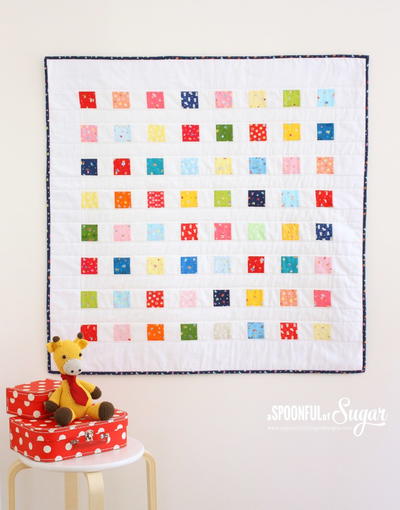
The Simply Sweet Quilt

Discover the sweetness of quilting with our charming baby crib tutorial! Crafted with care, this tutorial incorporates delightful candy motifs created from flying geese patches, adding a whimsical touch to your little one's nursery. Learn step-by-step techniques to stitch together a cozy and colorful quilt that's as soft as it is adorable. Perfect for beginners and seasoned quilters alike, create a cherished heirloom that wraps your baby in warmth and love.
Project Size: 40” x 40” square
Time to CompleteLonger than a weekend
Primary TechniqueQuilting

Materials List
-
Janome Product Used:
- Memory Craft 6700P
- Dual Feed Foot for quilting
- 1/4 inch seam O foot for piecing
-
Materials and Supplies:
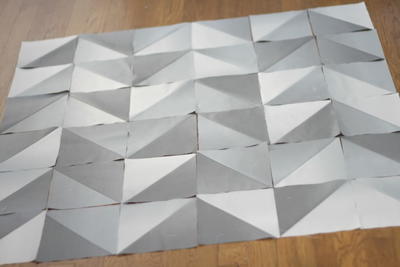
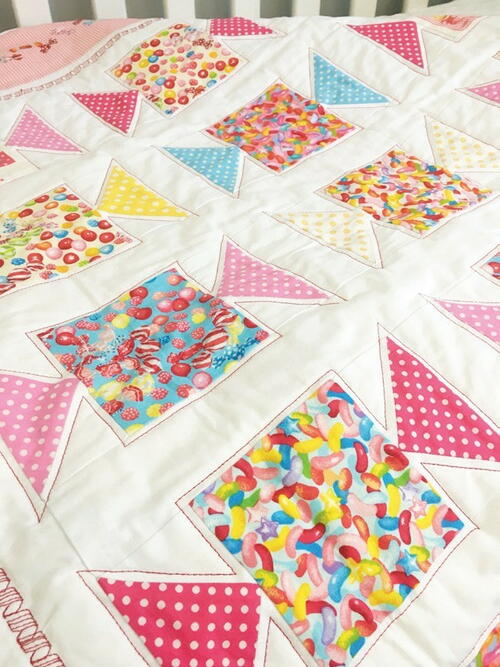
- Candy Pieces: Cut (15) 4.5” x 4.5”
- Candy Wrappers: Cut (30) 4.5” x 2.5”
- White: Cut (60) 2.5” x 2.5”
- White: Cut (10) 2.5” x 4.5”
- White: Cut (6) 28.5” x 2.5”
- White: Cut (2) 32.5” x 2.5”
- Border Print: Cut (2) 32.5” x 4.5”
- Border Print: Cut (2) 40.5” x 4.5”
- Binding: 1/2 yard (I use 2.5” wide binding)
- Backing: 1 yard
- Batting: 45” x45”
INSTRUCTIONS
General Notes:
- Piece with 1/4” seam allowance.
- Press seams to the dark side or open flat.
Project Steps:
Once you have all your fabric cut out and ready to go this quilt will come together quickly.
-
To make your “candy wrappers”, place one 2.5” white square on one half of your 4.5” rectangle, sew a diagonal line across, trim and press seam, then add the other side of your flying geese. Repeat until you have 30 flying geese “candy wrappers”.
-
Using a 1/4” seam foot add the candy wrappers to the “candy” squares. Arrange in the order you like and add your white sashing starting with the short pieces, then adding the long strips. Next, add the long white sashing to the sides and trim any excess. Attach your border pieces and press.
-
Spray baste your quilt sandwich and quilt as desired. I have outlined each candy using the Dual Feed walking foot with a red 50 weight Aurifil thread. For the Candy Stripe border I used number 161 from the stitch chart, I think it adds the perfect finish to this sweet project.
-
Trim your quilt and add your binding using your favorite method.
-
Your project is finished! If you love this tutorial, be sure to check out Janome.com for even more inspiration.

Read NextCharming Lucy Quilt Pattern