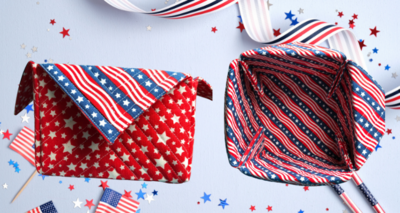
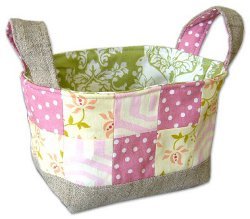
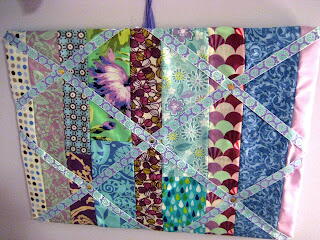
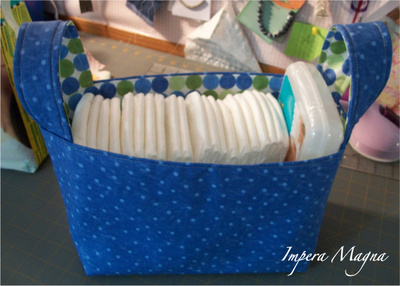
Reversible Quilted Fabric Baskets

Fabric baskets are great for storing your favorite craft and sewing supplies and for decorating and adding splashes of color to your house cheaply. You can make them for different holidays to dress up your holiday table. Make them in different sizes, weather you want them tall of shorter and wider for different uses. They are fun and easy to make and great for kids rooms too.
Basket sizes will vary depending on the size of your quilt sandwich. They are all about 4-1/2” tall.
Main MaterialFabric

HolidayPatriotic Holiday
Materials List
-
JANOME SUPPLIES REQUIRED
- 2- 14 ½” X 14 ½” Fabric The finished size for this is approx., 6” X 6” For larger 7” X 7” cut quilt sandwich to 16 ½” X 16”.
- 1-14 ½” X 14 ½” Batting
- Sewing Thread
- Sewing Machine
- ¼” piecing foot (optional)
- Walking foot with quilting bar guide
- Water-soluble marking pen/iron off pen/chalk
- Ruler
INSTRUCTIONS
-
Take one of the 14 ¼ X 14 ¼ piece of fabric and fold in quarter and crease near the folded edges.
-
Open up and on the right side draw a 3” line on each of the crease.
-
From the center drawn line, measure over 3”, draw a triangle from there to the center line. Do this to all the drawn lines.
-
Make a quilt sandwich with batting on table, then fabric right side up, and the piece you just finish on top with the right side down. (The wrong side is facing you). Pin to hold in place.
-
Set machine up with walking foot, sew all the way around the square using a ¼” seam allowance, back stitching at the beginning and end, leaving a 6” opening for turning the sandwich.
-
Clip corners, turn inside out, push out corners, and press seams flat. Turn seams from opening in while pressing close.
-
Stitch close to edge the way around, being careful to make sure to catch the open seams.
-
Place quilting bar on walking foot ankle, set bar 1” from center needle position. Start quilting with the bar on the edge of the square all the way around. Once completed the square, move the sandwich with the bar on the line you just finished sewing, and repeat this process.
-
Sew enough rows until you have passed the top of the triangle by at least 3 rows. This will add stability to the sides of the bowl.
-
To make the corners fold on the center marked line, making sure that the top edge is straight and stitch on the diagonal line. Do this to each side.
-
There are 2 options at this point. You have the corners on the inside or outside. If you want them to be on the inside then turn the bowl inside out, fold the flaps down and press with the iron.
If you want the corners to be on the outside, after pressing the seams press the corners flat and stitch across the top edge of the outside fabric.
Flaps can be held down by adding a button or just tacked down by machine or had stitched down. You have many options depending on how you want to embellish it. The possibility is endless.
Be sure to remove all markings from fabric. -
Your project is finished! If you love this tutorial, be sure to check out Janome.com for even more inspiration.


Read NextModern Maple Leaf Table Runner