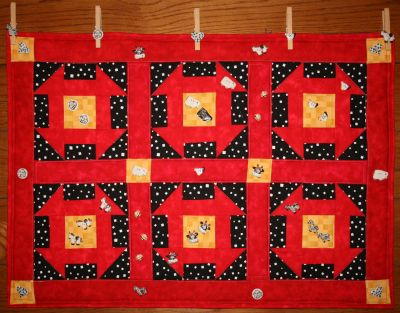
Strawberry Fairy Panel Quilt
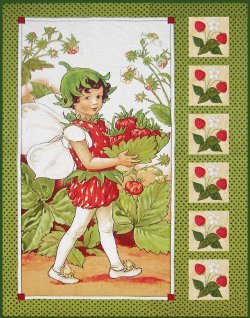
Give your wall a cute, folksy feel with wallhanging quilt patterns featuring adorable panels! This Strawberry Fairy Panel Quilt has loads of charm. It would look perfect in a kids' room or playroom. If you love panel quilts, try out this magical, woodsy quilt!
Project TypeMake a Project
Quilt Size37 inches wide x 47 inches long
Time to CompleteWeekend project
Primary TechniquePieced

Note: This quilt was designed using fabrics from Michael Miller Fabrics. Fabrics are coded in materials list.
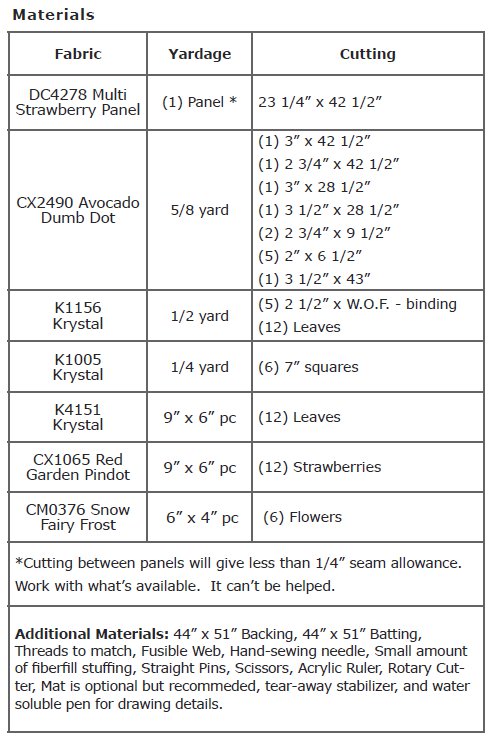
|
CX1065 Red |
CM0376 Snow |
CX2490 Avocado |
|
K1005 |
K1156 |
K4151 |


INSTRUCTIONS:
- Sew (1) CX2490 3” x 42-1/2” piece to the left side of the DC4278 Panel. Sew (1) CX2490 2-3/4” x 42-1/2” piece to the right side of the panel. Sew one CX2490 3” x 28-1/2” piece to the top of the panel. Sew one CX2490 3 1/2” x 28-1/2” piece to the bottom of the panel. Set aside.
- Trace (6) flowers and (24) leaves onto the paper side of fusible web. Cut out leaving a small margin around each. Following manufacturer's directions, iron (6) flowers onto CM0376, (12) leaves onto K4151, and (12) leaves onto K1156. Cut out.
- Arrange (1) flower, (2) K4151 leaves, and (2) K1156 leaves as shown on one 7” K1005 square. Fuse in place. Draw in stems and veins. Machine applique flower and leaves in place. Satin stitch each stem. Add calyx leaves using decorative leaf stitch on sewing machine. Free-motion stitch the center of the flower. Repeat for (6) blocks total.
NOTE: Back each block with tear-away stabilizer before stitching. This improves the finished quality of the block and eliminates distortion. Trim each block to 6-1/2” square.
- For strawberries: trace (12) onto the wrong side of CX1065. Cut out. With a threaded hand-sewing needle, gather each tightly between the dots. Knot off. Place (2) strawberries on one block as shown. Pin in place. Machine applique around raw edges-leaving a 1” opening. LIGHTLY stuff strawberry without distorting the background fabric. Machine applique closed.
- Beginning and ending with a 6-1/2” block, sew blocks together in a vertical row alternating with 2” x 6-1/2” K1156 pieces.
- Sew one K1156 3-1/2” x 43” piece to the right side of the block strip. Sew one K1156 2-3/4” x 9-1/2” piece to the top and bottom of the strips. Sew the strip to the right side of the panel unit.
- Layer backing, batting, and quilt top. Baste.
- Quilt as desired. Be careful around dimensional strawberries.
- Bind with K1156 piecing as needed for length.
APPLIQUE TEMPLATES:

Read NextCozy Cabins Wall Quilt Pattern
Your Recently Viewed Projects
Thanks for your comment. Don't forget to share!
kiwinzer
Jul 22, 2013
Pictures to go with the instructions and with the other fabric's are must , not every one has an imagination, I for one do not . Thank you
virginiac123456 11 78519
Jul 26, 2012
I enlarged the templete somewhat and used it to put the strawberry applique on a tote bag. I had a problem with the flower blossom, I could not get the center to look right, I ended up putting a colored bead in the middle.
Report Inappropriate Comment
Are you sure you would like to report this comment? It will be flagged for our moderators to take action.
Thank you for taking the time to improve the content on our site.