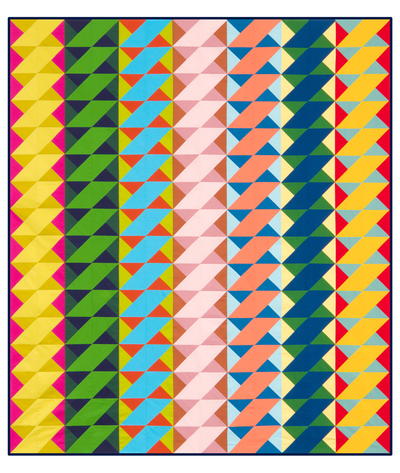
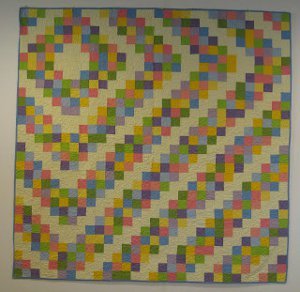
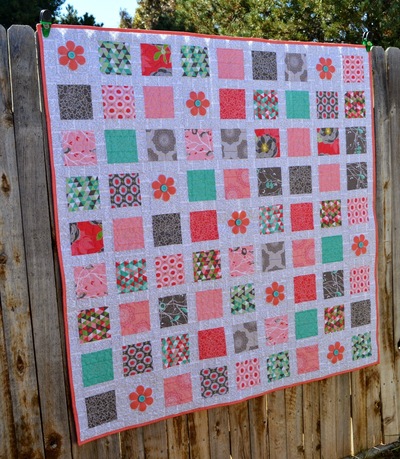
Bright Stretched Stars Throw

All you need to piece this easy star quilt pattern are AccuQuilt Go! dies for half-square triangles. Plain white background squares and colorful half-square triangles create a traditional stretched stars design in the Bright Stretched Stars Throw.
Project TypeMake a Project
Quilt Size46 inches wide x 54 inches long
Time to CompleteA week or two
Primary TechniquePieced

MATERIALS:
- 2-1⁄8 yards background fabric
- 3⁄8 yard each orange and pink fabric
- 5⁄8 yard green fabric for blocks and inner border
- 3/4 yard blue fabric for blocks and outer border
- 1/2 yard fabric for binding
- 3 yards backing fabric
- AccuQuilt Go! fabric cutter
- AccuQuilt Go! half square 4" finished triangle (55031)
- AccuQuilt Go! 6" x 12" mat (55112)
- AccuQuilt Go! strip cutter 1-1/2" (55024)
- AccuQuilt Go! strip cutter 2-1/2" (55017)
- AccuQuilt Go! square 4-1/2" (die packaged with fabric cutter)

CUTTING DIRECTIONS:
Use GO!® Strip Cutter-2-1/2" (55017) to cut outer border and binding strips. Use GO!Strip Cutter-1-1/2" (55024) to cut inner border strips. Use die packaged with your GO!Fabric Cutter to cut 4-1/2" squares.
- Cut 13—5-1/2" wide strips from background fabric. Sub cut into 60, 4-1/2" squares; 60, 4" half square finished triangles
- Cut 2—5-1/2" strips each orange, pink, green and blue. Sub cut into 15, 4" half square finished triangles
- Cut 5—1-1/2" strips across the width of green fabric for inner border
- Cut 5—2-1/2" strips across the width of blue fabric for outer border
- Cut 5—2-1/2" strips across the width of fabric for bin
SEWING DIRECTIONS:
- Make 15 half square triangle units with background fabric and each of the four colored fabrics for a total of 60 half square triangles.
- Press seams toward the darker fabric.
- Layout half square triangles and background squares according to image.
- Pin and sew horizontal rows together.
- Press seams toward squares.
- Pin and sew rows together to complete quilt center.
- Press seams toward bottom of quilt.
- Add borders, piecing where necessary, adding the side borders first, then top and bottom borders.
QUILTING & FINISHING:
- Layer batting between quilt top and backing.
- Pin or baste layers together.
- Machine quilt with an all-over design.
- Add binding, mitering corners.
For more star quilt ideas, check out our list of 29 Star Quilt Patterns: Free Block Designs and Quilt Ideas.
Read NextFarmhouse Four Patch Quilt Tutorial
Your Recently Viewed Projects

Thanks for your comment. Don't forget to share!
knudsens2 7252007
Jul 29, 2015
I made 2 of these for charity giving to a baby/child. I reduced the block size to 3-1/2" unfinished and adjusted inner and outer borders to 2-1/2" and 3-1/2" to yield about a 40"x45" quilt. I used scraps in 4 color families for the stars and sewed the squares in blocks of 4 before joining instead of by row. I love how the bright colors play with the white background and will definitely make more of this pattern. P.S. Print the layout and keep it by the sewing machine when assembling....easy to turn a square the wrong way.
Report Inappropriate Comment
Are you sure you would like to report this comment? It will be flagged for our moderators to take action.
Thank you for taking the time to improve the content on our site.