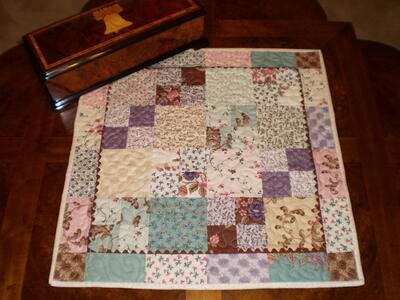
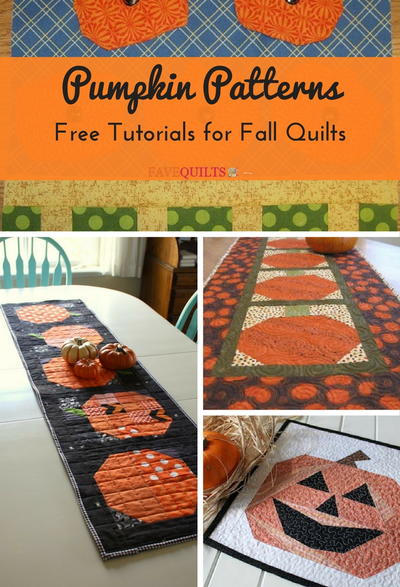
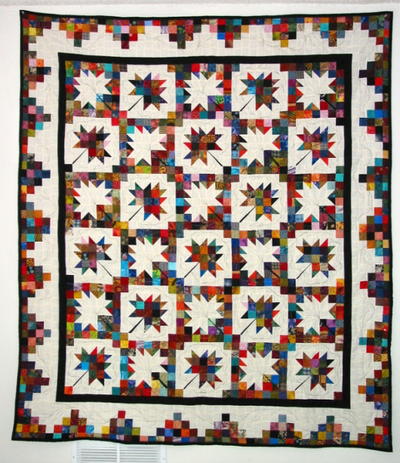
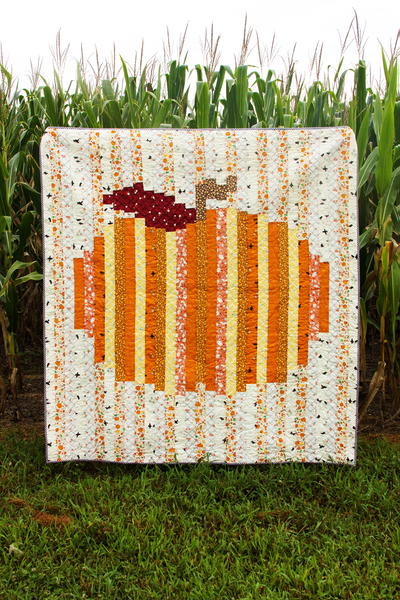
Autumn Glory Star Quilt

This easy star quilt pattern is a great project to get you quilting for autumn! The Autumn Glory Star Quilt incorporates traditional Ohio star blocks and fall leaves quilt fabric for a rustic piecework that reflects the warm colors of autumn. Make this quilt in a different color palette for other seasons.
Project TypeMake a Project
Quilt Size64.5 inches wide x 64.5 inches long

Note: This pattern uses fabrics from In The Beginning Fabrics. Fabrics are coded in materials list.
MATERIALS:
- 1-1/8 yds. Blue Swirl (5AG3) for blocks
- 7/8 yd. Brown/Rust Large Floral (2AG1) for blocks
- 1/3 yd. Tan/Brown Large Leaves (3AG1) for blocks
- 5/8 yd. Tan Hexagon Tonal (6AG3) for blocks
- 1-1/8 yds. Brown Fleur-de-lis (7AG1) for blocks and binding
- 7/8 yd. Tan Leaf Tonal (8AG1) for blocks
- 2/3 yd. Brown Nouveau Vine (4AG1) for blocks
- 2-1/8 yds. Brown Border Stripe (1AG1) for border
- 4-1/4 yds. for backing
INSTRUCTIONS:
Cutting:
Note: Fabrics are cut in order given in Materials lists. Cut strips across width of fabric, unless otherwise instructed.
From Blue Swirl, cut:
- 12 squares, 5-1/4" x 5-1/4"; cut each square twice diagonally to make 48 of triangle C
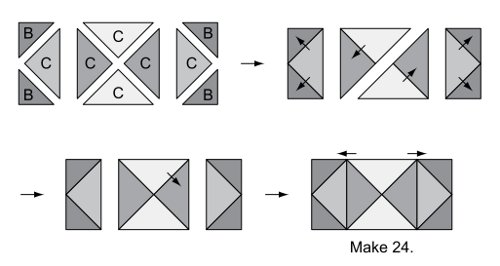
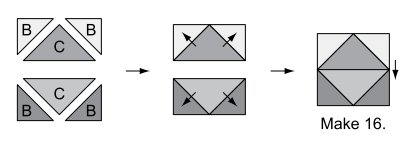
- 80 squares, 2-7/8" x -7/8"; cut each square once diagonally to make 160 of triangle B
From Large Floral, cut:
- 3 squares, 9-1/4" x 9-1/4"; cut each square twice diagonally to make 12 of triangle E
- 9 squares, 6-3⁄16" x 6-3⁄16", for A squares (6-3⁄16" falls between 6-1/3" and 6-1/4" on your ruler.)
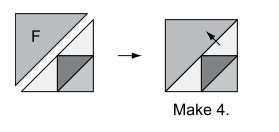
- 2 squares, 4-7/8" x 4-7/8"; cut each square once diagonally to make 4 of triangle F
From Large Leaves, cut:
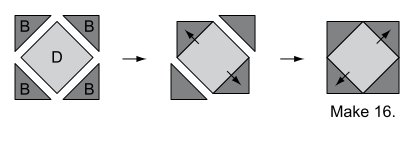
- 16 squares, 3-3/8" x 3-3/8", for D squares
From Hexagon Tonal, cut:
- 64 squares, 2-7/8" x 2-7/8"; cut each square once diagonally to make 128 of triangle B
From Fleur-de-lis, cut:
- 7 strips, 2-1/2" x 40", for double-fold binding
- 64 squares, 2-7/8" x 2-7/8"; cut each square once diagonally to make 128 of triangle B
From Leaf Tonal, cut:
- 16 squares, 5-1/4" x 5-1/4"; cut each square twice diagonally to make 64 of triangle C
- 32 squares, 2-7/8" x 2-7/8"; cut each square once diagonally to make 64 of triangle B
From Nouveau Vine, cut:
- 16 squares, 5-1/4" x 5-1/4"; cut each square twice diagonally to make 64 of triangle C
From Border Stripe, selectively cut:
- 4 strips, 8-1/2" x length of fabric, for border (Note: Selectively cut each border strip so that the design is the same in each strip, as shown in the photo. This will make the design match at the mitered corners.)
Block Assembly:
All seams ¼". Press seams in direction of arrows unless otherwise instructed. Refer to photographs for fabric placement.
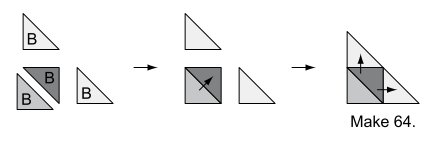
- Using 2 Swirl B triangles, 1 Fleur-de-lis B triangle, and 1 Leaf Tonal B triangle, assemble a unit as shown. Repeat to make a total of 64 units.
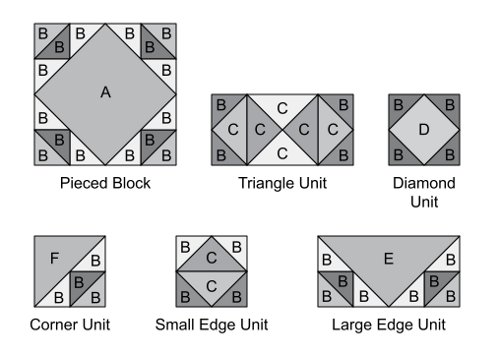
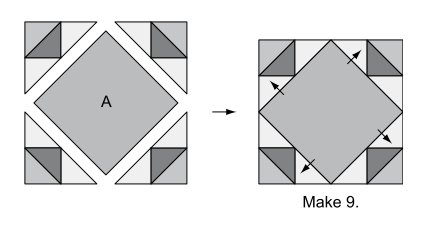
- Using 1 Large Floral 6-3⁄16" A square, and 4 units from Step 1, assemble a Pieced block as shown. Repeat to make a total of 9 blocks.
- Using 2 Swirl C triangles, 2 Nouveau Vine C triangles, 2 Leaf Tonal C triangles, and 4 Hexagon Tonal B triangles, assemble a Triangle unit as shown. Repeat to make a total of 24 units.
- Using 1 Large Leaves 3-3/8" D square, and 4 Fleur-delis B triangles, assemble a Diamond unit as shown. Repeat to make a total of 16 units.
- Using 1 Large Floral F triangle, and 1 unit from Step 1, assemble a Corner unit as shown. Repeat to make a total of 4 units.
- Using 1 Leaf Tonal C triangle, 1 Nouveau Vine C triangle, 2 Hexagon Tonal B triangles, and 2 Swirl B triangles, assemble a Small Edge unit as shown. Repeat to make a total of 16 units.
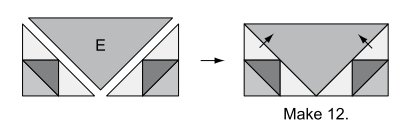
- Using 1 Large Floral E triangle, and 2 units from Step 1, assemble a Large Edge unit as shown. Repeat to make a total of 12 units.
Quilt Top Assembly:
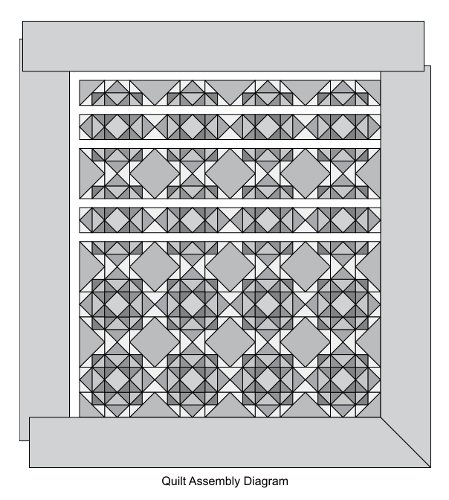
- Sew all of the blocks and units, made in Block Assembly Steps 2-7, together in rows as shown.

- Sew rows together as shown in the Quilt Assembly Diagram on back page. Press seams in one direction.
Borders:
With right sides together (and making sure that the design is oriented correctly, with the stripe portion of the design at the inner border), pin border strips to sides of quilt top (border strips should extend approximately equally beyond top and bottom of quilt; it’s easiest if you start pinning at the center of border and work outward). Sew border strips to sides of quilt top, beginning and ending 1/4" from raw edges of quilt. Backstitch to secure. Press seams toward borders. Now sew the top and bottom border to the quilt top; start and stop your seams at the point where the side borders join the quilt (1/4" from edges). Backstitch to secure. Press seams toward borders. Miter corners using your favorite technique.
Finishing:
Layer quilt top, batting, and backing. Quilt as desired. Bind. Don’t forget to sign and date your finished quilt.
Find more quilts for autumn in our collection of 15 Cozy and Comforting Fall Quilt Projects.
Read NextGlorious Louisiana Sunrise Block
Your Recently Viewed Projects
Thanks for your comment. Don't forget to share!
Report Inappropriate Comment
Are you sure you would like to report this comment? It will be flagged for our moderators to take action.
Thank you for taking the time to improve the content on our site.