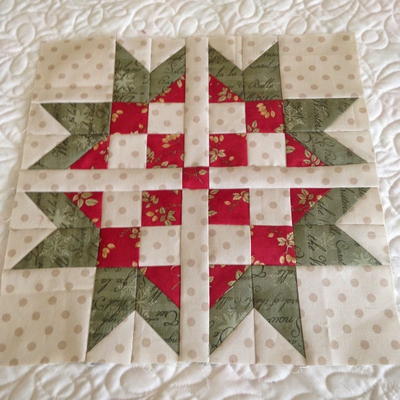
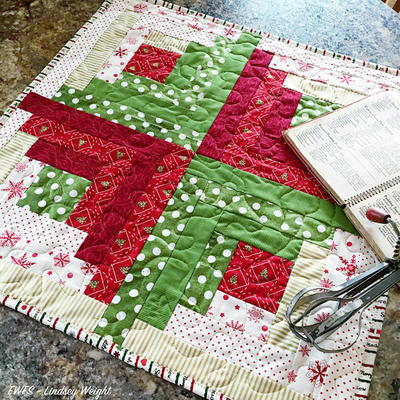
Candy Cane Stars Quilt

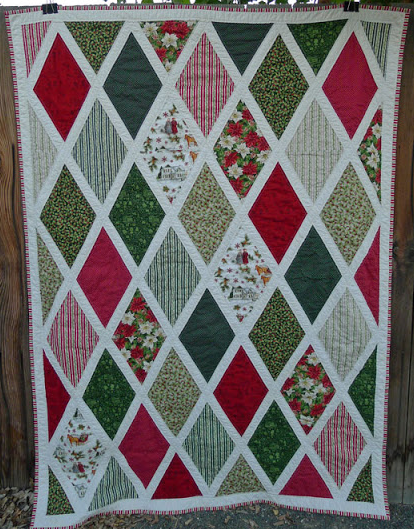
The Candy Cane Stars Quilt features intricate piecework that reveals the shapes of both swirling peppermint candies and six-pointed stars. Small Christmas quilt patterns like this one are great for festive wall hangings or Christmas throw quilts! This pattern features fabric from the Christmas Snowflower collection by Dena Designs for FreeSpirit.
Project TypeMake a Project
Quilt Size64 inches wide x 70 inches long
Time to CompleteA week or two
Primary TechniquePieced

MATERIALS:
Note: This pattern features fabrics from the Christmas Snowflower Collection by Dena Designs for FreeSpirit. Fabrics are coded in materials list.
- 1-1/2 yards DF26 Red
- 1/2 yard DF18 Red
- 1 yard (for fussy cutting) DF20Red
- 1/2 yard DF22 Red
- 1/2 yard DF23 Red
- 1/2 yard DF30 Red
- 1/2 yard DF41 White
- 1/2 yard DF42 Red
- 1/2 yard DF43 Green
- 1 yard DF44 Green
- 1 yard DF44 Red
- 1/3 yard DF45 Red
- 1/3 yard DF46 Green
- 1/2 yard DF47 Green
- 1/2 yard DF47 White
- 1-1/2 yards DF23 White (for Binding)
- 4 yards background fabric of your choice. (or less if you include your scraps from the front)
- 72”x 83” batting
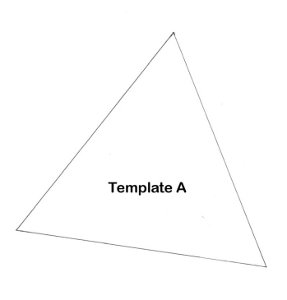
- Triangle template - When printing the template, double check with a ruler that the length from the tip of the triangle to the base is 5-1/2” to verify that your printer has printed the template the correct size.

INSTRUCTIONS:
Note: ¼” seams are assumed throughout this pattern.
Cutting directions for all blocks 1-9 by pieces: the Fabric Key that follows indicates
which fabrics to cut for which pieces in each star, as each star is made of different
fabrics.
Fabric Key for block cutting instructions:
- Block 1: Strips A,C, and E---DF22Red, Strips B and F---DF42Red, Strip D--DF44Green, Pieces G-J--- DF47Green
- Block 2: Strips A,C, and E---DF20Red, Strips B and F---DF41White, Strip D--DF44Red, Pieces G-J---DF26Red
- Block 3: Strips A,C, and E---DF23Red, Strips B and F---DF41White, Strip D--DF44Green, Pieces G-J---DF30Red
- Block 4; Strips A,C, and E---DF43Green, Strips B and F---DF44Red, Strip D--DF47White, Pieces G-J---DF18Red
- Block 5: Strips A,C, and E---DF45Red, Strips B and F---DF43Green, Strip D--DF44Red, Pieces G-J---DF42Red
- Block 6: Strips A,C, and E---DF46Green, Strips B and F---DF30Red, Strip D--DF44Red, Pieces G-J---DF23Red
- Block 7: Strips A,C, and E---DF20Red (fussy cut), Strips B and F---DF47White, Strip D--DF44Green, Pieces G-J ---DF47Green
- Block 8: Strips A,C, and E---DF47Green, Strips B and F---DF41White, Strip D--DF44Red, Pieces G-J---DF22Red
- Block 9: Strips A,C, and E---DF18Red, Strips B and F---DF30Red, Strip D--DF44Green, Pieces G-J---DF43Green
For each block:
- Cut (2) 2-1/2” x 24” strips for strips A and C
- Cut (1) 1-1/2” x 24” strip for strip B
- Cut (1) 2-1/2” x 24” strip for strip D
- Cut (1) 1-1/2” x 24” strip for strip E
- Cut (1) 2-1/2” x 24” strip for strip F
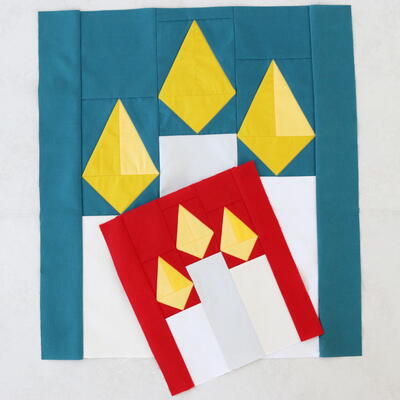
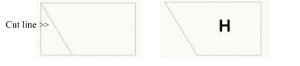
- Cut (4) Rectangles 5-1/4” x 9-1/4” then using the triangle Template A(found at the bottom of these instructions), trim off a 60 degree angle from the upper left corner to the base on two of the rectangles as shown in here creating (2) H pieces:
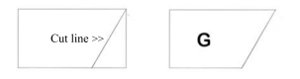
- Then trim off a 60 degree angle from the upper right hand on the other two rectangles to the base creating (2) G pieces as shown:
- Cut (2) 3” x 6” Rectangles for background pieces I and J, cutting one of these once diagonally from the upper right hand corner to the lower left hand corner as shown:

- Cut the other one once diagonally from the upper left hand corner to the lower right hand corner as shown:

Sewing Directions for a Block:
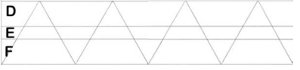
- Sew strip A and strip C to both sides of Strip B, then take Template A to cut 6 ABC triangles from this strip set.
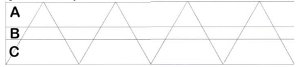
- Sew strip D and strip F to both sides of Strip E, then take Template A to cut 6 DEF triangles from this strip set.
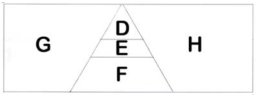
- Sew pieces G and H to two DEF triangles, creating two units (top and bottom) that look like this:
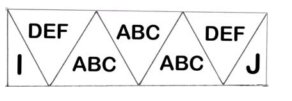
- Next (while carefully following the photo for placement) sew an I piece to a DEF triangle, then sew to a ABC triangle, then to another ABC Triangle, then to another ABC triangle, then to a DEF triangle, then to a J piece. Then repeat this step creating two units (middle) that look like this:
- Now sew a top and bottom unit to the two middle units, and then the two middle units together (one middle and the bottom unit will be flipped from the above two diagrams) carefully following the photo for reference and placement of triangle units. Trim to 171/4” wide by 19-1/4” tall.
Sashing the Blocks:
- Cut (10) 1-1/2” x 17-1/4” strips and (10) 1-1/2” x 21-3/4” strips of DF44Red. Sew the shorter strips to the tops and bottoms of Blocks 1, 3, 5, 7, and 9. Then sew the long strips to both sides of each block.
- Cut (8) 1-1/2” x 17-1/4” strips and (8) 1-1/2” x 21-3/4” strips of DF44Green. Sew the shorter strips to the tops and bottoms of Blocks 2.4.6, and 8. Then sew the long strips to both sides of each block.
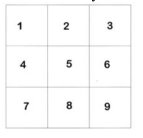
- Now sew the blocks in rows: Row 1: 1,2,3 Row 2: 4,5,6 Row 3: 7,8.9. Sew the rows together into the body of the quilt:
- Cut (7) 3-1/2” x 42” strips of DF26Red. Sew these strips end to end then measure the middle of your quilt across and cut (2) strips that measurement for the top and bottom border. Sew these two strips to top and bottom. Next measure your quilt up and down and cut (2) strips that measurement for the sides. Sew these two strips to the sides.
- Quilt the top and then bind it with your favorite method using DF23White. Don’t forget to include a label!!
If you're looking for more Christmas quilt patterns, browse our collection of 18 Quilt Patterns for Christmas.