Wedding Ring Motif Wall Hanging
By: Accuquilt
Wedding Ring Motif Wall Hanging
The double wedding ring quilt pattern is one of the most timeless quilt patterns, but you don't have to make a full-size quilt to display this lovely motif in your home. Make the Wedding Ring Motif Wall Hanging as a vintage-inspired quilt wall display.
Project TypeMake a Project
Quilt Size29 inches wide x 29 inches long
Time to CompleteWeekend project
Primary TechniquePieced
MATERIALS:
- 8 or more fat quarters
- Binding—½ yard
- Backing—1 yard
- Batting—36" x 36"
- Coordinating Thread
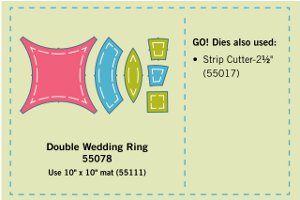
- Accuquilt die cutting machine
- Accuquilt Double Wedding Ring die (#55078)
- Accuquilt 10" x 10" mat (#55111)
- Accuquilt Strip Cutter - 2-1/2" (#55017)
INSTRUCTIONS:
Fat Quarters:
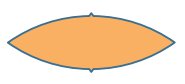
- Cut 4—Shape A
- Cut 24—Shape B
- Cut 12—Shape C
- Cut 72—Shape D
- Cut 24—Shape E
- Cut 24—Shape E Reverse
Binding Fabric:
- Cut 120" of 2½" bias binding
Sewing Instructions:
Whenever possible sew with the concave "(" curved shape
on top.
- Layout shapes for one arc—three D shapes and one pair of shape E as shown.
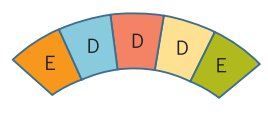
- Pin and sew together with accurate ¼" seam allowances. Press seams in one direction. (It does not matter which direction, but be consistent. Press carefully to avoid distortion of shapes.)
Tip: Cut out one Total Arc Shape F from paper. Position pieced fabric arc on top of paper total arc. They should match; if not, adjust seam allowance.
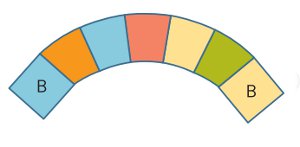
- Mark ¼" points on square B as shown.

- Pin and sew one square B to each end of one combined arc unit. Start and stop stitching at ¼" markings. Press seams toward squares.
- Mark ¼" points on shape C as shown.
- Pin and sew one shape C to one combined arc unit matching ¼" points and notches, starting and stopping stitching at ¼" points. Press seams toward shape C.
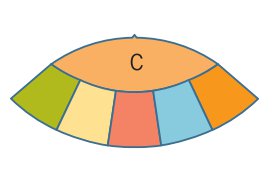
- Pin and sew one combined arc with corner squares to combined arc with shape C starting and stopping stitching at ¼" points of square B. Press seam toward shape C.
- Make 12 combined units.
- Mark ¼" points on tips of shape A.
- Pin and sew one combined arc unit to one shape A matching notches and ¼" points. Start and stop stitching at ¼" points. Press seams toward shape A or in the direction that creates the least bulk at intersections.
- Pin and sew another combined arc unit to another side of shape A. Start and stop stitching at ¼" points. Pin and sew edges of square B shapes together, raw edge to ¼" point.
- Continue to add combined arc units and A shapes in this manner to complete quilt top.
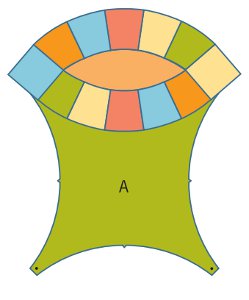
- Press completed quilt top.
Quilting and Finishing:
- Layer quilt top with batting and backing.
- Quilt as desired.
- Bind with bias binding.