Miniature Rail Fence Quilt Pattern with Video Tutorial
By: Carolyn Wainscott
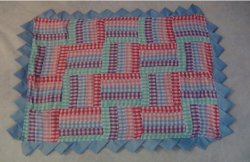
In this video tutorial, Carolyn Wainscott demonstrates how to make a miniature rail fence quilt pattern. Follow her directions to make your own mini quilt with 5-inch blocks, or use the tutorial to make a full-size rail fence quilt with 10-inch blocks.
Project TypeMake a Project
Quilt Size22 inches wide x 27 inches long
Time to CompleteWeekend project
Primary TechniquePieced
MATERIALS:
- 1/4 yard EACH from 5 fabrics [42”-45” wide]
- 22” by 27” fabric for quilt back
- batting
- binding, lace, or ruffle to finish after quilting
INSTRUCTIONS:
- Cut 1-1/2” strips from each fabric across width [cut 3 strips from each fabric].

- Create 3 identical strip sets by sewing one strip of each fabric together.
- Press seams in one direction.

- Cut 5-1/2” blocks from strip sets. Blocks will be 5-1/2” square.

- Arrange blocks to create rail fence pattern:
- Sew blocks together.
- Finish by quilting and binding. Find instructions for sewing a border of continuous prairie points here.
VIDEO TUTORIAL:
MATERIALS FOR QUILT WITH 10" FINISHED BLOCKS:
- 2 yards EACH of 5 fabrics
- 80" by 80" backing fabric
- batting
- binding, lace, or ruffle to finish after quilting
INSTRUCTIONS FOR QUILT WITH 10" FINISHED BLOCKS:
- Cut each strip 2-1/2" wide.
- Create identical strip sets as for 5-1/2” blocks.
- Press seams in same direction.
- Cut 10-1/2” sections from strip sets; blocks will be 10-1/2” square unfinished. Each strip set will give you 4 blocks. 16 strip sets = 64 blocks = 80” by 80” quilt top.