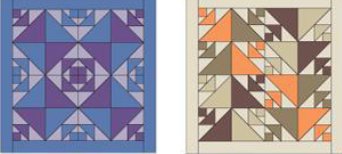
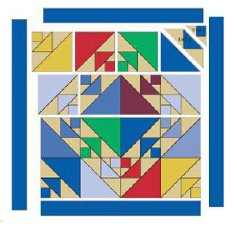
World of Triangles Quilt
See how easy it is to create an intricate-looking design using basic quilting shapes as seen in this World of Triangles Quilt. This easy quilt pattern shows you how to put together blocks keeping in mind how to use colors and various triangle shapes to help the overall quilt pattern stand out. Once you discover how many ways there are to arrange this easy quilt pattern, you'll be able to use it to create a number of stunningly patterned geometric quilts.
Project TypeMake a Project
Quilt Size28 inches wide x 28 inches long
Time to CompleteWeekend project
Primary TechniquePieced
Quilt Size: 28" x 28"
Block Size: 6"
Border: 2"
Note: All seam allowances are 1/4"
Technique: Bias edges on triangles and unit assembly
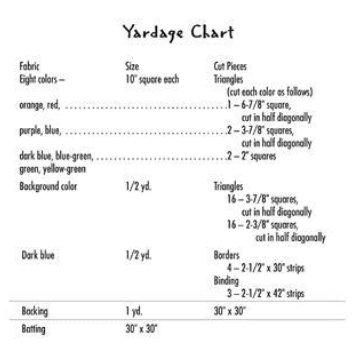
MATERIALS:
INSTRUCTIONS:
Sewing Units:
1. For Unit 1, sew two background color triangles (cut from 2-3/8" squares) onto a 2" square.
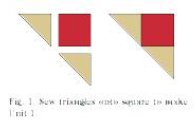
The long, bias edge of the traingles is very stretchy, so be careful not to pull the triangles as you handle them.
2. Extra care should also be taken when pressing these units. Move the iron with the grain of the fabric and across the seamline.
3. Continue sewing background triangles and colored squares together. Make two of these units of each of the eight fabric colors for a totel of 16 units.

4. Sew a 3-7/8" background triangle to two colored 3-7/8" triangles to make Unit 2.
5. Make two Unit 2 sections of each of the eight fabrics.
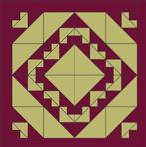
Block Assembly:
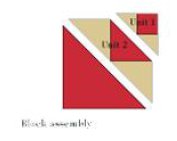 6. Lay out the blocks following the block assembly diagram. Sew Unit 1 to Unit 2 and add a 6-7/8" colored triangle to complete each block.
7. This quilt can be chain pieced if you lay out several blocks at a time. Pick up the same units for each block and feed them under the presser foot one after another.
8. After sewing all of one unit, cut the units apart and press. Then lay each unit into position in the blocks before beginning the next unit. Laying out the blocks each time you complete a unit is a step that will help keep the units turned in the right direction.
Quilt Assembly:
Once you have completed the blocks, you can lay them out following the quilt assembly diagram, or try a layout of your own. These blocks can be arranged to make a variety of interesting designs.
9. When you have decided on the design of your quilt, sew the blocks into rows. Press seam allowances for the rows in opposite directions so they will be staggered when you sew the rows together. Align raw edges and seamlines as you sew the rows together.
Borders:
10. Measure the width of the quilt and cut the top and bottom borders to that measurements. Mark the centers of the borders and the quilt with straight pins. Match the pins and align the raw edges, then sew the top and bottom borders to the quilt. Press the seam allowances towards the borders.
11. Measure the length of the quilt and cut the side borders to that measurement. Mark the centers of the borders and the quilt edge with straight pins. Match pins as above and sew the side borders to the quilt. Make sure the corners are square and the edges of the quilt are straight; trim if necessary.
Quilting:
12. Layer the quilt. Quilt in the ditch, following the color paths of the blocks. In the large triangles, repeat the pieced shapes by quilting triangles within them.
13. Sew the 2-1/4" strips together to make 126" of binding. Sew the binding to the quilt.
Extra:
1. This design makes a great two-color quilt. Make the blocks in only two colors, using high contrast between the fabrics.
2. Choose a different layout for the blocks. What happens if you turn the blocks a quarter turn? a half turn?